Disposal of Dirt: Site Compliance Guide
You're usually not reading about disposal of dirt at the start of a job. You're reading about it when the spoil pile is already growing, trucks are being discussed, and somebody on the site is saying, “Can't we just take it somewhere?”
That's when dirt stops being “just dirt.”
On active projects, excavated soil turns into a schedule problem, a documentation problem, and sometimes a regulatory problem in a hurry. If the material is clean and you can prove it, you may have reuse options. If it's mixed, wet, undocumented, or contaminated, your choices narrow fast. The crews that stay out of trouble aren't the ones that move dirt the cheapest on day one. They're the ones that classify it correctly, keep streams separated, and line up acceptance before the first truck leaves the gate.
The Hidden Costs of That Growing Dirt Pile
A familiar jobsite sequence goes like this. Excavation starts smoothly. Then the pile gets bigger than expected, rain hits, labor has to work around it, and the superintendent starts calling haulers and disposal yards with the same question: who will take this material today?
That's where jobs lose money.
The disposal of dirt affects production, access, trucking, site safety, and closeout records. A pile that looked harmless on Monday can block staging by Wednesday and trigger extra handling by Friday. If it gets mixed with broken concrete, washout residue, trash, vegetation, or suspect soil from a stained area, what could have been reusable fill may become a harder and more expensive waste stream to move.
Why this is bigger than one site
This isn't a niche issue. The EPA estimated about 600 million tons of construction and demolition debris were generated in 2018, more than twice the amount of municipal solid waste generated that year. Excavated soil from grading and trenching moves through those same hauling and disposal pathways, which is why dirt handling has become a real compliance and logistics issue for contractors.
When you look at it that way, the spoil pile on your site is part of a very large, very regulated material flow. Landfills, clean fill sites, recyclers, municipal programs, and private receiving facilities all have their own rules. Your problem isn't finding “a place that takes dirt.” Your problem is finding a place that takes your dirt, in its current condition, with your paperwork.
Practical rule: A dirt pile costs the least before you touch it the second time.
What usually drives the cost up
A few things consistently make disposal harder:
- Mixed material: Soil blended with roots, demolition debris, asphalt, or slurry loses reuse options quickly.
- Bad timing: Calling facilities after excavation starts usually means you're accepting whatever outlet is available, not the best fit.
- No paper trail: If the facility asks for test results, profiles, or a site sketch and you don't have them, the load can stall before it even leaves.
- Moisture: Wet soil is heavier, slower to handle, and more likely to create hauling and acceptance issues.
The crews that handle this well treat dirt like a managed material stream, not a cleanup task. That mindset saves time before it saves money.
Assess Your Site Before You Dig
The first mistake is assuming soil characterization starts when the bucket hits the ground. It doesn't. It starts with the site's history, the excavation footprint, and the question every receiving facility will eventually ask in some form: what exactly are you sending me?

Start with site history
A greenfield site, a former industrial parcel, an old service station, and a redeveloped commercial lot don't get the same sampling plan. Past use changes what you look for and where you look. If the property had fuel storage, heavy vehicle use, fill placement, demolition activity, or undocumented imports years ago, that history matters before you generate a single load of spoil.
Field crews should also walk the site with their eyes open. Staining, odd odors, buried debris, ash, brick fragments, cinders, discolored fill bands, and concrete washout traces all deserve attention. None of those observations are a final classification by themselves, but they help shape where targeted sampling needs to happen.
Characterization is not classification
A lot of people blur these together. That causes trouble.
General site characterization tells you what's in the ground across the planned excavation area. Waste classification is the later step that determines which disposal or reuse path a receiving facility will allow. Those are related, but they aren't the same thing.
As Clean Earth's guidance on soil recycling and waste characterization notes, a common pitfall is treating general site characterization as if it were the same as waste classification. Their practical workflow is the right one: sampling needs to cover the full proposed excavation footprint, including length, width, and depth, and it should be coordinated with the receiving facility's requirements before any truckload leaves the site.
If your sampling plan doesn't match the actual cut area, your report may be technically complete and still useless for shipping.
Build a sampling plan that matches the work
Good planning usually combines broad coverage with focused attention on suspect areas. The point isn't to collect paper for its own sake. The point is to avoid surprises when excavation opens up deeper or wider than expected.
A workable pre-dig review should cover:
Excavation limits
Mark the planned footprint, expected depth ranges, and any phases. If the trenching or grading area will expand later, account for that now.Known problem areas
Flag stained zones, old utility corridors, former tank locations, demolition backfill, or low spots where unknown fill may have been placed.Material separation plan
Decide in advance how clean-looking native soil, obvious debris-laden fill, and suspect material will be stockpiled separately if encountered.Receiving facility criteria
Ask potential outlets what they require. Some want a profile package. Others want specific analytical data. Some won't review anything until they know the source and intended volume.
What works in the field
The best jobs give the excavator operator and superintendent a simple escalation rule. If material changes visually or behaves differently than expected, work pauses in that area until the team decides whether the stockpile stays separate and whether more testing is needed.
That beats trying to reconstruct where the “bad pocket” came from after it has already been blended into the main pile.
A clean chain starts before excavation. Once mixed, it's hard to unmix.
Classifying Soil Clean Fill vs Contaminated Spoil
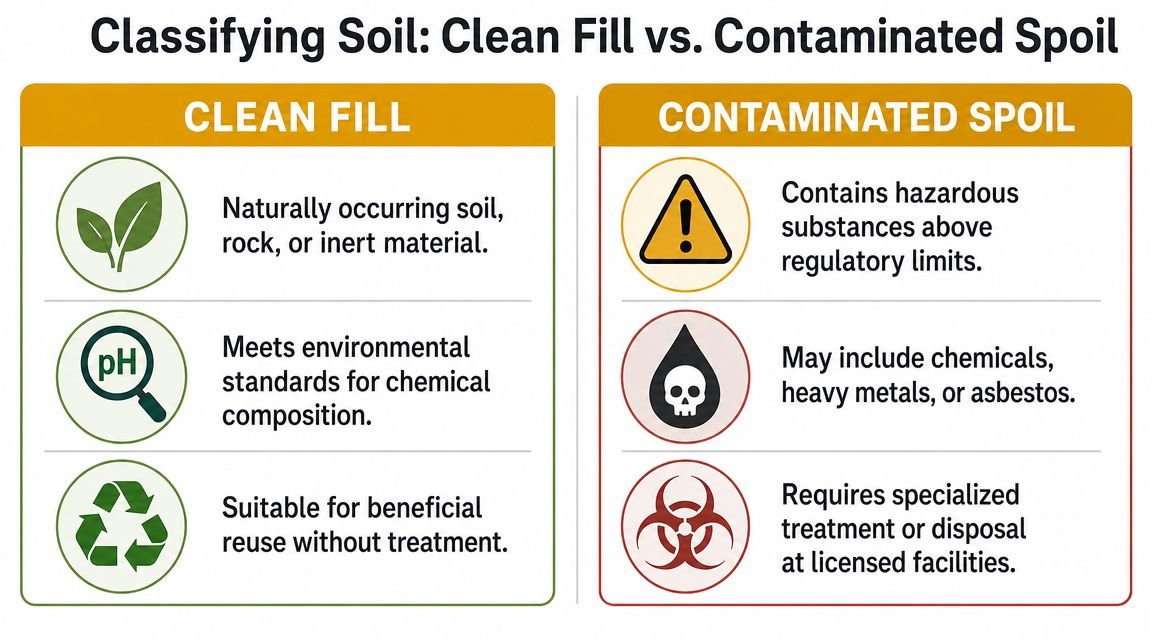
Most disposal mistakes happen right here. People want a simple yes-or-no answer, but soil classification is really a decision about acceptability. Clean fill isn't just soil that looks normal. It's soil that a specific receiving site will accept for a specific use, based on its standards and your documentation.
What clean fill usually means in practice
On real jobs, clean fill generally means naturally occurring soil, rock, or inert material that can be reused or accepted without special treatment. It should be free of obvious contamination and free of mixed waste that changes the disposal category. Depending on the outlet, that can include excess soils and some inert materials, but only if the facility says so.
Contaminated spoil is different. That usually means the soil contains contaminants, visible debris, or site-specific impacts that require stricter handling, treatment, or disposal controls. The material might not qualify as hazardous, but it still may be rejected by clean-fill outlets.
Then there's hazardous soil, which triggers much tighter controls and a very different disposal path. The mistake is assuming you can decide this from appearance alone. You can't.
The receiving facility has a real vote
Contractors often ask who decides whether the dirt is clean. The consultant may interpret the data. The generator owns the material. But the receiving facility still decides what it will accept.
That's why “dirt is dirt” thinking fails. The City of Chesapeake soil disposal program shows how specific this can get. Their municipal program requires applicants to submit a sketch so the soil isn't used to fill wetlands or other sensitive areas without the right approvals. In the same market, private facilities can differ sharply. Some accept inert fill, excess soils, broken concrete, topsoil, and dredge spoils. Others list only clean fill soil among accepted materials.
The lab report matters. The profile matters. But the acceptance gate is still controlled by the facility.
A practical comparison
| Material condition | Likely path | Main risk |
|---|---|---|
| Native-looking soil with supporting documentation | Reuse or approved clean-fill outlet | Assuming visual appearance is enough |
| Soil mixed with brick, wood, trash, or slurry | Limited outlets, possible rehandling | Cross-contamination |
| Soil from stained or suspect areas | Additional review or restricted disposal | Sending without matching test data |
| Material classified for one outlet only | Shipment to that specific approved facility | Redirecting trucks without re-approval |
Questions to settle before the first haul
Use this short list with the consultant, PM, and receiving site:
What is the exact accepted waste description
“Clean fill,” “inert fill,” and “soil” aren't interchangeable terms.What documents are required
Some outlets want a profile sheet, analytical results, generator information, and transport details. Others also want maps or sketches.How current must the sampling be
Ask the outlet, not just the lab.What disqualifies the load on visual inspection
One chunk of demolition debris in the truck can change the conversation fast.
What doesn't work
What fails most often is overconfidence. A superintendent sees brown soil and assumes reuse. A hauler says a yard “takes dirt.” The load gets there, the scale house asks for paperwork, and suddenly the truck is waiting while everyone scrambles.
The better move is simple. Get the material classified against the destination's criteria, keep suspect streams separate, and ship only what the paperwork supports.
Finding a Home for Your Clean Fill
Once you've established that the material qualifies as clean fill for a specific outlet, the job changes. You're no longer trying to get rid of waste. You're trying to place a usable material where it solves a problem.
That distinction matters. Landfill thinking leads to rushed decisions and avoidable cost. Reuse thinking usually gives you more options, but only if the soil stays clean and the documentation follows it.
Use it on the site if the project allows it
The cheapest load to move is the one you don't truck out. If the grading plan, outdoor design, or backfill scope can absorb the material, on-site reuse is usually the first place to look.
Typical opportunities include:
- Rough grading: Building low areas back up with approved clean material.
- Ground shaping: Berms, screening mounds, and non-structural contour work.
- General backfill: In areas where engineered requirements match the soil condition.
- Temporary site work: Access shaping or non-permanent fills where permitted.
That doesn't mean every pile belongs somewhere on-site. If the soil is too wet, inconsistent, debris-laden, or unsuitable for the intended engineering use, forcing reuse creates a second problem. The right question isn't “Can we keep it?” It's “Can this material perform where we want to place it, and can we document that decision?”
Off-site reuse takes more than a phone call
A lot of clean fill opportunities fall apart because teams approach them casually. Another contractor, site manager, or property owner may want fill, but they still need confidence in what they're accepting. Liability follows the dirt.
A clean off-site transfer usually needs:
- A clear description of the material
- Supporting test results if requested
- Source location details
- Confirmation that the receiving site is legally allowed to accept and place it
- Load records that tie hauled material to the approved destination
Clean fill only stays valuable while it remains separate, documented, and acceptable for the next user's purpose.
Match the material to the destination
Not every clean soil stockpile is useful everywhere. Topsoil, structural backfill, common fill, and inert excess soil serve different jobs. If the material contains rock, clay, or variable particle sizes, that may be fine for one site and a deal breaker for another.
A simple screening conversation saves wasted trips. Ask what the receiving party needs the soil for, whether they need it screened, whether they allow organics or rock fragments, and what paperwork they expect before delivery. If they sound vague, don't send trucks yet.
Protect the clean status
Jobs go sideways when crews correctly identify reusable soil, then stockpile it beside demolition debris, concrete washout, or traffic areas where trash and runoff get into it. At that point, you've damaged the very value you worked to preserve.
If you're trying to avoid unnecessary disposal of dirt, clean stockpiles need their own controls:
- Keep them physically separate from spoil and mixed debris
- Control run-on from dirty work areas
- Mark piles clearly so labor and operators don't blend materials
- Load clean fill with equipment that isn't dragging through contaminated zones first
Reuse is usually the smartest path. But it only works when the soil remains marketable from excavation to final placement.
Executing the Haul and Disposal Plan
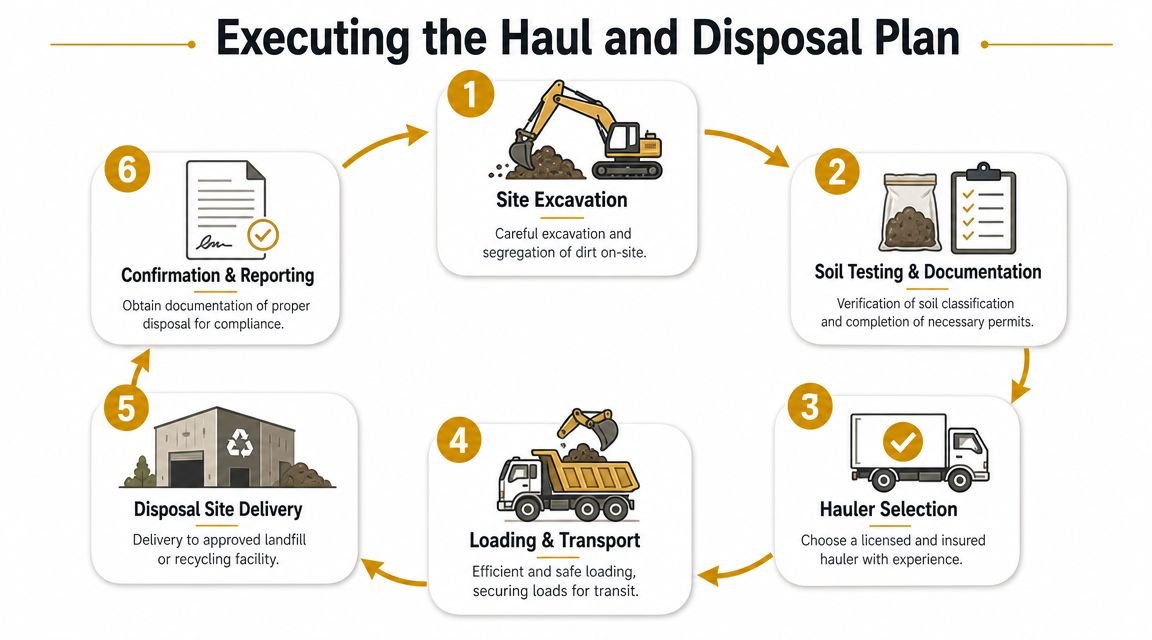
A disposal plan usually breaks down at the gate, not in the excavation. The trucks are loaded, the operator is waiting on the next cut, and then the facility rejects the load because the paperwork does not match the material, the profile is missing, or the driver cannot show where the soil came from. That is how a routine haul turns into standby time, rehandling, and extra disposal cost in the same afternoon.
Vet the hauler and the destination
Use haulers who understand the difference between clean fill and regulated spoil. A driver does not need to be an environmental consultant, but the hauling company does need to know which loads can go to a reuse site, which require a disposal facility, and what each location expects at check-in.
Confirm acceptance before the first truck is loaded. Facilities often approve a material stream based on classification, source, screening results, and visible condition. If the approved profile says clean common fill and the truck shows up with mixed soil, brick, roots, or washout residue, expect a rejection.
Ask these questions in plain language:
- Is this exact soil type approved for this exact facility
- What documents must the driver carry for each load
- Does the facility require a material profile number, generator information, or analytical summary
- What visible conditions trigger rejection
- What are the legal weight, cover, and arrival-hour requirements
- Who makes the call if a load is held or rejected
If concrete work is happening on the same project, keep washout material out of the soil program. Reborn Rentals provides concrete washout containment rentals, and that kind of separate containment can prevent a clean or profile-approved soil stream from becoming mixed waste.
Paperwork that actually matters
Facilities do not care that the crew is behind schedule. They care whether the load matches the approval.
For clean fill, the paperwork is usually lighter, but many outlets still want a source description, a generator or project address, and confirmation that the soil is free of trash, demolition debris, staining, and other obvious contamination. For contaminated or suspect soil, expect tighter controls. That often means a material profile, lab results or prior environmental reports, haul logs, and disposal receipts tied back to the source area.
Keep the document set simple and complete:
Material profile
The facility's description of what the soil is, where it came from, and why it qualifies for acceptance.Supporting classification records
Screening notes, analytical data, prior reports, or other approval documents the outlet required.Driver packet or dispatch record
Facility name, approval number if applicable, source location, and contact names in case the load is questioned.Load tickets and haul logs
A record of departure time, truck ID, material type, destination, and quantity.Scale tickets or disposal receipts
Proof that the load arrived, was accepted, and was charged under the expected category.
On larger jobs, I keep a live tracker by material stream. Clean fill goes in one line of reporting. Contaminated spoil goes in another. Mixing those records causes the same kind of trouble as mixing the soil.
Budget for the real cost stack
Hauling is only one line item. Classification drives the rest.
Clean fill can sometimes move at a lower cost if the receiving site wants it and the paperwork is straightforward. Contaminated spoil costs more because the outlet is narrower, the approval package is heavier, and the consequences of a bad load are worse. One rejected truck can create return freight, reload time, extra sampling, and a new disposal fee.
As Angi's dirt disposal overview notes, advertised dirt removal prices do not reflect the full project path. That matches what happens in the field. The quoted pickup number is rarely the final number once testing, facility fees, wait time, and rehandling show up.
A working budget should account for:
| Cost component | What affects it |
|---|---|
| Hauling charge | Distance, truck type, route limits, wait time |
| Acceptance or disposal fee | Clean fill versus contaminated classification, facility rules |
| Testing and profiling | What the disposal or reuse outlet requires before approval |
| Rehandling on site | Poor stockpile layout, rain, cross-contamination, double loading |
| Delay cost | Excavation stopped, trucks queued, crews waiting for direction |
Cheap hauling does not stay cheap if the load is turned away.
Control weight and volume before trucks roll
Excavated soil rarely loads the way it looked in place. Wet clay, mixed fill, and loose sandy material all behave differently in the truck. Legal payload, moisture, and swell matter more than the bucket count.
Check early tickets against your estimate and adjust the loading target the same shift. If the first few loads are heavy, correct it immediately. If they are light, the route plan or truck count may be off. Crews lose money when they repeat the same loading mistake all day.
The field plan should account for:
- Material condition: Wet, dry, cohesive, rocky, or mixed
- Truck capacity: Volume limit and legal weight limit
- Loading area conditions: Mud, slope, traffic, and cycle time
- Weather: Rain changes both weight and workability
- Separate tracking by material stream: Clean fill and contaminated spoil should never share the same dispatch record
Keep communication short and specific
The dispatcher, foreman, operator, and driver need the same instructions. Long explanations usually mean the plan is not settled.
Before hauling starts, confirm five items:
- where each approved material stream is staged
- which trucks go to which facility
- what paperwork goes with each load
- what the driver should do if the facility questions the load
- who has authority to stop, reroute, or reclassify material
That level of control prevents the common failure point. A load classified one way on site arrives looking like something else, and now everyone is paying for the confusion.
Pro Tips to Minimize Disposal Volume and Cost
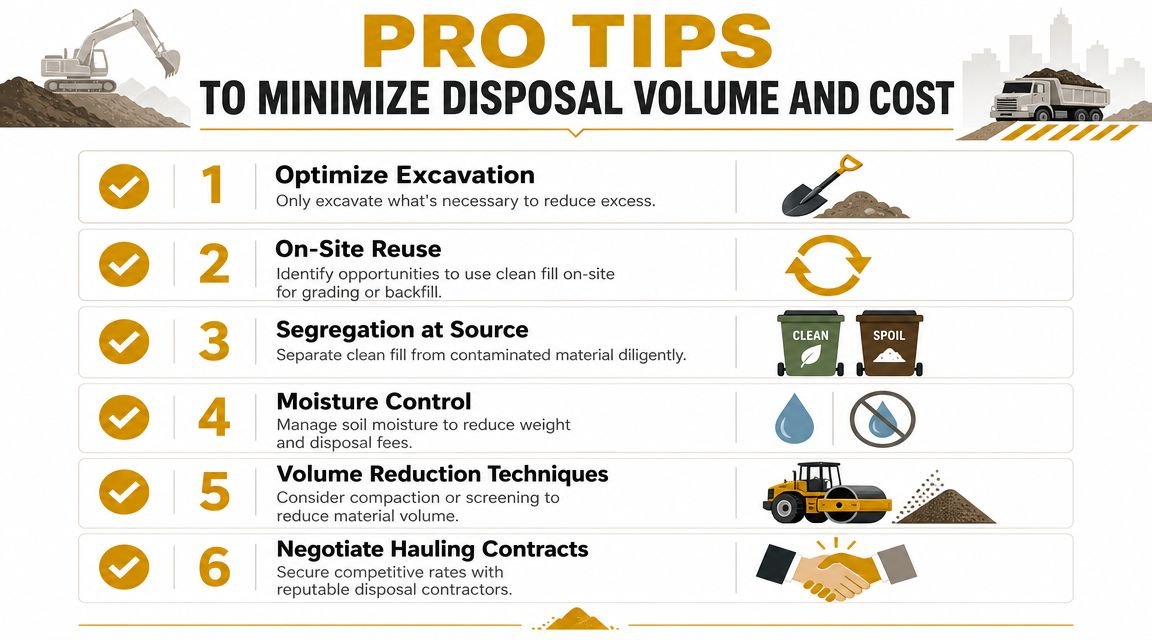
Most dirt disposal problems are self-inflicted. The site excavates too much, mixes what should've been separated, or starts calling outlets after the stockpiles are already in the way. Planning isn't paperwork for its own sake. It's how you avoid paying twice to move the same material.
The habits that save money
The best-practice guidance on disposing of dirt properly gets one operational point exactly right. Measure soil volume accurately and account for compaction, because overweight loads and bad volume estimates are a common cause of delays and compliance issues. In the field, that means matching soil condition to truck capacity and local weight limits instead of guessing.
Use these habits on every job:
- Excavate tighter: If the cut can be controlled more precisely, less soil becomes a disposal problem.
- Segregate early: Clean fill, suspect spoil, mixed debris, and slurry-related waste should never share the same pile.
- Protect clean stockpiles: Once traffic, runoff, or washout contaminates them, your cheaper outlets disappear.
- Watch moisture: Wet dirt costs more to move and can limit acceptance.
- Update the plan from live tickets: Early haul data tells you whether your estimate was realistic.
- Look for reuse before disposal: The right outlet for clean material is often a placement opportunity, not a landfill gate.
The cheapest disposal of dirt starts with generating less bad material, not with negotiating harder after the trucks are booked.
The pattern is consistent across good jobs. Test first. Classify correctly. Document what the facility needs. Keep streams separate. Then move the material once.
If your project includes concrete work along with excavation, keeping soil separate from washout residue matters. Reborn Rentals offers concrete washout containment equipment that can help crews maintain cleaner sites, protect reusable soil streams, and support compliance planning before mixed waste creates a bigger disposal problem.