Concrete Washout Box: A Contractor’s Complete Guide [2026]
The truck washout usually becomes a problem right after everyone thinks the hard part is done. The pour is in, the finishers are moving on, and somebody asks where the chute water, pump residue, and slurry are supposed to go. If the answer is “we’ll figure it out,” the job is already drifting toward a compliance problem.
A concrete washout box fixes that, but only if you treat it like a planned part of the work instead of an afterthought. Good washout management protects the site, keeps the SWPPP on track, and prevents cleanup choices that create bigger trouble than the pour itself.
Most crews know they need containment. Fewer teams budget it correctly, size it correctly, place it correctly, and manage it through rain, traffic, and final disposal without headaches. That’s where jobs get messy. The container itself is simple. The execution around it is what separates a clean site from a violation.
Your Guide to Flawless Concrete Washout Management
The usual failure point isn’t the concrete work. It’s the cleanup after. A truck driver rinses out where it’s convenient, a pump line gets flushed into the wrong spot, or a temporary pit starts out “good enough” and ends the day overflowing.
That’s why a dedicated concrete washout box matters. It gives the crew one controlled location for wash water, slurry, and solids, instead of letting that material spread across the site.
The market growth tells you this isn’t a niche item anymore. The global market for portable concrete washout bins was valued at US$224 million in 2024 and is projected to reach US$276 million by 2031, reflecting stronger regulation and more environmental scrutiny in construction markets where concrete production exceeds 4 billion tons annually (portable concrete washout bin market data).
A project manager needs to think about washout in four stages:
- Selection: Pick a box that matches the pour size and traffic on site.
- Placement: Put it where trucks and crews can reach it without creating runoff risk.
- Monitoring: Check fill level, liner condition, and weather exposure every day.
- Closeout: Solidify, remove, recycle, or dispose of the contents the right way.
Practical rule: If the washout plan isn’t discussed before the first truck arrives, the site is relying on luck.
The right setup keeps the job moving. The wrong setup creates rework, dirty access roads, arguments with inspectors, and costs that never show up in the original estimate.
Why Compliant Washout is Non-Negotiable
The first concrete truck shows up at 6:30 a.m. The pour is already tight, the pump is set, and someone realizes the washout area is either too far from the work or not usable after last night’s rain. That is how crews end up rinsing out beside a curb inlet, along a fence line, or on bare ground behind the staging area. One rushed decision can turn into a permit problem, cleanup cost, and a preventable argument with an inspector.
Concrete washout water carries a high pH, suspended solids, and contaminants that do not belong in soil, drainage systems, or surface water. Once it leaves containment, the issue is no longer site cleanliness. It becomes stormwater noncompliance, and that can get expensive fast.

What is in washout water, and why inspectors care
Concrete slurry is caustic. Guidance for washout containers describes slurry in the pH 11 to 12.5 range and notes that washout waste may also contain metals such as chromium, lead, and mercury if it is not contained and managed correctly. The same guidance warns that an uncontained truck washout can release 100 to 400 gallons of slurry with suspended solids above 50,000 mg/L, creating permit exposure and potential Clean Water Act fines of up to $37,500 per day (concrete washout container specification sheet).
Inspectors know what those numbers mean. High-pH discharge can damage vegetation, alter soil chemistry, and move off site with the next storm. If washout reaches a storm drain, the conversation shifts from BMP maintenance to enforcement.
The real cost is larger than the fine
The fine gets attention, but the field cost usually starts earlier. A bad washout setup slows trucks, creates muddy access routes, forces labor into cleanup, and leaves hardened residue where other trades need to work. If the box is undersized or placed poorly, crews lose time every time they use it.
That matters for budgeting.
A washout plan that fails in the field almost always costs more than a better setup would have cost on day one. The rent versus buy decision becomes a practical consideration. A short job may only need a rented unit with scheduled service. A long project, repeated pours, or remote work can justify ownership if the container will stay useful and the crew can maintain it. Weather also changes the math. Heavy rain cuts freeboard fast. Extreme heat bakes residue onto surfaces and makes cleanup harder. Freezing conditions can turn neglected slurry into a removal problem that costs real labor and equipment time.
Where jobs break down
Failures usually come from ordinary site habits and bad assumptions:
- Washout is too far from the work. Drivers and finish crews use the nearest convenient spot under schedule pressure.
- Capacity does not match the pour. A box sized for patch work gets used for a full production day.
- No one owns inspections. Liners tear, pans fill, and nobody catches the problem before weather does.
- Access changes during the job. Staging, fencing, or stacked material blocks the original route.
- Closeout was never priced correctly. Solids harden in place, hauling gets delayed, and disposal becomes a scramble instead of a planned cost.
I see this on sites that have a SWPPP binder in the trailer and still miss the basics in the field. The paperwork can be correct and the site can still be out of compliance if the actual washout area is inaccessible, overfilled, or missing.
This short video gives useful field context on why washout control matters on active jobs:
What compliant crews do differently
They make washout easy to use and hard to misuse. The location is clear, reachable, sized for the planned work, and checked daily like any other erosion control measure.
A clean, usable washout area tells an inspector the site is under control.
Good crews also plan for the full lifecycle, not just the first rinse-out. They know who is monitoring fill level, who calls for pickup or swap-out, how solids will be handled, and whether renting or buying makes better sense for the length and intensity of the job. That is the difference between a washout box that protects the project and one that becomes another problem sitting on the site.
How to Choose the Right Washout Box for Your Job
A bad washout box choice usually shows up at the worst time. The pour is underway, trucks are lined up, the pump is finishing cleanup, and the container is already too full or too beat up to keep using. That is how crews end up improvising, and improvised washout is what gets sites written up.
Choose the box based on job scale, cleanup volume, site conditions, and how long the operation will run. Cost matters, but the cheapest option at delivery is often the expensive one by closeout if it fails in weather, needs replacement mid-job, or leaves you with a messy disposal problem.
Disposable versus reusable
For small, short-duration work, disposable units can be the right call. Portable fiberboard washout boxes are commonly used for limited washout demand, while larger steel pans are built for repeated use on higher-volume pours and recycling programs, as shown in these portable fiberboard and steel washout box product details.
Base the decision on the work, not habit.
| Box type | Best fit | Strengths | Trade-offs |
|---|---|---|---|
| Disposable fiberboard or bag-style unit | Small pours, punch work, short-duration interior or retrofit jobs | Lower upfront cost, quick to stage, practical for limited washout demand | More vulnerable to rough handling, saturation, wind, and overfilling |
| Reusable steel pan | Large pours, pump work, infrastructure, multi-day concrete operations | Holds up better under repeated use, contains slurry more reliably, fits recycling and scheduled swap-out plans | Higher transport and service costs, needs equipment access and pickup planning |
The weather piece gets overlooked. On a dry, controlled site, a disposable unit may perform fine. On muddy ground, in freeze-thaw conditions, or during a wet week, steel usually gives you a wider margin for error. That matters if you are trying to avoid a spill, a crew delay, and an unplanned replacement on the same day.
Start with the pour, then price the full lifecycle
Project managers should answer four questions before selecting a washout box:
- How much concrete is being placed? More concrete usually means more truck, chute, and tool washout.
- Will a pump be used? Pump cleanup adds slurry and solids fast.
- How many separate washout events will happen? Count trucks, pump parts, buggies, wheelbarrows, and hand tools.
- What will removal look like at the end? A cheap box that is hard to service, swap, or dispose of can erase any savings.
That last question is where budgeting usually gets sloppy. Renting a steel pan can make sense on larger or weather-exposed jobs because pickup, swap-out, and disposal are easier to predict. Buying disposable units can pencil out on smaller jobs, but only if the crew will not burn through extra boxes or leave hardened waste that takes time to deal with later.
Concrete Washout Box Sizing Guide
| Pour Volume (Cubic Yards) | Recommended Box Type | Minimum Capacity (Gallons) | Example Use Case |
|---|---|---|---|
| Small patch or minor flatwork | Disposable fiberboard box | 260 | Sidewalk repair, curb patch, small renovation |
| Small to mid-size pour | Disposable box or small steel pan | 310 | Short run of slab replacement, light commercial retrofit |
| Large pour approaching pump work | Steel pan | 441 | Multi-truck slab or structural pour |
| 300+ cubic yards | Heavy-gauge steel bin | 441 | Large slab, pump truck operation, civil work |
Use that table as a starting point. Then add job reality.
If access is tight, the ground is soft, rain is in the forecast, or multiple crews will wash out at the same time, size up or plan for a second unit. Extra capacity costs less than an overflow response, cleanup labor, and inspector attention.
Capacity mistakes that cause trouble
Under-sizing is still the mistake I see most. The box looks fine before first placement, then truck washout, pump residue, and tool cleanup hit within an hour and the freeboard disappears.
Watch for these warning signs:
- Fill level rises early in the day: The estimated washout volume was too low.
- Stormwater has nowhere to go: A nearly full box leaves no buffer for rain.
- Crews start waiting to use it: Delays push drivers and laborers toward unofficial washout spots.
- The container is breaking down in the field: Soft walls, torn liners, or shifting on poor ground usually get worse fast.
A washout box is not just a compliance item. It is a small line item that can turn into rework, downtime, hauling changes, and disposal headaches if it is chosen without thinking through the full job cycle.
On-Site Setup and Best Management Practices
A washout plan usually fails in the first hour, not at the end of the pour. The box is on the wrong side of the site, rain starts pooling around it, one crew fills it faster than expected, and a driver dumps rinse water where it is easiest instead of where it is permitted. That is how small setup mistakes turn into cleanup labor, schedule loss, and inspector problems.
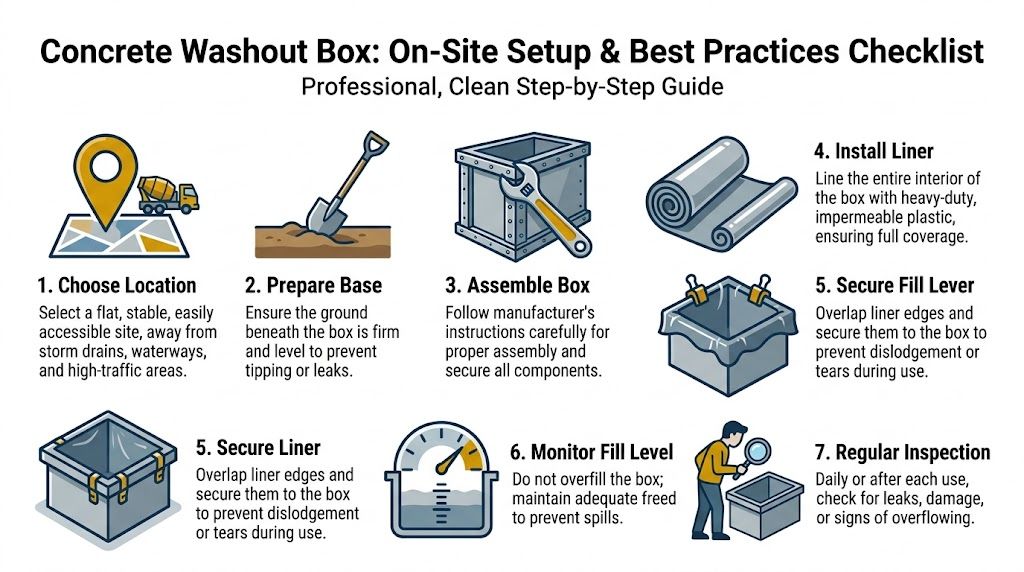
Put it where the job will use it
Crews use the washout box that is easy to reach and easy to identify. If access is awkward, they will improvise, especially during a busy placement when trucks are stacked up and the pump crew wants to keep moving.
Set the box close enough to active concrete work to make compliance the fastest option. Keep it clear of storm drains, curb inlets, ditches, and low spots that collect runoff. Mark it so there is no confusion about its purpose. A simple, visible "Concrete Washout Only" sign is usually enough if the approach is obvious from the truck path.
Field placement should also account for the economics of the full job, not just the pour day. A cheaper rental or smaller disposable unit can become the expensive choice if poor placement forces extra labor, a mid-job swap, or spill response after a storm.
Start with ground conditions, not convenience
Loaded washout containers get heavy fast. If the box sits on soft fill, mud, or broken aggregate, it can settle, rack, or tip enough to stress the liner and create a leak path.
Check these before the first truck arrives:
- Ground bearing: Use level, compacted ground that can handle the loaded weight.
- Truck approach: Keep backing and turning movements out of congested pedestrian routes.
- Equipment access: Make sure the hauler, forklift, or loader can still reach the unit after rain.
- Drainage pattern: Water should not run toward the box and then overflow into the site.
This is one of the main rent versus buy trade-offs in the field. Steel units usually tolerate rougher conditions and repeated handling better, but they still need proper support. Disposable systems save money on short, clean jobs, yet they are less forgiving when the site is wet, uneven, or exposed.
Treat the liner and cover as part of containment
On lined systems, the liner is doing real work. If it is torn at a corner, folded under the load, or loose at the top edge, the container is already compromised.
Inspect these points during setup and again after use:
- Corners and seams: High-wear areas during repeated chute and tool washout
- Top edge attachment: Loose edges slip when slurry hits the liner
- Puncture points: Rebar, broken concrete, and sharp debris can cut containment
- After rain or wind: Covers shift, liners sag, and pooled water adds weight
A five-minute check beats a half-day cleanup.
Site habits that prevent the usual failures
Good washout control comes down to routine discipline. The jobs that stay clean usually do the same few things every time.
- Set the box on level ground. A slight lean gets worse as material builds up.
- Keep the area clearly marked. Drivers should not need directions every time they wash out.
- Keep trash and other waste out. Mixed loads raise disposal cost and complicate hauling.
- Maintain freeboard. Leave room for rinse water, slurry, and weather.
- Inspect during the pour, not just after it. Fill level and liner damage change quickly on busy placements.
- Assign one person to own it. Superintendent, foreman, or competent person. Someone needs authority to stop misuse and call for service.
- Schedule removal before the box is close to full. Emergency pickups cost more and give crews a reason to use the wrong spot.
Weather changes the setup, the schedule, and the cost
Weather is where paper plans usually break down. Rain adds volume. Cold slows curing. Wind lifts covers and exposes liners. Soft ground can turn a legal washout area into a location no truck can reach safely.
For rain, cover early and recheck the box before the crew leaves. For cold weather, do not assume frozen material is stable or ready to move. For wind, secure covers and look at anchor points, not just the top sheet. After storms, verify access for both users and the pickup truck.
Lifecycle cost is a key consideration. A lower-cost option can make sense on a short dry-weather project with predictable use. On longer jobs, winter work, or sites with poor access, paying more for a sturdier unit often saves money by reducing changeouts, damage, labor, and compliance risk.
One rule holds on every project. If weather is likely to hit the site hard, plan washout capacity and service timing before the forecast becomes a problem.
Managing Washout Waste from Solidification to Disposal
The box being full isn’t the end of the job. It’s the handoff point to the next risk. If the waste sits too long, gets moved badly, or goes to the wrong destination, the site can still lose control of the process.
Get the slurry to a manageable state
The first goal is solidification. Some sites let water evaporate and let the slurry harden naturally. That can work when time, weather, and space are on your side.
Other jobs use approved solidification products or flocculants to speed the process. The point isn’t convenience alone. Faster stabilization reduces the time the site is storing wet, caustic material.
For steel pans, crews usually wait until the contents are ready for removal, then break up and extract the hardened material for transport or recycling. For disposable systems, the hardened block often stays contained for pickup and final handling.
Separate what can be recycled
The best operations don’t treat all washout waste as garbage. They separate usable concrete-based material and move it into a recycling stream when local facilities allow it.
That approach works at scale. Best practices can achieve 100% recycling of washout waste, and one South Florida effort diverted 63,823 tons from landfill. Of that total, 22,063 tons were crushed for new concrete and 41,760 tons were used as lake fill, with reported savings equal to 5,649 metric tons of CO2 (South Florida washout recycling example).
That example matters because it shows what’s possible when collection and handling are organized. It also gives project teams a better answer than “just haul it off.”
Disposal mistakes to avoid
A lot of problems happen after the concrete work is already done.
- Mixed loads: If crews toss trash, rebar, or general debris into the washout box, disposal gets harder immediately.
- No facility confirmation: Don’t assume every landfill or recycler will accept hardened washout material under the same terms.
- Missing paperwork: If a project is audited or questioned later, poor records create unnecessary exposure.
What a clean closeout looks like
A professional closeout is simple and documented:
| Stage | What to verify |
|---|---|
| Solidification | Contents are stable enough for safe handling |
| Removal | The material is loaded or picked up without spills |
| Destination | The receiving facility is permitted for the material |
| Records | Tickets, manifests, or disposal receipts are retained with project files |
Keep the area clean after pickup too. Residue around the box location is still a site issue, even if the main container is gone.
Renting vs Buying The Definitive Economic Breakdown
Many budgets drift off course when only visible purchase prices are considered. Teams compare the visible purchase price of a disposable unit against the daily rate of a rental pan and stop there. That’s not a real comparison.
The important question is total cost of ownership across the life of the job.
Buying looks simple until the side costs show up
Buying can make sense when your work is repetitive, predictable, and small enough for disposable systems or when you already have a well-run internal handling process.
But purchased units create operational responsibilities that many estimates miss:
- Storage between jobs
- Crew time for setup and teardown
- Cleaning or final handling
- Disposal coordination
- Replacement when units are damaged or saturated
- Internal tracking so purchased inventory doesn’t disappear across projects
Those costs don’t always hit one line item. They show up as labor drift, messy yards, supervisor time, and end-of-job scrambling.
Renting shifts the burden off the field team
Rental works differently. The big advantage isn’t just access to a steel pan. It’s that the job gets a purpose-built unit without creating a long-term asset management problem.
The available economic guidance notes that renting durable steel pans can reduce associated labor by 20 to 30% through simplified logistics and can be a more predictable and often cheaper option for projects under 30 days (cost comparison discussion for washout containment).
That lines up with what site teams often find in practice. The shorter the project, the less sense it makes to create your own cleanup, storage, and disposal system.
A side-by-side decision view
| Question | Renting usually fits better | Buying usually fits better |
|---|---|---|
| Project duration | Short-term work | Repeated small work with steady internal process |
| Pour size | Large pours needing steel containment | Small, limited washout volume |
| Yard space | Limited storage capacity | Existing storage and handling space |
| Admin burden | You want fewer moving parts | You already manage purchased inventory well |
| Weather exposure | Tough site conditions where durability matters | Controlled conditions and light use |
What project managers should actually compare
Don’t compare only invoice price. Compare these categories:
Field labor
How much crew time goes into setup, monitoring, moving, and final handling?Risk of failure
If the purchased option gets damaged, overloaded, or weather-impacted, what’s the cost of the correction?Logistics complexity
Who arranges final disposal? Who stores leftovers? Who chases the paperwork?Job duration
Short-term work usually favors predictable rental logistics. Longer or recurring small-job work may justify keeping purchased units in rotation.
The cheapest line item is not always the lowest-cost system.
Two common scenarios
A general contractor running occasional large pours usually benefits from renting. The job gets a durable container sized for the work, and the team avoids carrying washout equipment overhead between projects.
A subcontractor doing frequent small patch jobs may prefer to buy disposable units for convenience. Even then, the smart move is to price labor, weather exposure, and disposal handling before assuming purchase is cheaper.
When you budget a concrete washout box correctly, you’re not just selecting a container. You’re deciding how much uncertainty to leave in the job.
Build Cleaner Sites and Protect Your Business
A concrete washout box is one of the simplest tools on a concrete job, but it carries outsized weight. It protects stormwater, supports the SWPPP, keeps cleanup organized, and reduces the chance that one rushed decision turns into a citation or delay.
The strongest approach is practical. Match the container to the pour, place it where crews will use it, inspect it like any other BMP, and plan the end-of-job handling before the box is full. Then budget the system based on total cost, not just sticker price.
Clean washout management also says something about the way a company runs work. Owners notice it. Inspectors notice it. So do clients walking the site.
Frequently Asked Questions About Washout Boxes
Do I really need a dedicated concrete washout box for a small job
If there’s any concrete washout on site, you need controlled containment. Small jobs create less volume, but they still create caustic slurry. For limited work, a disposable washout unit may be enough if it’s sized properly and protected from misuse and weather.
Can crews wash tools and wheelbarrows into the same box as truck washout
Yes, if that box is designated for concrete washout and has enough remaining capacity. The mistake is letting every cleanup activity use the same container without tracking fill level. Tool washout seems minor until it adds up across the day.
Where should the box go on site
Put it on stable ground with clear access and away from storm drains and waterways. It should be close enough that drivers and laborers will use it, but not in a traffic pinch point where vehicles or forklifts are likely to hit it.
What if rain is in the forecast
Check the box before the weather arrives. Make sure covers are in place, freeboard remains, and the surrounding area won’t channel runoff into the container. If the site is using a disposable unit and heavy rain is expected, reassess whether that container is still the right choice.
Can hardened washout material be recycled
Often, yes. That depends on local facility acceptance and whether the load has been kept free of mixed trash and contamination. If recycling is available, separate and document the material instead of treating everything as general waste.
How often should the box be inspected
Daily is the baseline, and it should also be checked after rain and after heavy use. Inspections should look at fill level, leaks, liner condition, surrounding residue, and whether the area is still clearly marked and accessible.
What’s the most common field mistake
Underestimating volume. Teams plan for truck rinse-out and forget about pump residue, tools, wheelbarrows, and weather. The second most common mistake is placing the box where it looks good on paper but doesn’t work for actual site traffic.
Should I rent or buy
For short-duration work and larger pours, renting is usually the cleaner operational choice. For frequent small jobs, buying may work if your team is disciplined about storage, handling, and disposal. The right answer depends less on price alone and more on how much logistics you want your field team to absorb.
If you need a straightforward washout solution without adding extra coordination headaches, Reborn Rentals offers durable washout containment with clear pricing, delivery options, and equipment built for real job-site use. It’s a practical option when you want compliant concrete washout management handled cleanly from setup through pickup.