
Concrete Pump Washout Tray Guide for Contractors
The pump is scheduled, the ready-mix trucks are lining up, and the finishing crew is already waiting on the first load. Then someone asks where the washout pan is. If the answer is “still at the other site,” your pour plan has a hole in it. Pump cleanup creates more than a little chute dribble, and an improvised pit can turn a controlled operation into a stormwater problem, a production delay, and an uncomfortable conversation with the inspector.
A concrete pump washout tray gives the pump operator a defined place to collect prime material, residual concrete, hose flush water, and hopper washout. The right tray also fits the pump setup, holds the expected residue, and leaves enough room for the crew to work without sending alkaline slurry toward a curb or storm drain. This guide focuses on that practical intersection of pump-day logistics and SWPPP control.
The Day a Missing Tray Cost the Crew a Half Day
The pour was a residential slab, about 60 yards, with the pump truck due before the first ready-mix load. The operator backed into position, the crew protected the forms, and the hose was ready to prime. The missing item was the washout tray, left on another project because the previous foreman assumed this site had a disposal pit.
At first, the cleanup looked manageable. A little material landed on the gravel while the operator worked through the prime. Then the hopper washout started, followed by the hose flush. Water carried gray slurry toward the street, and the nearest storm drain suddenly became the most important object on the block.
The crew shoveled together a shallow makeshift pit, lined it with whatever plastic was available, and stopped production while someone found a proper container. The delay ran between 45 and 90 minutes, depending on how quickly the replacement containment arrived and whether the inspector accepted the temporary setup. By then, finishers were waiting, trucks were stacking up, and the foreman was explaining why the site had no documented washout location.
Field rule: If the pump is coming, the washout plan needs to arrive before the pump.
Pump cleanup is messier than chute-only cleanup because the pump system adds several waste streams. The crew may need to manage:
- Prime purge: The first material pushed through the line may be cement slurry, grout, or another priming material that can't run onto the ground.
- Hopper residue: Concrete remains around the hopper, grate, and lower feed area after the last load.
- Hose flush water: Line cleaning sends water and fine cement particles into the containment area, often with more spread and splash than a mixer chute.
- Emergency leakage: A burst line or interrupted pour can leave wet concrete where the crew needs immediate containment.
The compliance stakes are real. EPA stormwater guidance says washout water and solids should be collected in leak-proof containers so caustic material doesn't migrate to soil, groundwater, or surface waters, and it calls for 100% of collected washwater and solids to be recycled. The same EPA concrete washout guidance describes washout BMPs as portable and reusable, which is why dedicated trays, bins, and containment systems are now standard tools on many sites.
A missing tray can trigger inspector pushback, a stop-work warning, neighbor complaints, or a cleanup bill that dwarfs the effort needed to stage containment correctly. The tray isn't a housekeeping accessory. It is part of the pump setup.
What a Concrete Pump Washout Tray Actually Does
A concrete pump washout tray is a low-profile, reinforced containment pan positioned under or near the pump hopper and discharge area. It captures wash water, residual concrete, prime purges, and hose-cleaning waste while the pump is set up and taken down.
The useful distinction is between a pump tray and a mixer chute pan. A chute pan sits behind the ready-mix truck and handles the material left in the rear chute. A pump tray works around the hopper, delivery line, and hose cleanup, where cement slurry and rinse water can arrive together and spread quickly.
A chute pan is like a sink basin. It catches a limited, predictable stream under one outlet. A pump washout tray is more like a mop bucket catching a mop being wrung out. The waste may arrive from several points, and the mix can include prime material, leftover concrete, and water released during line cleaning.
The features that matter on pour day
The tray needs enough containment capacity for the planned cleanup, but capacity alone doesn't make a tray useful. A deep container with no working clearance can block the hopper, interfere with the chute swing, or force the operator to wash down from an unsafe position.
Look for four practical characteristics:
- Low profile: The crew can place it under the hopper or discharge point without creating an awkward step or interfering with pump access.
- Reinforced construction: The floor and sidewalls need to tolerate wet concrete, tools, wheelbarrows, and controlled removal of hardened residue.
- Watertight containment: Seams, corners, and lifting points should not become leak paths once the tray is loaded.
- Lifting and handling points: Fork pockets, lifting eyes, or rings allow the tray to be moved without dragging it across finished work.
The EPA guidance also emphasizes portable, reusable washout BMPs. That matters on projects where the pump moves from one pour area to another, or where the washout station must be relocated as the site develops. A tray that can be lifted, emptied, cleaned, and redeployed is more useful than a container that works only once.
Don't confuse a pump tray with a generic plastic tub. The tub may catch the first rinse, but it may not have the floor strength, rim height, lifting arrangement, or working area required for a full pump cleanup. The right unit supports the process, not just the final splash.
Key Specifications Contractors Compare
Foremen usually compare four specifications first: capacity, footprint, load rating, and handling design. Each one answers a different jobsite question. A tray can have plenty of volume and still fail because it won't fit between the outriggers and the hopper.
Capacity should match expected residue, not the pump's advertised output. A regulatory sizing example from a state construction stormwater manual recommends at least 6 cubic feet of containment for every 10 cubic yards of concrete poured, as summarized in the Water Industry Journal discussion of concrete washout controls. Treat that as a planning benchmark, then account for the actual pump configuration, prime volume, hose length, and available removal method.
Compare the specification to the setup
| Spec | Typical Range | Why It Matters |
|---|---|---|
| Capacity | Roughly 4 to more than 60 cubic feet | A small chute cleanup and a full hopper washout aren't the same job. Select for residue and wash water, with working headroom. |
| Footprint | Commonly 6 by 8 feet to 10 by 12 feet | The tray must fit between outriggers, the hopper, access paths, and chute swing without creating a trip or traffic hazard. |
| Load rating | About 4,000 to 20,000 pounds | The floor must support wet residue, a loaded wheelbarrow, and planned removal with a forklift or skid steer. |
| Stack height and pockets | Varies by design | Low stack height helps storage. Forklift pockets and lifting points control how the tray reaches the site and leaves it. |
A 30-yard slab pour generally calls for a mid-size solution rather than the largest pan on the rental yard. A 200-yard structural deck creates a different cleanup problem. The crew may need the largest unit available or multiple trays positioned around the pump operation, especially when the pump must remain active while one containment area is being serviced.
Footprint often wins the buy-or-skip decision. Measure the actual setup, including outrigger pads, hose routing, truck access, and the operator's working position. If the tray forces the operator to stand in the line of a swinging hose or blocks a ready-mix truck's exit, the capacity is irrelevant.
Load rating also deserves a field check. Ask how the hardened material will come out. If the plan calls for a forklift to tilt the tray, confirm that the rim, lifting points, and floor are designed for that movement. A pan that can contain the material but can't be safely emptied creates a second problem at closeout.
Common Tray Designs and How They Stack Up
No single tray design fits every pump day. A commercial structural pour, a residential driveway, and an interior renovation have different access, handling, and disposal constraints. The practical choice depends on whether the crew values ruggedness, light handling, short-term convenience, or minimal storage.
| Tray Type | Material | Typical Capacity | Portability | Best For |
|---|---|---|---|---|
| Welded steel pan | Heavy-gauge steel | About 500 to 2,000 pounds | Requires forklift or crane handling | Commercial pours and repeated use |
| HDPE tray | High-density polyethylene | About 250 to 750 pounds | Relatively easy to move | Residential and small slab work |
| Corrugated bin | Rigid plastic | About 250 to 750 pounds | Simple delivery, limited reuse | One-off pours with no return logistics |
| Roll-up mat | Vinyl or rubber | About 100 to 300 pounds | Highly portable | Tight driveways and restricted access |
Welded steel pans dominate larger commercial work because they tolerate repeated loading, tool contact, and hardened residue removal. Their drawback is handling. A steel pan may need a forklift, crane, or suitable lifting arrangement, so the delivery plan must include more than the pan itself.
HDPE trays are easier for a residential crew to position and can work well when the pump cleanup is moderate. They reduce handling effort, but a dropped boom stand, sharp tool, or concentrated impact can damage plastic. Inspect the bottom and corners before every use.
Corrugated plastic bins have the lowest commitment for a single pour. They make sense when the contractor doesn't want to retrieve a reusable pan, but disposal becomes part of the job. The crew still has to prevent leakage and arrange lawful handling of the hardened and liquid contents.
Roll-up vinyl or rubber mats solve a different problem. They pack down, fit through narrow access routes, and can protect a driveway where a rigid pan won't fit. Their smaller capacity makes hose management critical. They work when the operator controls the discharge carefully, not when the crew expects to dump a large volume into one spot.
Practical judgment: Choose the lightest design that can safely contain the cleanup. Going lighter than the cleanup requires only moves the work onto the pavement.
Renting Versus Buying for Your Crew
The rental decision starts with operations, not a spreadsheet. Ask how often your crews pour, how many pumps work at once, where the pans will live between jobs, and whether your yard can load and unload a steel unit without disrupting other equipment.
Rental usually fits a contractor with occasional pours, a single-site project, or no flatbed, forklift, or crane available for handling. It also avoids dedicating yard space to an asset that may sit idle. For a project manager who needs a compliant pan delivered for a defined pour window, that convenience can outweigh ownership.
Purchase becomes more sensible when the company runs multiple pumps weekly, has a usable laydown yard, and wants a known asset ready early in the morning. Ownership also gives the superintendent control over condition. The crew knows whether the pan is watertight, whether the lifting points are sound, and whether hardened concrete has been removed.
The supplied rental and purchase benchmarks are clear enough to support a rough decision. A 7-day rental may run $150 to $400, with delivery and pickup surcharges of $75 to $150 per leg, while a new steel pan may cost $1,800 to $4,500. Those figures come from the planning brief and should be treated as job-specific market ranges, not guaranteed quotes.
The hidden logistics test
The rental company may deliver a dirty unit, arrive outside the agreed window, or add environmental handling charges that weren't understood at dispatch. Confirm the condition, delivery time, pickup responsibility, and disposal terms before the pump arrives.
Purchased pans create their own obligations:
- Storage: Keep the pan accessible, stable, and protected from damage.
- Cleaning: Provide a wash rack or another controlled cleaning method.
- Removal: Decide where hardened concrete will go before the pan is full.
- Inspection: Check welds, rims, lifting eyes, pockets, and liners before dispatch.
- Transport: Match the pan to the truck, trailer, forklift, or crane available.
A simple decision rule works well. Rent when the project needs containment but your company lacks the handling and storage system. Buy when washout is a routine part of weekly production and the company can manage the complete life cycle, from staging through disposal.
Sizing the Tray to Your Pour and Pump Setup
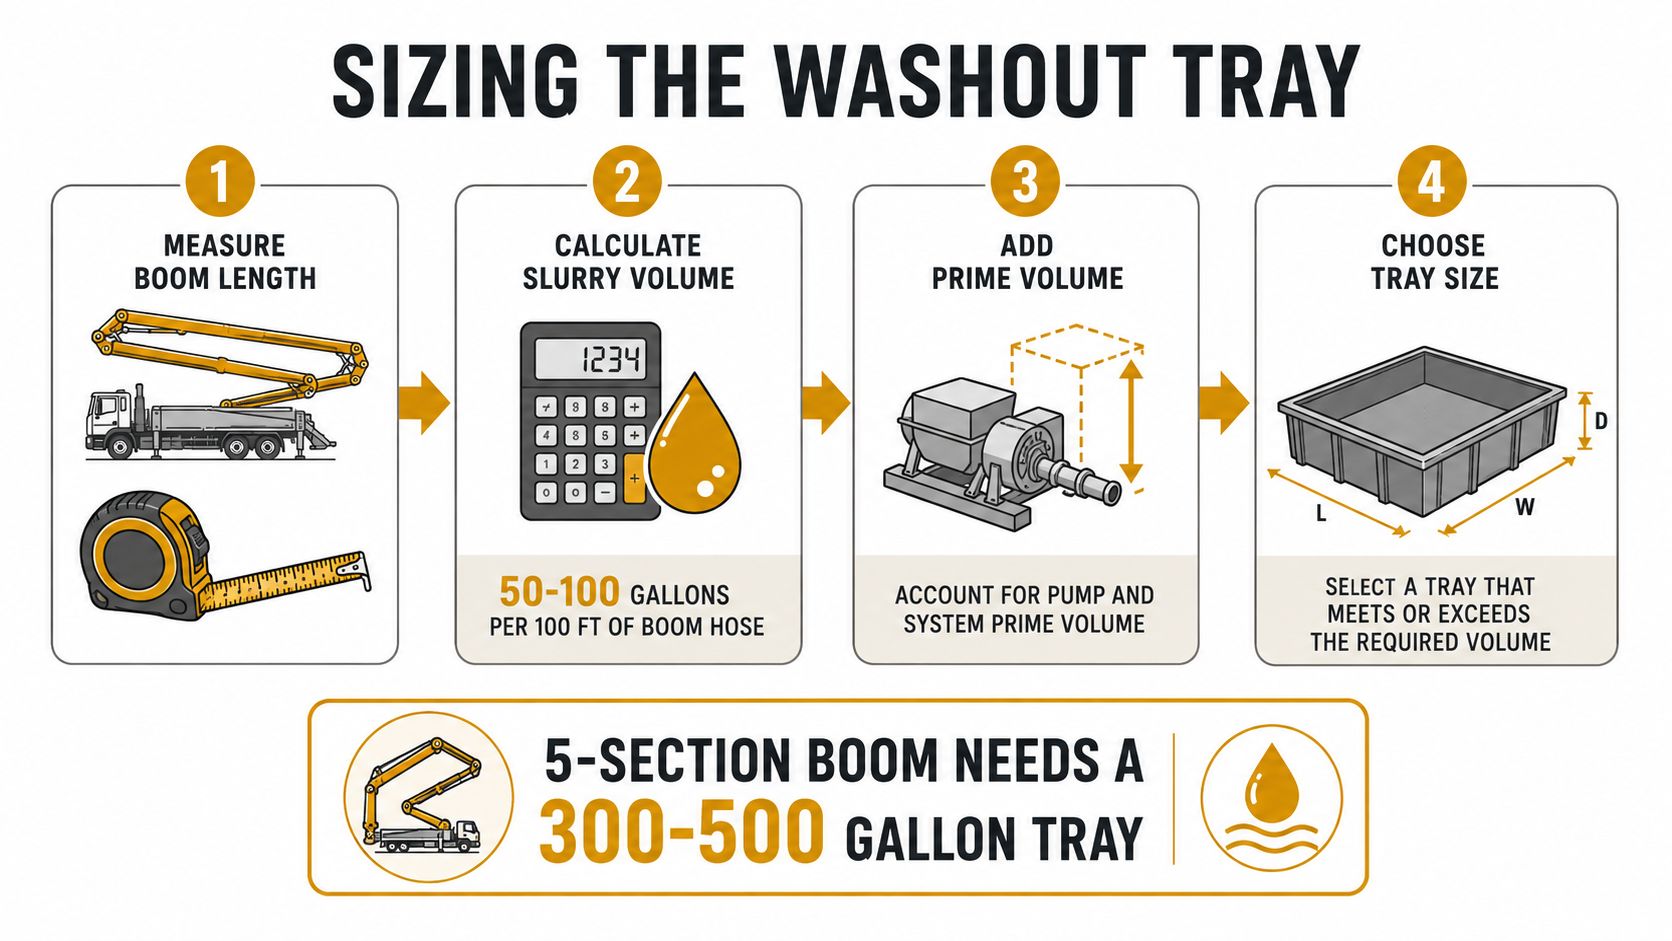
A tray that handles the pour can still fail during cleanup. Size it around the full pump-day sequence: prime discharge, remaining concrete, hose or line flushing, hopper rinsing, and the freeboard needed to stop splashing. Before ordering or renting, map the boom or line arrangement, identify the discharge point, and estimate the cleanup volume.
The planning brief uses 50 to 100 gallons of slurry per 100 feet of boom hose, plus prime volume, as a field estimate. For a 5-section boom, it gives a planning range of a 300 to 500 gallon tray. Treat those figures as planning benchmarks, then adjust for the actual hose length, pour volume, cleanup method, and room available inside the SWPPP controls.
Set the tray before the first load
Place the pan within 10 to 15 feet of the pump outrigger, on level ground that can support its loaded weight. Keep the discharge path controlled and, where the site allows, position the tray downhill from storm drains. Leave enough working room for the operator and crew to approach the hopper without stepping over hoses or backing equipment into the containment area.
The EPA stormwater benchmark cited earlier recommends locating washout operations about 50 feet from storm drains, open ditches, and water bodies. If the site cannot provide that separation, document the deviation in the SWPPP and add controls such as secondary containment, drain protection, and approval from the responsible stormwater authority.
Use a fixed pump-day sequence:
- Pump out remaining concrete: Keep usable material in the placement area as long as practical.
- Control the prime purge: Direct the first discharge into the tray, never onto gravel or pavement.
- Clean the line: Follow the approved air-ball or water-cleaning method for the pump setup.
- Wash the hopper: Keep the boom low and aim rinse water at the tray's center.
- Check the perimeter: Look for seepage, splash, overflow, and tracked slurry before releasing the pump.
A plastic sheet beneath the tray adds secondary containment and helps protect the ground from minor leaks or punctures. It does not replace a watertight pan. Treat it as backup protection within the broader SWPPP setup.
The common field failure is an undersized tray that appears adequate during setup, then fills during hose cleanup. An oversized pan can create a different problem if the operator cannot safely reach the hopper or the truck cannot access the work area. Measure the actual pour zone, cleanup route, and equipment clearance, then choose containment that supports the crew's complete sequence.
Maintenance, Disposal, and Site Closeout
Closeout begins before the pump leaves. While residue is still workable, consolidate it in the tray, keep solids away from drains, and capture all rinse water. A full tray left beside the slab can block access, harden in place, and turn the next shift into a cleanup operation.
Wash water from concrete work is highly alkaline, commonly above pH 11 and often within the pH 12 to 14 range. One peer-reviewed measurement recorded ready-mixed concrete wash water at pH 12.37, while controlled discharge ranges are often around pH 6 to 9. Rinsate can look like ordinary dirty water, but its chemistry still requires containment and an approved disposal route.
A workable closeout sequence
- Pump the tray down: Remove free liquid and workable slurry through the approved disposal or recycling route.
- Let the residue harden: Keep the remaining cake contained until it can be removed safely.
- Plan the pickup: Arrange removal before other trades, parked vehicles, or equipment restrict access.
- Document the condition: Record the containment area, disposal action, and any overflow or incident.
- Release the location: Remove ground protection only after the tray and surrounding area are clean.
Planning notes call for allowing tailings to cure 24 to 48 hours before handling. Use the material's actual condition and the site requirements as the final guide. A small hardened cake may be removable by the crew with approved tools. A heavy load, or a pan owned by a rental company, may require the vendor to haul and dispose of it.
Check access before the residue sets. If a truck, forklift, or other trade will occupy the route, schedule pickup while the tray can still be moved safely. Keep the containment area identifiable until the waste has left the site.
Never return a damaged tray to service. Tag out units with cracked welds, deep gouges, bent rims, damaged lifting eyes, or compromised fork pockets. A pan that held yesterday's washout may fail during the next cleanup if its floor or lifting gear has weakened.
Foreman's one-page closeout checklist
- Rinse lines and hopper: Direct every rinse stream into containment.
- Log the waste: Record the disposal or recycling information required by the SWPPP.
- Photograph the empty tray: Include nearby ground and protected drain areas.
- Check for leakage: Inspect seams, corners, liner material, and the ground beneath.
- Confirm pickup: Get the vendor's pickup window in writing when the pan is rented.
- Tag damage: Remove questionable equipment from the next pour schedule.
This record protects the site, keeps the pump available, and prevents the next crew from finding hardened material at shift start.
For scheduled pump days, Reborn Rentals offers concrete washout pans and containment equipment with delivery options for construction and renovation sites. Review available pan configurations, provide the dates and location, and arrange the washout setup before the pour.