Equipment Inspection Checklist for Washout Containment
The truck is idling, the pump line is already set, and the foreman is staring at a washout pan that looks “fine” from ten feet away. That's usually where the bill gets born, because “fine” isn't the same thing as verified. On a concrete day, a good equipment inspection checklist keeps the job moving, protects the site from a spill or washout problem, and gives you something stronger than memory if the rental company later says the pan came back damaged.
Why a Washout Pan Inspection Beats a Cleanup Bill
A washout pan gets judged twice, once when it lands on site and again when it comes back. If nobody wrote down what it looked like at the start, the second judgment usually favors the invoice. That's why a written equipment inspection checklist matters here more than on almost anything else you rent, because it turns a quick visual into a record you can defend.

The five-minute check that pays for itself
The inspection itself doesn't need to be theatrical. Walk the pan, look for damage, confirm it's sitting where it should, and take photos before the first truck discharges slurry. That small habit matters because preventive-maintenance logic consistently shows that 82% of factory failures are equipment-related and detectable in advance, and structured inspection catches 4x more failures proactively than reactive maintenance, with about a 30-day advance warning window for many mechanical failures (source). The washout pan isn't a factory machine, but the principle is the same, find the problem before the mess turns into downtime or a dispute.
Practical rule: if you wouldn't sign for the pan blind, don't use it blind.
The trade-off is speed versus proof. Crews often choose speed and trust the rental yard's word that the pan is “good.” That works until the first claim shows up, and then you're trying to reconstruct an arrival condition from a dirty memory and a few blurry phone shots.
Why this is a control process, not paperwork
A proper inspection program isn't just “clean or not clean.” It's a control system that makes the crew decide whether the asset can go into service, stay in service, or get tagged out. That's the same logic behind documented inspection systems in construction and facilities work, where the standard format creates an auditable trail and supports maintenance planning.
For washout containment, the payoff is simple. You avoid stormwater trouble, keep slurry where it belongs, and make it much harder for a rental company to argue that a post-return issue started on your watch. The checklist becomes the cheapest insurance on the site because it creates a clean handoff before anyone pours a yard of concrete.
Pre-Delivery Verification Before the Truck Leaves
The smartest time to inspect a washout pan is before it's rolling toward your jobsite. Once the truck leaves the yard, the conversation changes from “swap it” to “prove it,” and that's a worse place to be. A superintendent should spend ten minutes on the rental order, the photos, and the equipment ID before dispatch so the pan arrives as the exact asset expected, not a vague substitute.
Match the asset to the order
Start with the basics, asset ID, class, and declared capacity. Reborn-style washout pans are commonly listed in large formats such as 72" x 72" x 24" with about 18.25 tons and roughly 441 gallons, or 72" x 72" x 14" with about 310 gallons (source). Those numbers matter because the crew needs the right size for the pour plan, not whatever happens to be available in the yard.
Use the rental paperwork to confirm delivery window, site contact, and any stated surcharge terms before the truck moves. If the order says one thing and the dispatch note says another, fix it before anyone signs at the curb. A pre-delivery mismatch is an administrative problem, but a mismatch discovered after placement becomes a jobsite problem.
Verify condition with photos before transport
The delivery photos are your baseline. Look for cracks, bent edges, missing fittings, or anything that suggests the pan was already rough before it reached your site. If the yard is reluctant to provide images, treat that as a warning sign, because the inspection record is only useful if it starts before the asset is exposed to the pour.
A defect caught on delivery is a swap-out. A defect caught after the first discharge is an argument.
Many crews get lazy here. They assume the pan is a simple container, so there's nothing to inspect beyond “is it here?” That mindset misses the whole point of inspection, which is to catch a bad asset while the rental company can still own the fix.
Keep the paperwork packet together
Put the order, photos, and contact notes in one place. The point isn't to build a bureaucracy, it's to create a clean handoff if someone needs to verify condition later. Digital forms help here when they force asset fields, timestamps, and sign-off, because incomplete records are almost useless when the billing question shows up after the pour.
If you've ever had a rental issue turn into a callback chain, you already know the value of one clean pre-delivery packet. It shortens disputes, and it stops the crew from relying on the memory of whoever happened to be on the loading dock that morning.
Daily On-Site Inspection Routine
Once the pan is on site, the inspection has to become part of the pour rhythm. It can't be a separate event that only happens after something looks wrong. The best on-site routine is fast, fixed, and boring in the right way, because the crew can repeat it without slowing production.
Walk the pan in the same order every time
Use the same route each day. Check the walls and floor for cracks, seam separation, punctures, or signs of impact. Confirm the pan is sitting level on stable ground and that it isn't tilted toward a drain, driveway, or low spot that will carry slurry where it doesn't belong. Then look at freeboard, the empty depth left before overflow, because a pan that's nearly full is one bad rinse away from a problem.
After that, look for sheen, color change, or active leaking at the seams. Verify that covers, signage, and the spill kit are still where they should be. Those details don't sound dramatic, but they're the difference between a contained washout and a contaminated edge of the site.
Stop-use cues that should end the discussion
Some conditions aren't “watch and see” items. Standing liquid outside the pan, a bowed wall, or any smell or visual sign of a breached seam should trigger tag-out and escalation immediately. Don't let the jobsite talk itself into another hour of use because everyone wants to keep the pour moving.
Use this simple sequence when something fails:
- Tag it out immediately and keep the pan out of service.
- Notify the superintendent so there's no confusion about ownership.
- Request a replacement or repair direction from the rental contact.
- Document with photos before anyone moves the asset.
That's the decision path that protects both the site and the billing record. If you skip the tag-out and keep going, you've basically accepted the condition as your own.
Keep the routine short enough to survive the day
This whole walk takes under five minutes when the crew knows the sequence. That's the right length for a field control, because anything much longer starts competing with production. The goal isn't a perfect essay about the pan, it's a fast, repeatable yes-or-no check that keeps a bad asset from becoming a bigger cleanup.
Documentation and Photo Evidence That Actually Hold Up
Inspection findings only matter if the record can survive a dispute. A note that says “looks okay” won't help when someone asks who saw the wall crack, when they saw it, and whether the pan was already compromised before use. The record has to read like evidence, not like a memory dump.
Log the facts, not the story
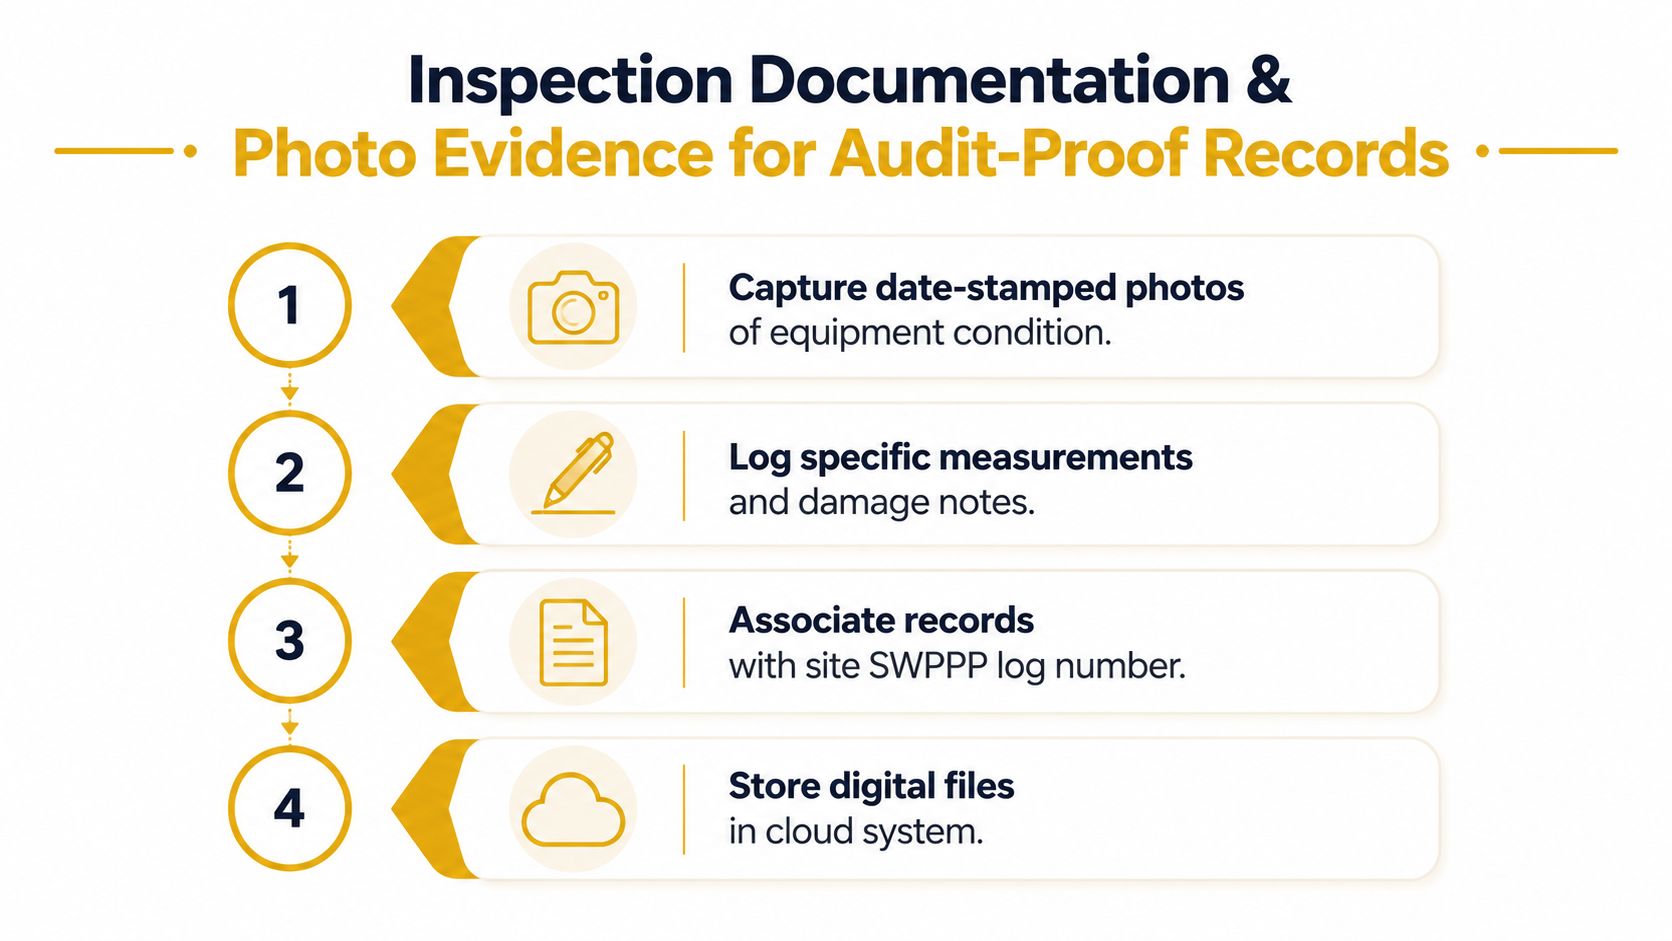
Capture date, time, pan ID, crew or operator name, weather, and a short pass/fail note for each item. That's the minimum useful set because it ties the inspection to a specific asset at a specific moment. If the site uses a SWPPP log or similar environmental file, keep the inspection linked to that folder so the trail is easy to follow later.
The photo set should be just as disciplined. A practical approach is three reference photos per shift, one overview, one wall close-up, and one showing the freeboard or fill condition. Those images give you context, detail, and a condition marker in one package.
Why digital records beat loose paper
Paper checklists tend to break at the worst possible moment. A form gets wet, a box stays blank, or somebody files it in a truck seat instead of a job folder. Digital forms with required fields and timestamps reduce that mess, and they make it much easier to show what was found and who signed off.
Keep the record simple enough that the foreman will actually finish it in the field.
That matters more than many teams admit. The best form in the world is worthless if the crew treats it like a clerical chore and fills it out from memory after the day is over.
Build a single rental folder
Keep one folder for each rental. Put delivery photos, daily inspection photos, defect notes, and return photos in the same place, in order. When a damage claim shows up weeks later, that folder is the difference between a quick answer and a long argument.
The bigger lesson is that documentation isn't separate from inspection. It is the inspection, made durable. Without it, you're asking the rental relationship to run on trust alone, and trust is a weak defense when money is on the line.
Reading the Fees and Surcharges Before You Sign
The rental company's fee page should be treated like part of the checklist, not fine print for accounting to discover later. Most surprise charges on a washout pan come from the fact that nobody on the crew read what the return conditions were. If you know the rules before delivery, you can inspect and handle the pan in a way that avoids the common surprise bill.
What to look for on the surcharge page
Expect categories like delivery, rough-terrain or limited-access sites, express orders, and post-return cleaning or damage. Those are the areas where the rental company is protecting itself from extra handling or a pan that comes back in worse shape than expected. The point isn't to memorize a fee table, it's to know what condition the company will inspect on return.
That changes how you use the pan every day. If cleaning is part of the return condition, the crew has to manage residue and rinse timing accordingly. If access is charged separately, the superintendent needs to plan placement so the delivery isn't pushed into a penalty lane by poor site access.
Make the return criteria part of the field routine
A good surcharge review helps the crew avoid arguments they could've prevented. If the company cares about clean return condition, then the on-site inspection must include residue buildup, wall damage, and missing accessories. If the company flags limited access, the pre-delivery review should confirm that the chosen location isn't going to create a special delivery event.
Here's the trade-off: you can treat fees as a billing problem after the fact, or you can treat them as a jobsite condition issue before the pour. The second approach takes less time than one disputed invoice.
Don't wait until pickup to learn the rules
That's the mistake crews make most often. They assume the return process is intuitive, then get surprised when the yard rejects the asset or charges for cleaning they thought was included. Reading the surcharge page up front lets the foreman align the inspection checklist with the rental terms instead of discovering them at pickup.
The result is tighter control over the whole rental cycle. You spend a few minutes up front and save the much bigger cost of a pointless back-and-forth after the job is done.
Post-Return Handoff That Keeps the Deposit Intact
The last hour on site is where discipline usually slips. Everybody's tired, the pour is over, and someone says the rental yard will “figure it out.” That's exactly how deposits get pinned to vague damage claims, so the return-day handoff needs the same fixed routine as the arrival check.
Clean, document, and confirm before pickup
Solidify and dispose of residue per local rules, then sweep and rinse the pan if the rental terms allow it. Take photos of the clean interior and all four walls before the driver hooks up. Confirm that any accessories, like covers, signage, or the spill kit, are still present, because missing pieces often become part of the dispute later.
If the pickup driver gives a condition note, capture it. That note matters because it creates a shared record at the moment of transfer, while everyone can still see the asset in the same condition.
The two mistakes that cost crews money
The first mistake is assuming the rental company will handle cleaning ambiguities in your favor. They usually won't, because they're comparing the return condition to their own standards and whatever the paperwork says. The second mistake is skipping the photos because the job is over and nobody wants one more task.
Neither mistake saves time in the long run. Both create a gap between what the crew remembers and what the company can charge.
Return photos are cheap. Reconstructing a disputed return is expensive.
Make the handoff look like a handoff
The cleaner the handoff, the less room there is for a claim to grow teeth. Keep the return checklist short, do the work in order, and leave the site with a documented condition note if the driver offers one. That's how you protect the deposit and keep the next rental relationship smooth.
Your Printable Washout Equipment Inspection Checklist
A superintendent should be able to hand this to a new crew member on day one and get the same result every time. The four-stage lifecycle matters because it keeps the inspection tied to the asset's actual path, from truck arrival to final pickup, instead of treating the pan like a one-time form.
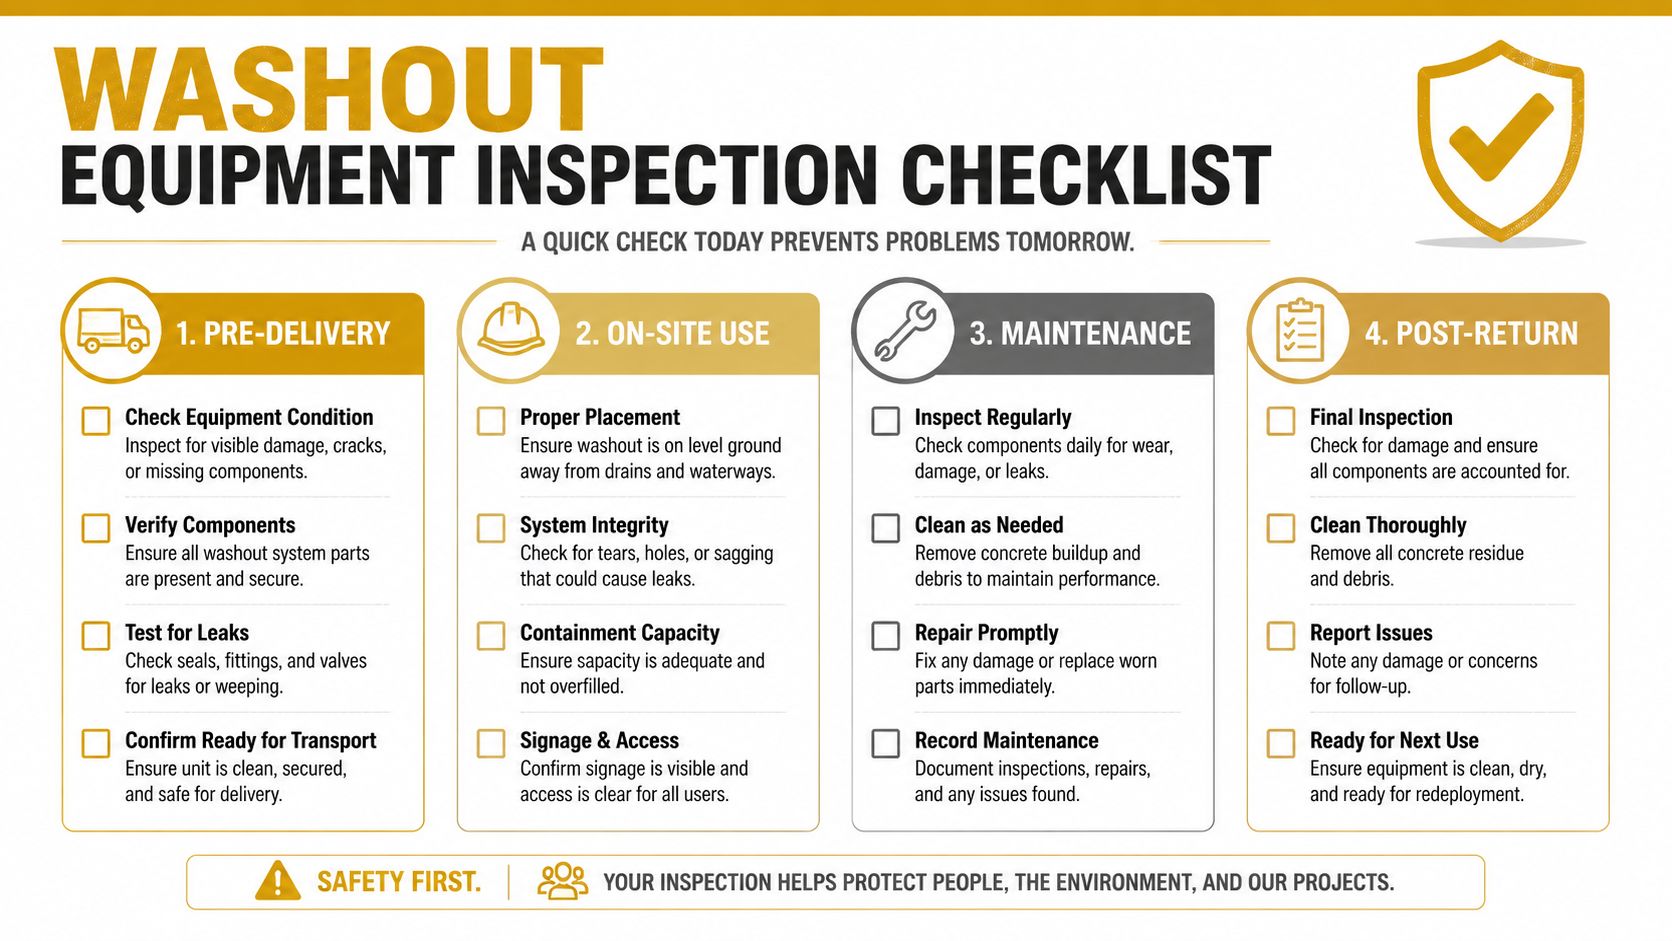
Pre-Delivery
- Match asset ID and class to the rental order before dispatch.
- Verify declared capacity fits the pour plan and site demands.
- Review arrival photos for damage, missing parts, or obvious wear.
- Check paperwork for delivery window, contacts, and surcharge terms.
On-Site Use
- Walk the pan in sequence every day or shift.
- Check for cracks, leaks, and seam issues before the first discharge.
- Confirm level placement and freeboard so overflow risk stays controlled.
- Keep signage, covers, and spill kit present and easy to access.
Maintenance
- Tag out defects immediately and keep the pan out of service.
- Track corrective action with photos and a supervisor note.
- Verify repairs before return to service so the pan doesn't cycle back unsafe.
Post-Return
- Remove residue per local rules and return the pan in the agreed condition.
- Photograph the clean interior and walls before pickup.
- Confirm accessories are present and note the driver's condition record if offered.
- File all records in one rental folder for the next invoice or audit.
Track two things across pours, defect-detection rate and surcharge incidents per rental. Those numbers tell you whether the checklist is catching problems early or just creating paper. A team that watches those two measures usually spots weak points in delivery, daily inspection, or return handling fast enough to fix them before the next job.
If you want a washout rental process that already lines up with the way crews inspect, document, and return containment gear, take a look at Reborn Rentals. Their checkout flow puts pricing and surcharge categories up front, which makes it easier to keep your inspection checklist aligned from delivery through pickup.