
Spill Containment Procedures for Concrete Sites
The trucks are already arriving, the pump is charged, and someone needs to rinse a chute before the next load takes position. Then the rinse bucket tips on a sloped slab, slurry starts moving toward a curb inlet, and the crew has seconds to decide whether to dam it, divert it, or call for help. That decision is the practical heart of spill containment procedures on a concrete site.
Concrete washout isn't ordinary construction runoff. EPA guidance describes washwater as highly caustic, with a pH near 12, comparable to drain cleaner at pH 13.5, and notes that it can contain toxic metals. If it reaches soil or water, it can alter soil chemistry, inhibit plant growth, contaminate groundwater, and harm fish EPA concrete washout guidance.
Why Concrete Washout Spills Need Immediate Control
During an active pour, a rinse bucket can tip, a liner can shift, or a washout container can reach its fill limit before the next truck arrives. Slurry then moves across finished pavement, follows the grade, coats boots, and heads toward the nearest drain. Waiting for it to settle enlarges the cleanup area and makes the drainage route harder to protect.
Wet cement can burn skin when trapped against boots or gloves. Alkali splashes can injure eyes, and hardened material can block curb inlets, trench grates, and temporary drainage. The schedule can suffer as well. Crews may have to stop placing concrete, protect finished work, clear blocked drainage, and arrange specialized cleanup before the next operation starts.
Practical rule: Treat the first minutes of a washout failure as a control operation, not a cleanup task.
Fill level is an operational decision, not just a housekeeping detail. If the container is approaching its working limit, pause rinsing and contact the rental provider or designated waste hauler before the next washout. Rain adds another load, especially where the containment system has limited freeboard or little room for a backup unit. In a tight site, moving a full container may require shutting down truck access, so the response plan must account for retrieval space and timing.
Uncontrolled washout can also affect the project's SWPPP record. Inspectors may find a discharge, an unprotected inlet, a leaking liner, or missing corrective-action notes. Depending on the permit and local requirements, the superintendent may need to involve the environmental manager, owner, or regulator. A fuel or hydraulic leak mixed with cement slurry creates separate waste streams that the crew must control and document.
Record the time, location, estimated volume, containment actions, affected drainage features, photographs, and who was notified. The response sequence is straightforward: stop the release, protect people, block migration, capture the material, and document the result. That order protects workers, the schedule, and downstream waterways.
Planning the Washout Area and Rental Setup
The washout area has to work under pressure, not just look suitable on the site plan. Before the first truck arrives, walk the pour footprint and mark storm drains, ditches, surface waters, trenches, low spots, finished surfaces, and truck paths. Confirm stable support, room for mixer access, and a route for a pump truck or service vehicle if the system needs emptying during the pour.
Keep the designated area at least 50 feet from storm drains, ditches, and waterbodies, following the Kentucky concrete waste management guidance. Apply the setback to the actual drainage pattern, not just the map distance. A washout uphill from an inlet can still send slurry toward it. Berms also need protection from truck tires, and the rental provider must be able to retrieve a full container without crossing active work.
Size for the pour, rain, and operating pace
Estimate more than chute rinsing. Include bucket cleaning, pump priming slurry, rejected concrete, and water entering the system during rain. Kentucky EPSC guidance calls for at least 6 cubic feet of containment volume for every 10 cubic yards of concrete poured.
Use that figure as the starting point, then reserve freeboard for real site conditions. A container that matches the planned pour can reach its limit early when trucks arrive close together, a pump requires extra rinsing, or rainfall enters an uncovered system. Set the fill trigger before placement begins. A practical trigger is the 75% capacity threshold. At that point, pause or redirect washout and contact the rental provider or designated waste hauler. Confirm who can pump, swap, or remove the unit, and how quickly they can arrive.
Rain needs its own decision. A cover may reduce inflow, but it can restrict access or collect water if installed poorly. Pumping preserves space, yet requires compatible equipment and a controlled discharge or disposal route. In a tight site, a backup pan may be easier to stage than a second large container, while a full unit may still require temporary shutdown of truck access for retrieval.
Match the rental to site logistics
Steel pans provide rigid sides and clear inspection points, but they need lifting equipment and a firm base. Plastic containers are easier to position in constrained areas, though traffic can puncture the walls or damage the liner. Lined pits can provide useful volume where excavation is permitted, but the liner needs protection from sharp material and a removal plan after the concrete hardens. Roll-off bins suit larger operations when the truck can reach the location without crossing unstable ground.
| Washout Containment Options Comparison | |||
|---|---|---|---|
| Method | Typical Capacity | Best Use | Key Trade-Off |
| Steel washout pan | Select to match the planned pour and rinse demand | Active pours with regular truck access | Durable and visible, but needs stable placement and retrieval access |
| Plastic container | Select by verified liquid and solids capacity | Short-duration work or constrained sites | Easy to position, but vulnerable to puncture and traffic damage |
| Lined pit | Sized from the pour plan and local site constraints | Projects with permitted excavation space | High flexibility, but liner integrity and removal require close control |
| Roll-off bin | Match the rental bin to expected solids and washwater | Larger pours or high-volume cleanup | Efficient removal, but delivery and pickup depend on truck access |
Confirm the handoffs
Keep the pre-pour checklist short enough for field use:
- Location approval: Confirm setback, slope, access, and protection from traffic.
- Capacity confirmation: Compare container or pit volume with the pour plan and the 75% fill trigger.
- Weather review: Check rain conditions and decide whether the system needs a cover, pumping, or earlier cleanout.
- Rental coordination: Confirm delivery time, placement requirements, pickup timing, pumping or swap-out arrangements, and rough-terrain limits.
- Communication: Tell the foreman, pump operator, truck drivers, QC inspector, and SWPPP contact where washout occurs and who authorizes a change.
Document the agreed location, capacity, rental contact, fill response, and backup option before the pour. A backup area matters if reinforcement, excavation, deliveries, or changing access blocks the primary location. It does not need to be installed immediately, but approval, access, and setup requirements must be understood before the first rinse.
Responding to a Concrete Spill or Overflow
A response works when every person knows the first action and the person directing the next one. Don't send six workers in different directions. Assign one spill lead, one person to protect drainage, one person to manage the concrete operation, and one person to contact supervision or environmental staff when escalation is required.
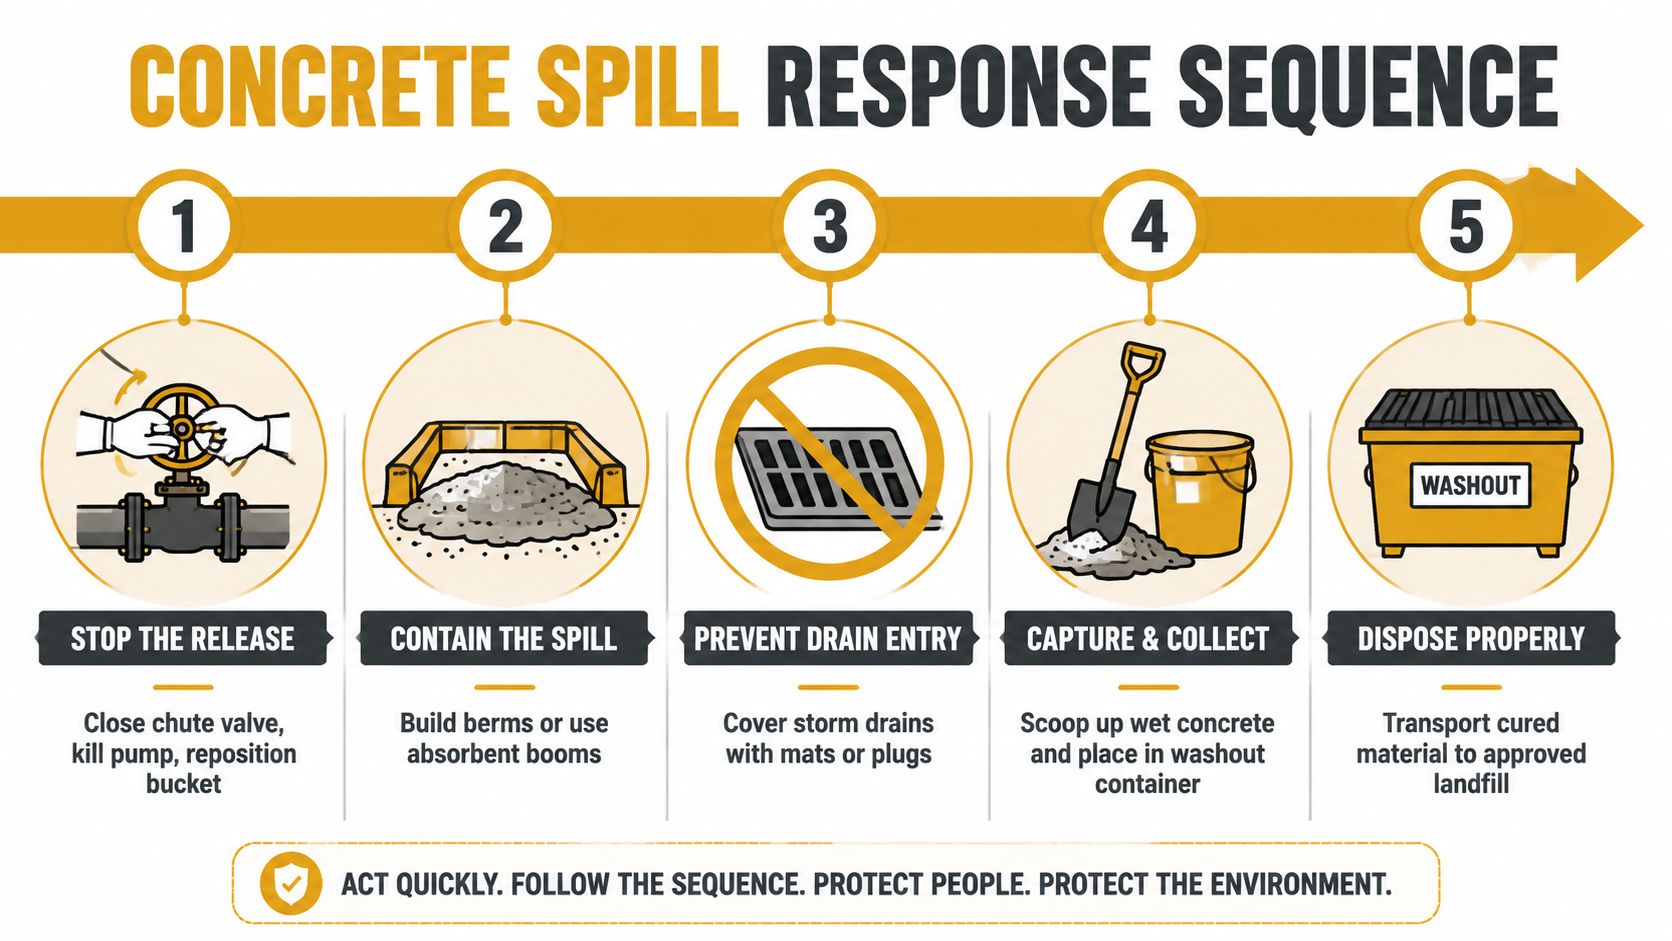
Stop the source first
The nearest trained operator should close the chute valve, kill the pump, stop the rinse, or reposition the bucket. Don't begin shoveling while another person continues adding water or slurry. If a hose has failed, isolate it. If a pan is overtopping, stop all washout into that pan and move the operation to an approved backup system only after the spill lead confirms the route is protected.
Protect people before the material
Move unnecessary workers away from the release and keep them clear of splash and vehicle movement. Anyone who contacted wet cement should address the exposure promptly under the site's safety procedure, especially where slurry entered boots, gloves, sleeves, or eye protection. Keep a single person in charge of the work zone so the crew doesn't create additional tracks or disturb contaminated material.
Build control downhill
Use dry absorbent, sand berms, absorbent booms, temporary plugs, drain covers, or other suitable barriers to form a downhill perimeter. Protect curb inlets and trench grates before the slurry reaches them. If material is already moving across pavement, stop it at the leading edge first, then work back toward the source.
The first barrier doesn't need to be elegant. It needs to stop the flow and stay stable while the crew captures the material.
Scoop wet concrete into the designated containment system where practical. Use a wet vacuum for thin residue only when the equipment and receiving container are suitable for cement slurry. Don't wash the pavement toward a drain, and don't dilute the problem into a larger runoff path.
Escalate on clear triggers
Call the superintendent or environmental lead when the release exceeds available containment, reaches a storm drain or surface water, threatens to leave the site, or combines with fuel, hydraulic fluid, or another material. The spill lead should record the time, source, approximate area, drainage features threatened, controls installed, personnel notified, and final disposition of collected waste.
The cleanup handoff isn't complete until the response lead verifies that the source is stopped, drainage protection remains in place, collected material is secured, and the area has been photographed and logged.
Choosing Washout Pans, Containers, and Containment Methods
During an active pour, containment choice depends on more than volume. The crew must account for truck movement, rain, hose routing, available freeboard, and how quickly the unit can be removed. A shallow open pan may suit a controlled chute rinse, yet leave little margin for pump priming slurry, repeated mixer washout, or a rain event. A lined pit offers more room, but a torn liner, cut berm, or equipment track can turn that capacity into a release.
Use the earlier method comparison to select the basic system. This section focuses on the operating decision that often determines whether that system works: staged swap-outs. Match the setup to the work sequence. Chute rinsing needs a stable lip and convenient truck positioning. Pump operations may need greater depth and a clear hose route. High-frequency pours may justify two moderate-capacity units rather than one oversized unit if the larger unit cannot be removed before it fills.
Use staged swap-outs
Keep a second pan or container ready when space, traffic, or rental timing makes immediate removal difficult. The active unit receives current rinsing. The standby unit sits where the service truck can reach it without crossing the pour area or tracking through wet material. Once the active unit approaches its project-defined fill threshold, stop adding washout, switch to the standby unit, and arrange pickup or exchange.
This arrangement preserves freeboard during a long pour and reduces the pressure to keep using a container that is already too full. It also carries a trade-off. The spare unit needs space, stable ground, and a delivery or pickup route. In a constrained yard, those access requirements may outweigh the benefit of extra capacity, so confirm the swap path before the pour begins.
Rain changes the calculation. A covered unit protects usable capacity, while an uncovered pan or pit may lose room to rainfall before the next truck arrives. Check the forecast, secure covers without blocking chute access, and allow room for collected water if the unit must remain outside. Inspect after rain and before restarting work.
Check for sagging walls, wet ground beyond the liner, torn seams, displaced berms, slurry trails, blocked access, and water entering the unit faster than planned. A container can remain intact and still be a poor control if truck traffic prevents safe servicing or pickup.
Reborn Rentals lists ready-to-deploy concrete washout pans and containers, including a 72' x 72' x 24' unit at approximately 18.25 tons and 441 gallons, and a 72' x 72' x 14' option at approximately 310 gallons. Confirm current specifications, delivery conditions, and site access directly through Reborn Rentals. Treat those listed capacities as planning inputs, not automatic working capacity. Solids, rain, and removal timing reduce available freeboard, so record the selected unit, expected pour volume, swap trigger, and pickup plan before work starts.
Decontaminating Equipment and Handling Collected Waste
Cleanup should follow one controlled waste stream. If the crew rinses a hopper onto bare ground, scrapes tools beside a drain, and sends vacuum residue to a separate container, the site loses track of where the contamination went. The washout setup should receive equipment rinse water, captured slurry, and wet residue from the response unless the project's approved waste plan directs otherwise.
Begin with suitable PPE for wet cement exposure, including gloves, eye protection, and waterproof boots selected under the site safety program. Keep unnecessary workers out of the cleanup zone. Rinse chutes, hoppers, tools, and wheels only in the designated area, away from stormwater features, and direct the water into the same containment system used for the spill.
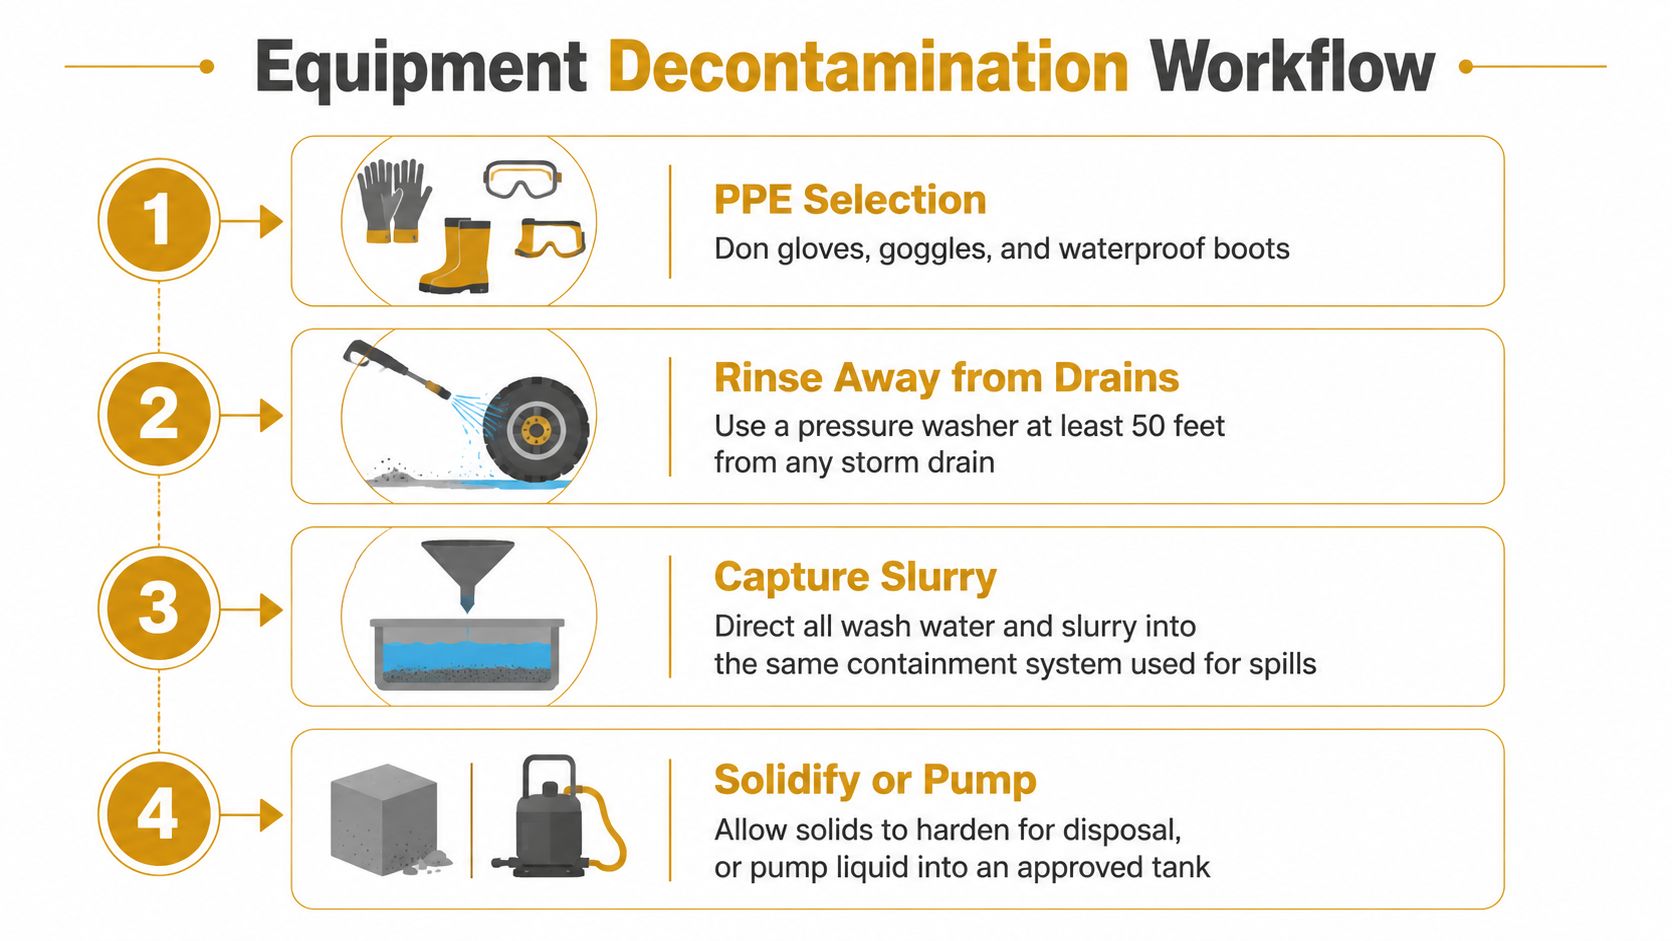
Choose hardening or pumping deliberately
For a small pour, allowing captured solids to harden in a suitable lined container can simplify handling. The crew can then break the cured material into manageable pieces and transfer it according to the project's approved disposal or recycling route. This method only works when the container can remain secure, the cured mass won't prevent future containment, and rain won't turn the remaining liquid into an overflow risk.
Larger slurry loads often justify vacuum or pumping service. Pumping preserves container capacity and keeps the active pour from being forced into an overfilled system, but the receiving tank, hose route, service timing, and waste destination must be confirmed in advance. Don't pump liquid into an unapproved tank or onto ground that hasn't been designated for containment.
Close the chain of custody
Record what was collected, where it went, and who accepted it. Keep service tickets, disposal receipts, recycling documentation, photographs, and notes on whether material was hardened, pumped, transported, or transferred. If the cleanup involved an incident, attach the waste record to the incident log so the corrective action can be verified later.
The final inspection should cover the pan or pit, surrounding ground, nearby drains, equipment wheels, hose connections, and traffic paths. A clean-looking surface isn't proof of a completed response if residue remains in a low spot or under a container edge.
Meeting SWPPP, Permit, and Documentation Requirements
During an active pour, a washout area can meet the plan and still fail operationally. A truck may arrive with less usable capacity than expected, rain may be moving in, or limited space may force the container close to a drain. The SWPPP should address those decisions before the crew has to make them. Concrete washout discharges are restricted under construction and development effluent guidelines, so an overflow is more than a housekeeping problem.
Project requirements depend on the work and the governing documents. Recent guidance identifies sites disturbing one acre or more, along with smaller sites included in a larger common plan, as needing a detailed washout plan 2026 concrete washout and SWPPP guidance. Smaller renovations still need a containment decision. Confirm the applicable permit, local requirements, owner conditions, and common-plan status instead of using project size as the only test.
Put the control on the plan and on the ground
The SWPPP or equivalent site plan should show the washout location, truck and pump access, drainage protections, inspection responsibility, and removal method. It should also state how the crew will keep washwater and solids off soil, account for rain, and respond when the primary container nears its fill threshold, becomes damaged, or cannot be reached by the rental service.
Space affects the control choice. A tight urban site may need a smaller container, a different truck route, or more frequent pickup. A larger project may justify mapped controls, scheduled pump-outs, subcontractor coordination, formal inspection reports, and disposal records. Rental timing matters too. Confirm container delivery, exchange or pumping availability, hose access, and the receiving facility before the pour, not after the pan is nearly full.
A small job may use a designated, leak-proof container and a short inspection record. Local authorities and permit conditions can add requirements, so the site manager should verify the governing documents before work begins.
Capture evidence while the work is happening
| SWPPP and Documentation Elements for Concrete Washout | |||
|---|---|---|---|
| Documentation Item | Purpose | When Captured | Who Keeps the Record |
| Site map and washout description | Shows location, drainage relationship, and control method | Before mobilization and after site changes | SWPPP manager or designated environmental lead |
| Pre-pour check | Confirms placement, liner condition, access, and capacity | Before each active pour | Foreman or superintendent |
| Inspection log | Records condition, fullness, weather exposure, and repairs | During routine inspections and after heavy rain | Assigned inspector |
| Incident note and photographs | Establishes what happened and what controls were used | Immediately after a spill, overflow, or near miss | Spill lead with project management |
| Volume and removal record | Tracks pumping, hardening, transport, disposal, or recycling | At each service or cleanout | Contractor and waste vendor |
| Corrective-action record | Shows how the failure was fixed and prevented | After the event and during plan review | SWPPP manager or project engineer |
Record the decision as well as the condition. Note whether rain changed the setup, whether capacity crossed the project's action threshold, who ordered a pump-out or replacement, and which rental or waste provider handled the material. Keep photographs, service tickets, disposal receipts, recycling records, and corrective actions with the project file. The planning principle is simple: design controls before the pour, then document how crews used and adjusted them.
Inspection, Training, and Continuous Improvement
A washout plan can be accurate on paper and still fail when a crew skips the pre-pour check. Assign one person to inspect the containment area, confirm its condition, and record the result. Do not leave the plan in the trailer and assume the setup remains workable throughout the pour.
Run the same short field loop
Before the pour, walk the washout area and check placement, liner integrity, label visibility, truck access, freeboard, and the route to the nearest drain. During active work, watch the liquid level, wall movement, hose position, traffic conflicts, and weather. If rain is approaching or the pour sequence changes, decide whether to cover, pump out, relocate, or bring in another container. At shift end, confirm that buckets and tools are accounted for, the system is not leaking, and the next cleanout or pickup is scheduled.
A one-page log is enough:
- Pre-pour: location, container condition, access, capacity, and weather decision.
- During work: check time, approximate fill condition, active controls, and responsible person.
- After work: damage, overflow signs, cleanup status, waste destination, and photographs.
- Correction: repair, pump-out, replacement, relocation, or change to the next pour plan.
Inspect daily and after heavy rain. Pump out at 75% capacity to leave working room and reduce overflow risk, as noted in the Planning section. The action point may need to come earlier when rain is forecast, the container is small, access is restricted, or a rental exchange will take time.
A full container is only one failure signal. Rain exposure, a damaged liner, blocked access, or a revised pour sequence can require action sooner.
Turn findings into the next briefing
After each pour, discuss one near miss and one practical improvement. Move the pan if trucks are turning too close, add a cover before rain, stage a spare container when rental delivery is uncertain, change the pump-out time, or place the drain cover kit closer to the work. Assign one owner to update the inspection log, rental arrangement, SWPPP notes, and next toolbox talk.
If the same overflow or access problem returns, change the setup before the next truck arrives. Paperwork does not correct a container that is too small, a pump-out that cannot be scheduled, or a location that crews cannot reach safely.
Reborn Rentals provides concrete washout pan and container rentals for active pours, renovation work, and short-duration containment needs. Confirm delivery and site logistics before mobilization, then arrange the setup that matches the pour at Reborn Rentals.