
Sustainable Construction Practices: A Site Manager’s
A concrete pour rarely fails because the crew doesn't understand sustainability. It fails because the trucks arrive early, the pump is already primed, the access road is crowded, and nobody has confirmed where the washout water will go. By the time someone notices slurry moving toward a drain, the site has become a compliance problem.
That's why practical sustainable construction practices start with site control, not a product brochure. Recycled steel, low-emission finishes, efficient insulation, and careful design all matter, but they can't compensate for unmanaged waste and poor documentation. Concrete washout containment is one of the simplest places to establish discipline because it forces the team to plan location, capacity, inspection, cleanup, and disposal before the work gets hectic.
The Unseen Mess That Undermines Green Projects
The morning pour begins with familiar noise. Mixer trucks queue at the gate, the pump operator checks the boom, finishers move between forms, and laborers clear a path through pallets, packaging, and offcuts. At the edge of the work area, a driver needs to rinse the drum and chute. If the crew hasn't prepared a controlled washout point, the nearest open ground or storm drain becomes the default.
That alkaline water carries cement fines with it. A small release can spread quickly across compacted soil, pavement, or a sloped access route. The problem isn't limited to what the site looks like. Uncontained washout can create runoff exposure, trigger corrective work, complicate an inspection, and undermine the environmental controls documented in the project's SWPPP.

Sustainability starts where the mess starts
The construction and operation of buildings remain major climate drivers. The IEA's Global Status Report for Buildings and Construction reported that buildings and construction represented 36% of final energy use and 39% of energy- and process-related CO2 emissions in 2018. Manufacturing materials such as steel, cement, and glass accounted for 11% of those emissions, which makes material selection important, but it also makes waste prevention a practical responsibility.
A project can specify lower-impact materials and still perform poorly if crews waste cementitious products, contaminate recyclable loads, or leave disposal records incomplete. Sustainability is a chain of decisions. The weakest daily control can compromise the credibility of the whole chain.
Site rule: If a truck can't reach the washout area without crossing an active work path, the area isn't properly planned.
The cost of treating washout as an afterthought
The usual excuse is convenience. A temporary pit near the pour seems faster than setting up a proper basin. In practice, that choice creates more handling, more exposure to rain, and more opportunities for a driver or pump operator to use the wrong location. Cleanup then becomes a rushed closeout task instead of a controlled part of production.
The same principle applies to other waste streams. A documented construction waste management standard from Yale describes weight-based diversion measurement, source separation, reuse, and recycling as core controls. Concrete washout belongs in that system because it's a high-volume, high-risk waste stream generated during normal operations.
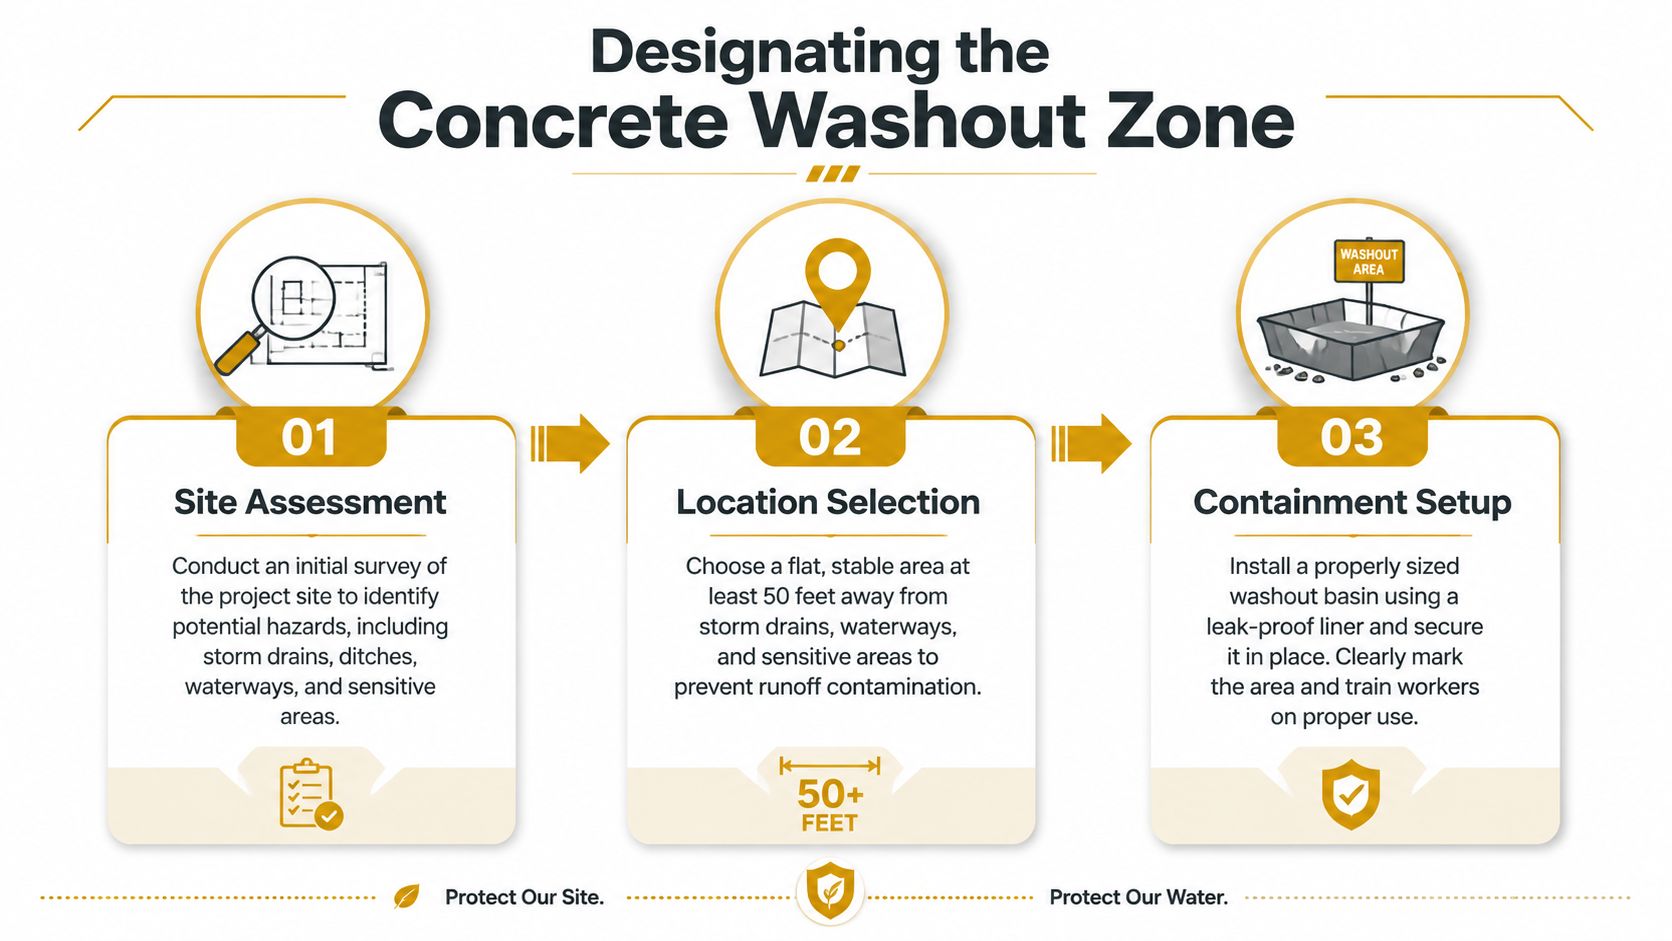
Designating the Concrete Washout Zone
Approve the washout location before the first truck is dispatched. If drivers have to ask where to rinse, the site is already relying on improvisation. The zone must support truck and pump movements while keeping slurry away from storm drains, surface water, steep grades, and routes where runoff could leave the property.
Review the civil plan, SWPPP map, and current field conditions together. Drawings may show drainage features, but grading changes, temporary inlets, haul roads, and stockpiles can change the exposure. Walk the proposed route with the superintendent, concrete subcontractor, and erosion-control lead. Mark the path a driver will use, including entry, turning, backing, and exit.
Three checks before you approve the location
Check drainage: Locate storm drains, inlets, ditches, swales, exposed soil, and any route toward a water body. Keep the zone clear of these pathways. Do not depend on a berm that a truck can drive over.
Check ground stability: Use a flat, stable surface that will support a loaded pan or container. Soft fill can settle, tilt the unit, reduce capacity, and create a low edge where liquid escapes.
Check traffic: Keep the entrance clear of rebar deliveries, forklifts, excavators, and pedestrian routes. If the unit obstructs production traffic, someone will eventually move it without updating the plan.
The field setup must match the SWPPP map. A location shown on paper provides little protection if the actual route leads around the containment area, or if changing grades direct runoff toward it.
Match the zone to the pour
Place the washout point close enough to prevent drivers from carrying wet residue across the site, while keeping enough separation from drainage features to contain a minor mistake. Provide turning room, and avoid backing movements that trap workers between trucks and fixed objects.
Size the containment around the work, not the average pour. Account for truck count, pump activity, chute rinses, and planned cleanup before choosing the method. A small renovation may suit a compact pan. A structural pour or civil placement may need multiple units, scheduled servicing, or a larger container with separate capacity for liquid and hardened residue.
Inspect the route before the pour and again after major grading or access changes. A washout zone is a production control, not a permanent mark on a plan.
Post clear signs at the entrance. Use the words CONCRETE WASHOUT, name the person or crew responsible for the area, and give drivers three direct instructions: use this location only, keep the truck inside the containment boundary, and report damage or rising levels immediately.
Linking Containment to Carbon Goals
Washout containment is routine housekeeping with direct consequences for embodied-carbon accounting. Concrete slurry represents material that has already passed through extraction, processing, transport, batching, and delivery. If it spills and hardens outside controlled containment, the project may need excavation, cleanup, replacement fill, or disposal of contaminated material. The site then carries added handling and equipment impacts that never appear in the original concrete order.
Sustainable construction practices have to cover operational energy and embodied carbon. The IEA buildings analysis reported that buildings accounted for 32% of global energy demand and 34% of CO2 emissions in 2023, including 9.8 GtCO2 from operational emissions and about 2.9 GtCO2 from embodied carbon in construction materials. Construction waste therefore belongs in the carbon conversation, not in a separate housekeeping file.
Measure the material before claiming progress
Start with a basic reconciliation. Record what enters the project, what remains in the finished asset, and what leaves as waste. Apply the same discipline to concrete washout, steel, timber, packaging, drywall, and excavation materials.
For waste control, set a diversion target by weight. Major standards and institutional specifications commonly use a target of at least 75% diversion by weight. Documented Canadian demolition programs have reached 84% to 85% overall diversion and 76% diversion for construction and renovation work through source separation and documented reuse or recycling, as described in the Yale construction waste management specification.
The destination still matters. Landfill cover and low-value downcycling can improve a diversion report without preserving comparable material value. Require haul tickets, identify the receiving facility, and record whether the concrete enters legitimate reuse or recycling.
Connect washout records to the project carbon model
Embodied-carbon analysis depends on a defined boundary and consistent records. The Carbon Leadership Forum's EC3 methodology describes benchmarking upfront emissions across stages A1 to A5 and comparing normalized measures such as kg CO2e per square meter. EC3 is an open-access system for comparing material options and procurement decisions.
Washout containment gives that model better field data:
It protects material accounting: Reconcile concrete delivered with concrete placed, returned material, and hardened washout residue.
It prevents secondary impacts: A spill can trigger soil removal, hauling, replacement material, and additional equipment use. A basic material schedule may miss those activities.
It preserves sorting quality: Clean, separated concrete has a better chance of reaching a legitimate reuse or recycling stream than mixed, contaminated debris.
It creates a repeatable control: A documented washout inspection is easier to audit than a general claim that the site “minimized waste.”
Measurement remains a practical bottleneck. Recent reporting cited by the World Economic Forum's Sustainable Construction Barometer found that 67% of professionals evaluate project carbon footprints, while only 30% do so systematically. The same reporting noted that 30% cite insufficient knowledge and skills. A controlled washout zone gives supervisors one visible checkpoint where environmental requirements become a daily, auditable site action.
Deploying and Managing Containment Solutions
A containment unit works only when the crew manages it as production equipment. Set it up, inspect it, protect it from rain, and remove it before capacity becomes a crisis. The most common failure isn't that a pan exists. It's that nobody knows how much room remains inside it.
Select capacity from the work plan
Ask the concrete subcontractor for the expected number of truck rinses, pump priming requirements, chute washouts, and cleanup activities. Don't size the unit from the footprint alone. A broad pan with limited depth may provide less usable liquid capacity than a deeper container, and hardened residue can reduce working volume as the pour progresses.
Use the manufacturer's stated liquid and load capacities. Keep the unit level, inspect the liner or basin for tears, and make sure the sides are supported. If the planned pour may exceed one unit's practical capacity, arrange a second unit or a service exchange before placement begins.
Typical washout pan capacities
| Dimension | Approx. Liquid Capacity | Approx. Load Capacity |
|---|---|---|
| 72' x 72' x 24' | Approximately 441 gallons | Approximately 18.25 tons |
| 72' x 72' x 14' | Approximately 310 gallons | Not specified |
The capacities above come from the publisher's listed rental options. Confirm the current specifications, access requirements, and site conditions before ordering. The apostrophe notation in the dimensions should also be checked with the supplier so the crew understands the actual unit size and doesn't plan truck access around an incorrect assumption.
Keep rain out of the calculation
Rainwater is an uncontrolled addition to the containment volume. Cover the pan or container when it isn't actively receiving washout, and secure the cover so wind doesn't turn it into a hazard. A missing cover can fill the unit before the next pour, leaving no usable allowance for slurry.
Assign one person to check the level before the first truck arrives and again during the pour. The inspection should look for:
Rising liquid: Stop use before the liquid approaches the working limit.
Accumulated solids: Hardened concrete can occupy space even when the liquid level appears manageable.
Damaged containment: Remove the unit from service if the liner, wall, frame, or base has shifted.
Unsafe access: Keep workers clear of pinch points, unstable edges, and truck backing paths.
A rented pan can suit a short-term placement when the site lacks storage or the project needs a quick deployment. Reborn Rentals lists washout pans and containers with stated liquid and load capacities, date and location selection, and delivery arrangements. Treat any rental as part of the site logistics plan, not as a substitute for inspections and trained operators.
Executing Disposal and Compliance Protocols
The Superintendent owns the disposal workflow from the moment the unit reaches capacity. Assign responsibility for monitoring, service authorization, and destination approval before removal becomes urgent. A cured slab left on site can become a compliance problem, not a finished task.
Stop adding material at the practical limit. Isolate the unit until the residue has hardened enough for safe handling, then follow the supplier's removal instructions. A dried slab is not automatically acceptable for burial, grading, or undocumented fill. Local waste rules, permit conditions, and project specifications determine where it may go.
A controlled closeout sequence
Confirm the waste stream: Identify the material as concrete washout waste. Keep it separate from general trash, soil, wood, packaging, and hazardous products.
Verify the receiving facility: Confirm that the disposal or recycling facility accepts hardened concrete washout residue and ask what paperwork it requires. Requirements differ by jurisdiction and facility.
Break down safely: Use suitable equipment in a controlled work area to reduce the hardened mass into manageable pieces. Keep workers clear of suspended loads and establish an exclusion zone around breakers, loaders, and dumpsters.
Load an approved container: Do not overload the dumpster or place pieces where they could fall during transport. Secure the load according to the hauler's instructions.
Collect proof: Retain weight tickets, receipts, manifests, facility confirmations, and service records. Connect each document to the project, date, waste stream, and destination.
Restore the zone: Remove residual concrete, inspect the ground and nearby drainage controls, and update the SWPPP record if construction changed the location or control.

Paperwork is part of the environmental control
During an audit, “the hauler took it” does not establish proper disposal. The project file should show what left the site, when it left, where it went, and who accepted it. Keep photographs of the containment area, inspection entries, damaged-unit repairs, final cleanup, and the empty or removed unit.
Waste diversion claims also require a clear destination and material outcome. Record where the concrete went and how it was handled, rather than treating a truck departure as proof of meaningful reuse.
A closeout file should contain:
Site map evidence: The washout location shown on the SWPPP or equivalent environmental plan.
Inspection records: Dates, responsible personnel, observed level, condition, and corrective actions.
Service documentation: Delivery, exchange, pump-out, or removal records.
Disposal records: Tickets or receipts from the approved receiving facility.
Incident reports: Details of spills, overflow, damaged containment, and response actions.
Final verification: A signed check confirming that no washout residue remains in drainage paths or unapproved ground areas.
If a spill occurs, stop the source, protect nearby drains, notify the responsible environmental lead, and follow the project's incident-response procedure. Do not wash the material toward a drain to make the pavement appear clean. That spreads the problem into the drainage system.
Daily Site Checks for Sustainability
A sustainable site is managed through ordinary decisions repeated without exception. The daily walk should catch a missing cover, a damaged liner, an unmarked route, or a rising level before a truck operator has to improvise.
Use a short checklist that the supervisor can complete during the normal site inspection. The form doesn't need elaborate software. A dated paper log, project application, or inspection platform is acceptable if the entries are legible, attributable, and retained with the environmental records.
Before the pour
Confirm the location: Verify that the washout zone remains on the SWPPP map and that current grading hasn't created a new runoff path.
Inspect containment: Check the pan, liner, seams, supports, and base for damage or settlement.
Check access: Walk the truck route and remove stored materials, debris, or equipment that could force unsafe backing or relocation.
Confirm capacity: Account for existing liquid, hardened residue, and rainwater. Arrange another unit or servicing if available capacity is inadequate.
Brief the drivers: Tell mixer operators, pump crews, and finishers where to wash out and who to contact if the unit is full or damaged.
During the pour
Watch the first truck closely. It tells you whether the route, signage, turning space, and containment setup work under real conditions. Continue checking for leaks, splashing outside the basin, unstable edges, and workers entering the backing zone.
Field test: If a new driver can't find the washout area without asking three people, improve the sign and route before the next truck arrives.
After the pour
Record the final level and condition, remove loose debris around the unit, replace the cover, and photograph any issue requiring follow-up. File delivery and disposal records with the daily report rather than leaving them in a truck cab or subcontractor inbox.
This routine supports the broader measurement challenge identified in recent global construction status reporting. Sustainable construction practices have to function where codes, skills, budgets, and site conditions are uneven. A controlled washout area won't solve embodied carbon alone, but it gives the crew a concrete operating standard: plan the waste, contain it, measure it, document it, and send it to a legitimate destination.
If your next pour needs a controlled, documented washout setup, review the available pans and containers from Reborn Rentals, then confirm capacity, delivery access, and project dates before trucks arrive. Put the containment unit on the site plan, brief the crew, and make the first inspection part of your pour checklist.