
Waste Reduction Strategies for Construction Sites in 2026
Monday morning starts with the same problem on too many concrete sites. A chute wash has left a gray trail across the access drive, a shallow pan has overflowed during the night, and the SWPPP consultant wants photographs and removal records nobody kept. The crew may call it cleanup, but the owner sees schedule risk, the inspector sees uncontrolled discharge, and the project manager sees an unplanned cost.
Effective waste reduction strategies treat concrete washout as one node in a measurable site waste system. The pan, the rental period, the hauler ticket, the subcontractor clause, and the daily inspection log all need to connect. The system below is built around four practical controls: planning before mobilization, equipment and placement decisions, disciplined daily operations, and measurement that holds up during reporting or inspection.
The Real Cost of a Messy Pour
Unmanaged washout water carries more than inconvenience. Cement slurry can stain finished surfaces, obstruct access, create a discharge concern, and force a crew to stop work while someone builds an emergency containment solution. A pan that sits too close to a curb inlet can turn a routine rinse into a stormwater problem after the next rain.
The direct cost is easy to miss because it appears in several budgets at once. Operations pays for cleanup labor, equipment pays for an urgent replacement or extra delivery, the project team loses time, and the environmental team spends hours reconstructing documentation. A client walking past a gray-stained driveway or hardened slurry outside the designated area doesn't distinguish between a small mistake and a weak control system.
Field rule: If the crew can't point to the washout location before the first truck arrives, the site isn't ready for the pour.
Concrete washout also belongs inside the broader waste hierarchy. Source reduction comes before recycling, and recent construction research identifies reduction at the source as the strongest outcome among the strategies reviewed in a 2025 Frontiers review of construction waste minimization. That means ordering accurately, preventing rejected material, and controlling slurry at the point of generation matter more than sorting a larger pile after the damage is done.
Where the waste starts
The table below is a working field map, not a universal percentage breakdown. Actual shares vary by project type, design, demolition scope, and procurement practice. EPA's construction and demolition guidance shows why renovation and demolition deserve attention, with U.S. building-related C&D debris estimated at about 136 million tons in 1996, including 48% from demolition and 44% from renovation. Those figures are documented in the EPA C&D waste guidance.
| Stream | Typical share of jobsite waste | Where it goes when uncontrolled |
|---|---|---|
| Concrete washout and slurry | Project-specific | Bare ground, curb lines, drains, or an overflowing pan |
| Demolition and renovation debris | Often a major stream | Mixed dumpster, unauthorized stockpile, or landfill |
| Packaging and offcuts | Varies with procurement | General waste container or scattered laydown area |
| Spoiled or rejected materials | Depends on planning and handling | Disposal container, rework area, or stockpile |
The practical lesson is simple. A washout pan won't solve poor material ordering, and a recycling bin won't solve a pan overflow. The superintendent needs a connected system that follows waste from generation to final destination.
Planning Inputs Before the First Truck Arrives
A washout pan chosen at the last minute often becomes the most expensive item on the pour. Before mobilization, review the project's SWPPP, locate every nearby drain and waterway, confirm discharge requirements, and mark the containment area on the logistics plan. The placement must serve the truck driver and pump operator while staying clear of runoff, traffic, and excavation risks. A pan that blocks access will be bypassed. A pan exposed to stormwater will lose capacity before the next load arrives.
Use one control system for washout, diversion, and subcontractor accountability. Set the project's diversion goal, identify materials that can be reused or recycled, put recovery duties in each subcontract, and connect payment to documented results. The EPA construction waste guidance describes this stepwise approach and emphasizes that design and procurement decisions can produce greater savings than sorting material after it reaches the site.
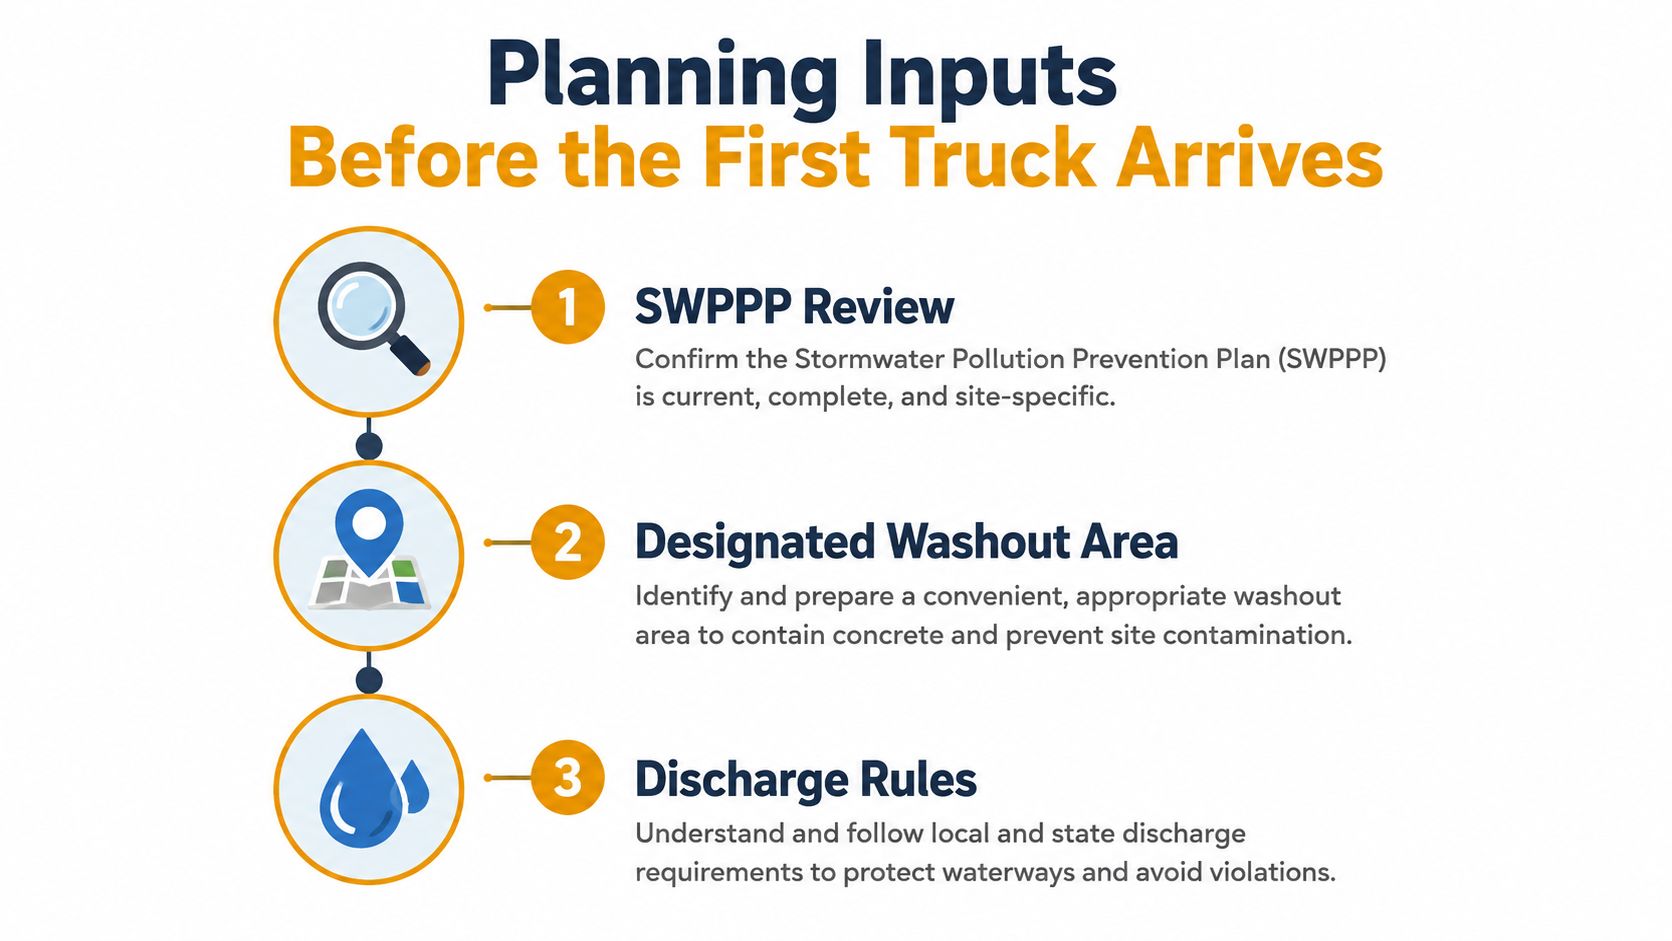
Build a one-page control sheet
The project engineer should give the superintendent a single page that answers who, what, where, and when. Include:
- SWPPP reference: List the washout, concrete handling, stormwater, inspection, and corrective-action requirements.
- Marked site map: Show the pan, truck approach, pump access, emergency overflow route, drains, and protected waterways.
- Discharge confirmation: Record the authority or project rule governing water and hardened material disposal.
- Diversion target: Copy the owner or general contractor's target into the KPI sheet, rather than leaving it in a sustainability specification.
- Subcontractor language: Require concrete, pumping, finishing, demolition, and hauling subcontractors to use the designated area and provide removal records.
- Removal agreement: Name the party responsible for hardened concrete, the receiving container or hauler, and the ticket or receipt that verifies transfer.
- Inspection log: Assign one person to record condition, available capacity, cover, photographs, and corrective action.
Payment clauses need a clear boundary. Hold subcontractors accountable for unauthorized washout or undocumented disposal, but do not charge them for conditions outside their control. A short pre-pour meeting should confirm the route, containment area, and responsibility. Drivers who miss the kickoff still need the same instruction before the first truck enters the site.
Sizing and Placing a Concrete Washout Pan
Pan selection is a capacity decision first and a rental decision second. Estimate the concrete work planned for the pour, the number of chute rinses, pump and hose cleaning cycles, likely weather, and the time until the next service or removal. A small pan may fit a tight urban site, but it gives the crew less tolerance for a delayed truck, a second pump wash, or a rain event.
Published Reborn Rentals specifications illustrate the trade-off. One listed option measures 72 feet by 72 feet by 24 inches, with approximately 18.25 tons of load capacity and about 441 gallons of liquid capacity, while another listed option measures 72 feet by 72 feet by 14 inches and holds about 310 gallons. These specifications appear in the Reborn Rentals washout containment catalog. Treat the listed capacity as an equipment reference, not permission to fill a container to its practical limit.

Match capacity to site conditions
A deeper, higher-capacity pan is useful where the access route is predictable and the pour produces sustained washout activity. A lower profile can be easier to position near a constrained work area, but the crew needs a tighter inspection routine and a clear trigger for service or swap-out. Don't select based only on footprint. A pan that fits on paper but blocks the truck's turning path will be bypassed in practice.
Place the unit on flat, stable ground with enough bearing capacity for the liquid and hardened material. Keep it away from storm drains and waterways, protect the approach from rutting, and leave room for a cover or tarp during downtime. The operator should be able to reach the pan without crossing fresh concrete, active reinforcing steel, or an unsafe edge.
Budget the full lifecycle, not just the daily rate. The equipment line should show rental days, delivery, pickup, rough-terrain charges, express-order charges, and the hauler or disposal cost for solidified waste. Reborn Rentals lists daily pricing starting at $25 per day and separately identifies possible delivery, rough-terrain, and express-order charges in its rental pricing and fee information. Divide the total by the number of planned pours, then compare that figure with the cost of a delayed pour, emergency cleanup, or missing documentation.
Practical rule: The cheapest pan is the one the crew can reach, use, inspect, and empty without inventing a workaround.
Daily Operations That Actually Keep the Site Compliant
At 6 a.m., the pre-pour check should take only a few minutes, but it must be deliberate. Confirm the pan is upright, intact, accessible, visibly marked, and not already near its working limit. Check the route from the truck or pump, look for standing water around the containment area, and take a time-stamped photograph before the first load.
During the pour, the driver washes the chute into the designated pan, not onto a shoulder, gravel strip, curb line, or bare ground. The pump operator cleans the hopper, hose, and tools over the same containment area. Keep wash water and cement solids together unless the approved project procedure directs another method.
Run the same sequence every time
A practical shift routine looks like this:
- Before placement: Inspect the pan, confirm capacity, check the cover, and brief every operator on the location.
- After each truck or batch: Direct chute rinsing into the pan and look for splashing, leakage, or material tracking outside the containment.
- During pump cleaning: Keep the hose and hopper over the pan. Don't discharge pump water into a curb inlet or drainage channel.
- Before breaks: Check the liquid level and remove stray slurry from the access path while it's still manageable.
- At shift end: Photograph the pan, record its condition, secure the cover, and note whether the material will harden in place or needs authorized removal.
- After rain: Inspect for overtopping, displaced covers, erosion, and contaminated water outside the containment.
High-pH concrete water needs controlled handling. The project environmental plan or local authority should determine whether treatment, testing, pumping, or disposal is required. Crew members shouldn't improvise neutralization chemicals, pour additives into stormwater, or assume that dilution makes a discharge acceptable.
A pan can sometimes remain in service while slurry hardens, provided the remaining capacity, structural condition, access, and removal plan are acceptable. Pumping out liquid or swapping the unit is the safer choice when capacity is tight, heavy rain is forecast, the pan is damaged, or solidified material would prevent the next pour from being contained.
The common failure is not a complex technical error. It's a rushed operator washing a tool beside the formwork, followed by a storm that moves the residue toward the drain. Give the crew one location, one instruction, and one person with authority to stop the workaround.
Measuring Diversion and Reporting With Real Numbers
A waste plan becomes defensible when another person can trace the material from source to destination. For a small renovation, that may mean a dated photograph, a signed removal receipt, and a simple material log. For a major build, track each material class by process step, including concrete washout, demolition, packaging, offcuts, spoiled materials, and recovered items.
The distinction between prevention and disposal matters. The peer-reviewed study of Malaysian firms found source-reduction value in segregation, on-site reuse and recycling, improved housekeeping, and equipment modification. It also supports tracking waste by material class and process step, because broad disposal totals can hide the point where a purchasing or process change prevented waste.
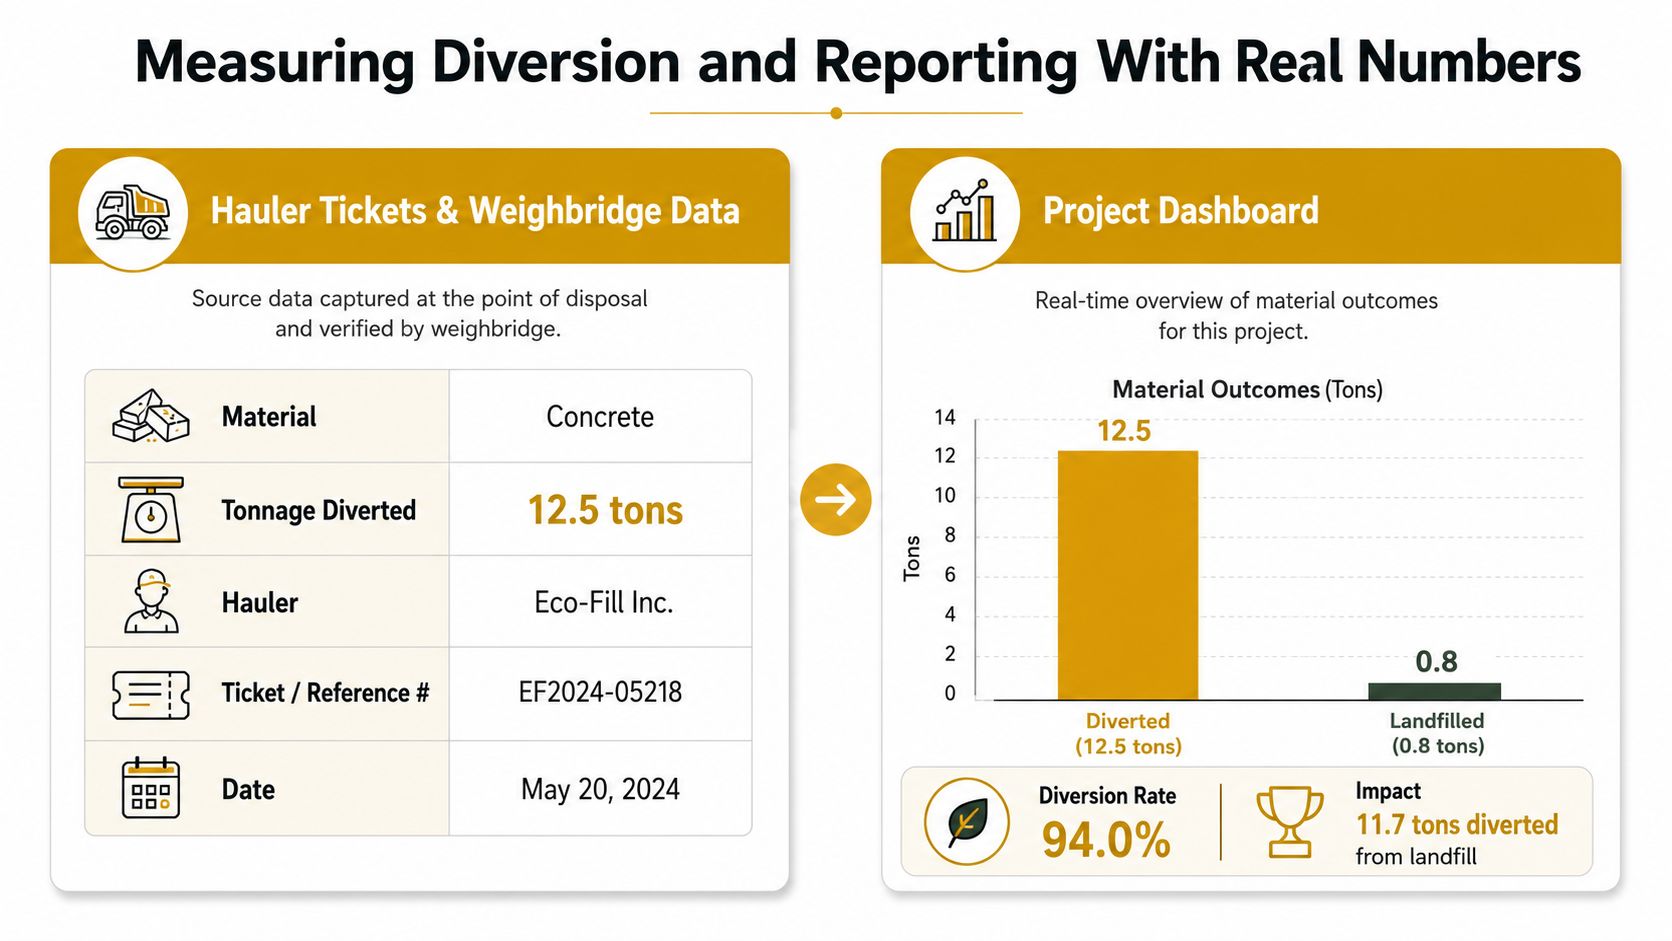
Choose the lightest system that proves the result
Hauler tickets and weighbridge records provide the strongest evidence for material quantity. Photo logs prove condition and location but don't replace weight data. A dashboard makes trends visible, yet it only works when someone enters consistent source records.
| Method | Best for | Output | Cost to maintain |
|---|---|---|---|
| Photo and inspection log | Short renovations and small pours | Dated condition record | Low |
| Hauler tickets and weighbridge data | Projects with regular removal | Material quantities and destinations | Moderate |
| Project dashboard with material classes | Large builds and audited programs | Diversion, landfill, source-reduction trends | Higher |
Australia's 2025 national building benchmark reported that the average building project wastes 141 kilograms per square metre and identified AU$64 billion in building materials at risk of becoming waste. The benchmark also introduced free tools and reported that mandatory waste reporting for Green Star Buildings projects is planned from 2027, as described by the Clean Energy Finance Corporation. Canada's federal construction, renovation, and demolition reporting provides a different reference point, with a 72% diversion rate across reported departments and 7,107 tonnes still landfilled, according to the Government of Canada's federal CRD data.
A one-page monthly status update can contain:
- Generated by stream: Concrete slurry, demolition, packaging, metals, timber, and mixed waste.
- Destination: Reuse, recycling, recovery, or landfill, supported by tickets.
- Prevention action: Ordering change, equipment adjustment, design change, or housekeeping control.
- Evidence status: Ticket received, photograph filed, subcontractor record pending, or corrective action open.
- Next decision: Swap pan, change pickup frequency, revise procurement, or retrain the crew.
Regulatory Touchpoints and Inspection Readiness
The superintendent doesn't need to recite every regulation to run a controlled site, but the team must know which document governs each action. The SWPPP sets the stormwater controls and inspection process. State and municipal requirements may govern discharge, wastewater, hauling, and disposal. EPA construction and demolition guidance informs waste prevention and recovery planning, while the project's safety program governs PPE, access, lifting, and exposure controls around the washout area.
Local discharge limits deserve direct confirmation. Don't assume that a pan makes every handling method acceptable, and don't assume that water can be released because it looks clear. Ask the municipality or project environmental lead what must be contained, treated, tested, pumped, or removed, then file the answer with the site plan.
What an inspection should reveal
Thirty minutes before a consultant or inspector arrives, walk the route a visitor would take:
- Start at the entrance: Remove loose debris and make the site look controlled, not merely recently cleaned.
- Check the containment: Confirm the pan is intact, stable, signed, accessible, and free from obvious overflow.
- Follow the water path: Inspect nearby drains, curb lines, channels, and low points for staining, sheen, or tracked slurry.
- Open the records: Have the latest inspection log, photographs, removal ticket, and corrective actions available.
- Ask the crew: Verify that the driver, pump operator, and finisher can identify the approved washout location.
Red flags include washing tools over bare soil, an uncovered pan before wet weather, a container positioned where trucks can't reach it, no record of hardened waste removal, and subcontractors who were never given written handling requirements. A clean-looking pan with no documentation still leaves an evidence gap.
Inspection standard: The control should be visible on the ground and explainable in the records.
If an overflow occurs, protect the drain first, stop the source, contain the material, notify the responsible environmental contact, photograph the condition, and document the corrective action. The exact notification path depends on the project and jurisdiction, so the SWPPP and local requirements must control.
A 30-Day Rollout Plan and Budget Snapshot
A new system doesn't need a long committee process. It needs an owner, a written location, equipment that matches the work, and records that crews can complete during a busy shift.
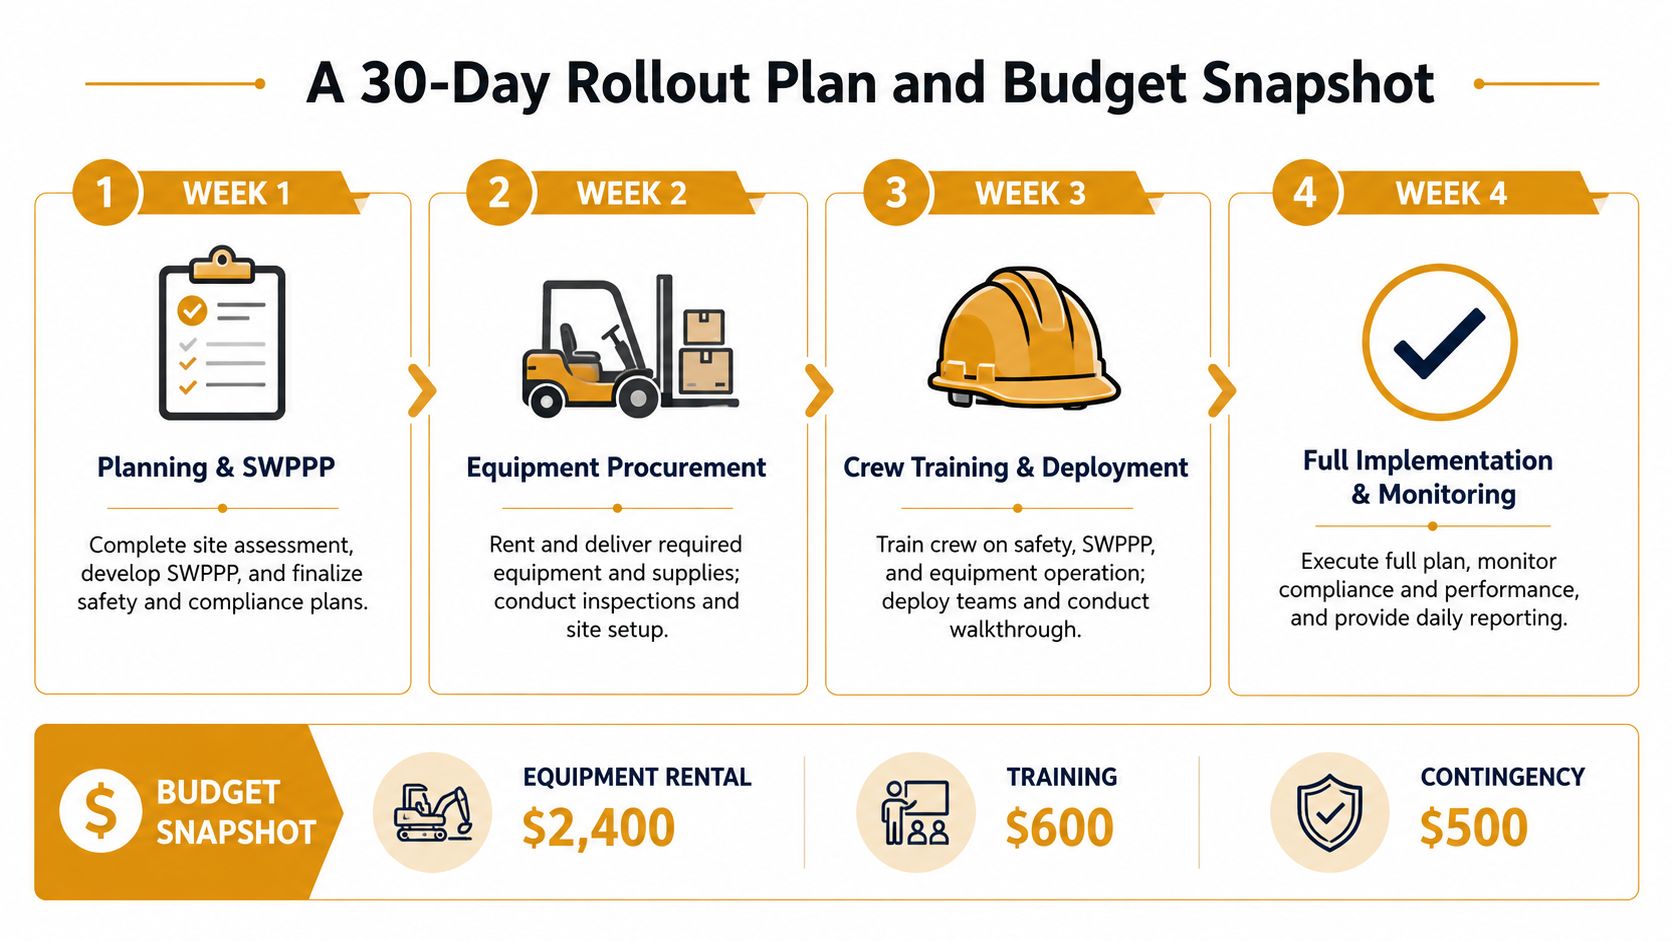
Week one
Review the SWPPP and contract requirements. Mark the washout area, drains, access route, and emergency response path. Assign the superintendent, project engineer, environmental contact, and subcontractor leads. Create the inspection log and decide what evidence the owner or consultant will accept.
Week two
Confirm pan dimensions, delivery access, rental duration, pickup terms, and service triggers. Add washout and recovery language to concrete, pumping, finishing, demolition, and hauling scopes. Hold a short field briefing using the site map rather than relying on a general toolbox talk.
Week three
Run the first pour under full documentation. Photograph the empty pan, record each inspection, retain hauler or removal records, and note any workaround the crew attempted. If the pan fills faster than expected or the truck route fails, adjust the plan immediately instead of waiting for the monthly meeting.
Week four
Review the records against the diversion target. Separate source reduction from recovered material, identify the process step that created avoidable waste, and revise the order quantity, equipment setup, pickup frequency, or subcontractor instruction. The plan should get easier to run after the first pour, not more complicated.
The sample line items below show how to frame a budget without pretending that every project has the same price. Use the vendor's written quote for actual delivery, terrain, express service, hauling, and labor assumptions.
| Line item | Assumption | Estimated cost |
|---|---|---|
| Pan rental | Base daily rental starting at $25 per day | $25 per rental day |
| Delivery and pickup | Standard access, confirmed in quote | Project-specific |
| Rough-terrain surcharge | Difficult access or uneven ground | Quote required |
| Express-order surcharge | Short-notice availability or delivery | Quote required |
| Solidified waste hauling | Removal frequency and material destination | Hauler quote |
| Crew labor | Scheduled inspection and controlled washout | Internal labor rate |
| Documentation | Photos, tickets, dashboard entry | Internal labor rate |
The infographic's sample budget labels equipment rental at $2,400, training at $600, and contingency at $500. Treat those as planning figures shown in the supplied project visual, not universal pricing. The verified publisher information supports a daily starting rental price, while the final cost still depends on dates, location, terrain, delivery, pickup, and disposal.
Questions crews ask before rollout
How often should a pan be swapped? Swap it when working capacity, structural condition, weather exposure, or removal timing makes continued use unreliable. A calendar alone isn't enough. The inspection log should trigger the decision.
What changes during freezing or wet weather? Protect the pan from precipitation, monitor ice and access conditions, and follow the project procedure for handling high-pH water and hardened slurry. Never let a cover create an unsafe access condition or allow stormwater to carry material around the containment.
When does renting beat buying? Renting usually fits short-duration work, scattered infrastructure pours, renovations, and projects where delivery and pickup are more practical than storing and maintaining a container. Buying may make sense for repeated work with predictable storage, transport, cleaning, and service capability. Compare the complete lifecycle cost, not the purchase price alone.
Start Monday by printing the site map, naming the washout owner, and adding the documentation requirement to the next concrete subcontractor briefing. For pan specifications, delivery coordination, and project-specific containment planning, visit Reborn Rentals and confirm the equipment, dates, location, and applicable logistics charges before the first truck is booked.