
Construction Pollution Prevention Guide
Construction-site runoff can be 10 to 20 times higher than runoff from agricultural land and 1,000 to 2,000 times higher than runoff from forested land (EPA construction runoff factsheet). That's why construction pollution prevention isn't a paperwork issue, it's a field-control problem that starts the moment soil is exposed and concrete trucks roll in. If you don't manage sediment, wash water, and liquid waste at the source, you end up trying to catch them with perimeter controls after the damage has already started.
The True Scale of Construction Site Runoff
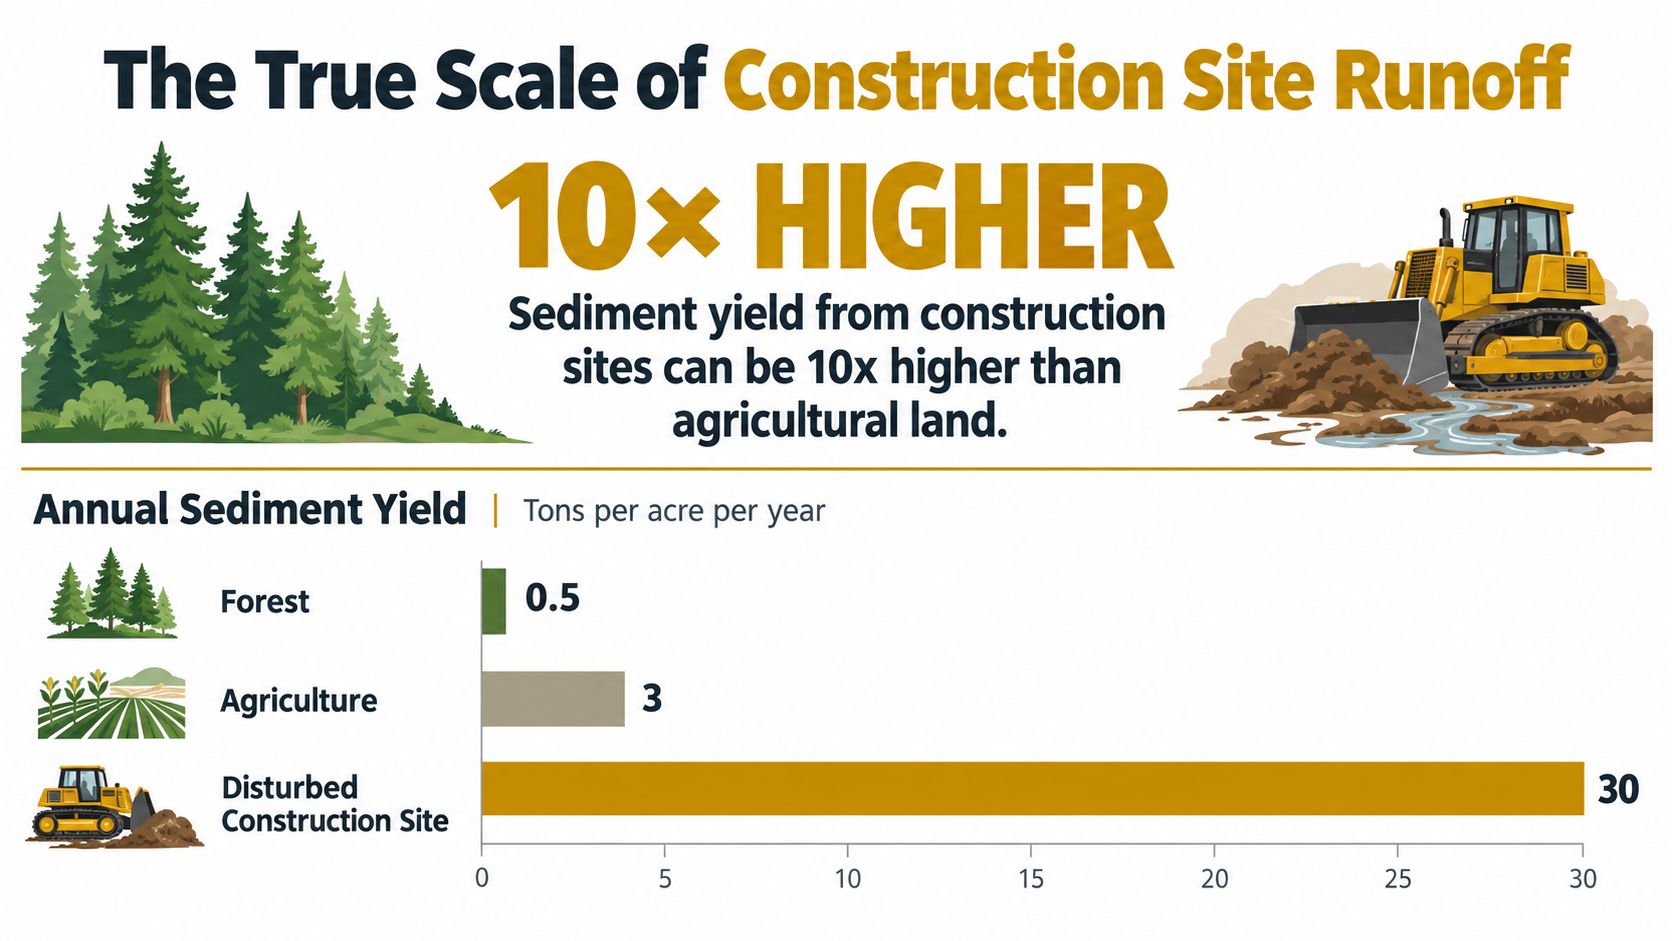
A stripped and graded site sheds far more than soil. EPA says construction-site runoff is typically 10 to 20 times higher than runoff from agricultural land and 1,000 to 2,000 times higher than runoff from forested land, with erosion rates documented at 7.2 to 500 tons per acre per year (EPA construction runoff factsheet). That is why pollution prevention has to be budgeted, staged, and supervised like any other production task.
Why that matters on a job site
Once soil is exposed, it carries more than dirt. Sediment can move into drainage systems, reach waterways, and affect aquatic habitat, which is why construction programs keep returning to perimeter controls, stabilized entrances, inlet protection, phased grading, rapid revegetation, and managed material areas. On an active job, those measures only work if they are in place before the rain and maintained after it.
Practical rule: treat sediment control like production equipment, not landscaping. If it goes in late, gets ignored, or is left damaged after a storm, it will not hold up when water starts moving.
The true cost shows up in crew hours and cleanup, not just in materials. A site that needs repeated washout removal, regrading, or emergency response is already losing time, and liquid waste streams make that harder because soil barriers do little against wash water, slurry, or alkaline residue once they spread across the pad.
How Stormwater Regulations Reached the Job Site
Construction stormwater rules came out of enforcement history, not paperwork fashion. Congress directed EPA to build a stormwater permit program in 1987, EPA rolled out Phase I in 1990 for construction activities disturbing at least 5 acres, and the 1999 Phase II rule extended coverage nationwide to smaller projects disturbing 1 to 5 acres, with required coverage starting in March 2003 (CRS stormwater history). That shift turned broad policy into jobsite duties.
What changed on the ground
Before those milestones, runoff control stayed at the level of general environmental policy. After them, contractors had to document how they were handling erosion, sediment, inspections, and waste, not just whether a fence or silt sock was in place. EPA's later construction and development effluent guidelines, first published in 2009 and revised in 2014, added specific erosion, sediment-control, and pollution-prevention requirements for regulated discharges (EPA construction and development effluent guidelines).
That history explains why SWPPPs, washout control, and inspection logs are part of the work, not paperwork on the side. On a renovation or a civil package, inspectors look for the same thing, a site that can show it controlled discharge sources instead of hoping a storm would pass without trouble.
A superintendent who knows that timeline schedules SWPPP updates into the pre-mobilization week, assigns washout locations before the first concrete truck rolls in, and checks whether inspection logs match field conditions. That changes the day's decisions. Stormwater is part of production, part of QA, and part of the daily rhythm of the site.
Identifying Every Pollutant Source on Site
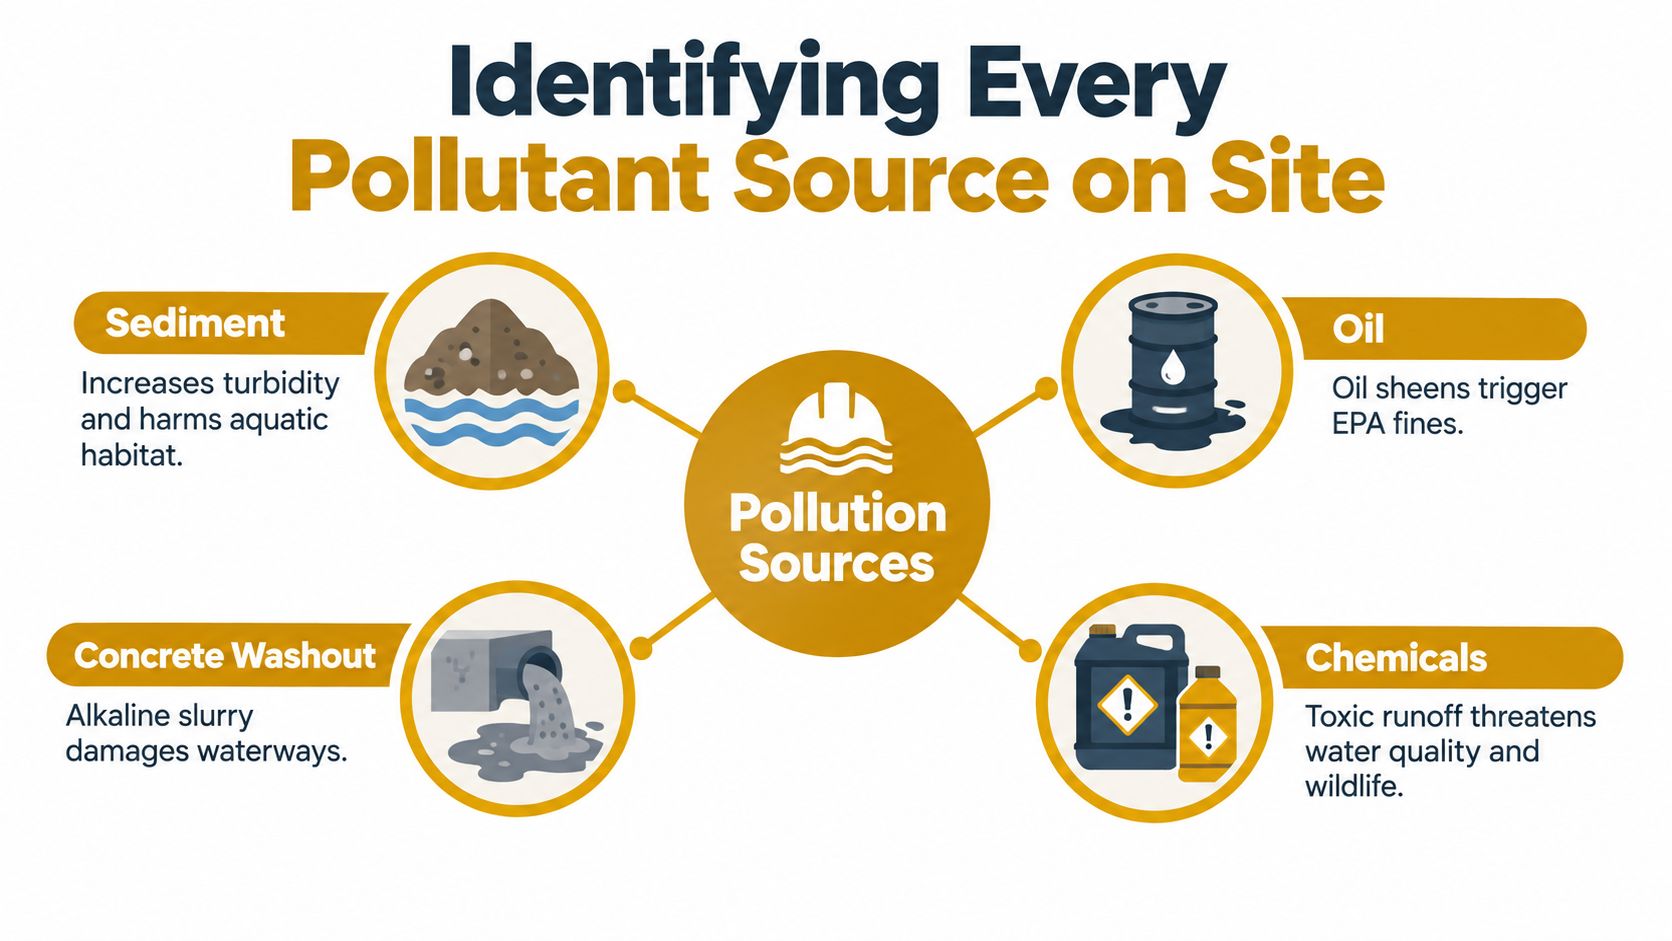
EPA says construction discharges can include concrete truck washout, oil and grease, chemicals, debris, and sediment, with sediment usually the main pollutant of concern (EPA construction runoff factsheet). That list is the reason a site plan has to start at the source. If you only protect the outlet, the waste still reaches the water.
Source control before perimeter control
Source controls stop the problem where it starts. Contain concrete washout at the pour zone, keep material waste in designated areas, and handle liquid waste before it reaches a swale, inlet, or ditch. Perimeter controls still matter, but they are the backup line.
Stage the washout pan inside the pour exclusion zone before the pump truck arrives, not at the site entrance.
Turbidity limits show why that difference matters. Some projects are held to 5 NTU of background, while other project-specific requirements call for more than 90% turbidity reduction under the applicable permit or state standard. Near streams, wetlands, or municipal storm drains, one generic control package does not fit every site.
What a defensible plan looks like
A solid site plan puts the dirtiest work in a controlled footprint first, then uses perimeter measures to catch what is left. Concrete washout, fuel and oil housekeeping, debris handling, and material storage all need their own locations and their own checks. If a crew can dump slurry wherever it is convenient, the perimeter system is already behind.
Corrective action also has to be visible. Inspectors want to see what was found, what was fixed, and when it was fixed. A plan that only exists on paper will not stop a discharge during a storm, and it will not hold up after one.
Managing High-Risk Concrete Washout
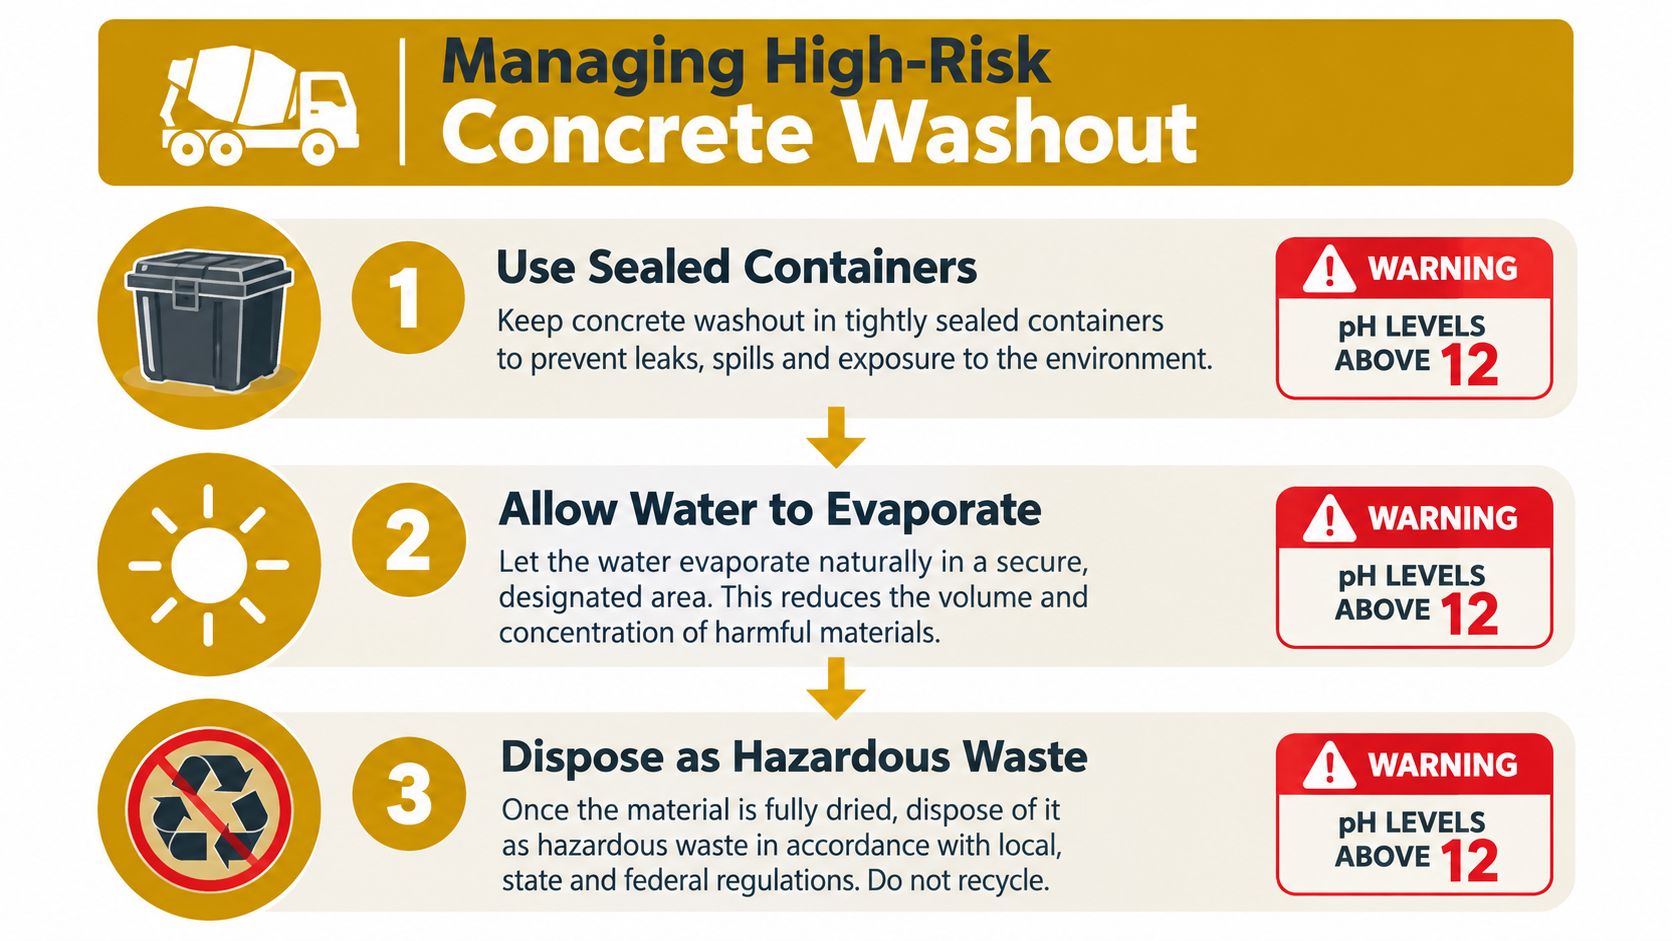
Concrete washwater is easy to overlook until it becomes a violation. EPA guidance describes it as caustic and near pH 12, and it can also contain toxic metals. If that slurry reaches soil or stormwater, the issue is chemical, not just messy.
The control sequence that works
Containment has to start before the pour. The washout area should be set up in leak-proof containers so liquid and cementitious solids stay out of soil, surface water, and groundwater (EPA concrete washout guidance). On a live job, that means the crew needs a place to dump slurry that is ready when the first truck backs in.
Daily checks keep the system from failing without warning. Liners tear, sidewalls shift, and a rain event can turn a workable setup into an overflow risk. EPA guidance calls for inspection every day and after heavy rainfall, with attention to leaks, damaged liners, and compromised sidewalls (EPA concrete washout guidance).
Track the 75% fill threshold daily
Capacity has to be watched in real time. Once a containment facility reaches 75% full, the liquid should be vacuumed or managed by an approved evaporation process so it does not overflow or create chronic alkaline infiltration (EPA concrete washout guidance). Crews need that threshold built into their routine, not left to memory after the pour is over.
Field rule: if the washout is nearing the threshold, service it before the next truck arrives. Waiting until it is obviously full is how a site ends up with a spill and a cleanup bill.
After the remaining solids harden, remove them for recycling where that is allowed and practical. The sequence is straightforward. Contain the slurry, keep it from overflowing, let the material harden, then remove it in an orderly way. That is operational control, not cleanup improvisation.
Sizing and Placing Containment Systems
Most washout failures start with a bad assumption, either the bin is too small for the pour or it's too awkward to use. Local guidance generally says washout facilities should be placed at least 50 feet from storm drains and water bodies, and it warns that a larger container gives less real protection if trucks disturb it, if it can't be inspected, or if it's hard to service (Diligent CW Report). Size matters, but location and access matter just as much.
Bigger isn't automatically safer
A nominally large container can still fail if it sits in a tracking route or behind active equipment. If a truck can't reach it cleanly, the crew won't use it consistently. If the foreman can't inspect it without climbing over obstacles, small problems become missed problems.
That's why sizing washout should be a logistics exercise, not just a purchase decision. You have to account for truck-chute rinses, pump-bucket residue, rainfall, accumulated solids, and a little freeboard for the unexpected. The point isn't to buy the biggest box on the yard, it's to place the right containment where the work happens.
Placement criteria crews can live with
A useful setup stays clear of traffic, stays visible, and can be serviced without disrupting the pour. If you need a spotter every time someone empties a chute, the location is wrong. If the only access route cuts across finished work, the location is wrong again.
One practical option is a rented watertight pan or container sized for the pour sequence and staged where the pump truck can reach it without crossing clean zones. Reborn Rentals is one provider that supplies concrete washout containment for this kind of temporary use, but the same placement logic applies no matter whose equipment you use. The container has to support the work, not complicate it.
A container that's easy to use gets used. A container that's awkward gets bypassed.
The best field test is simple. Ask whether the crew can dump slurry into the system without stopping the job, and whether the superintendent can inspect it without hunting for a path. If the answer is no, the washout plan isn't finished.
Turning Containment Into Audit-Ready Documentation
When an inspector asks where the slurry went and the answer is a shrug, the site fails the audit even if the material was handled correctly. Washout control has to prove containment, handling, and the path to reuse or disposal. That is what separates a tidy yard from a site that can defend its records under review.
What needs to be recorded
Label the washout area so every crew member knows where slurry belongs. Log inspections, fill levels, and any maintenance or service actions. If the site separates liquids from hardened solids, document that process as well, because the handoff record is part of the proof.
The paperwork also needs a clear destination. If hardened material goes to recycling, note when it left and where it went. If a vendor removes slurry or handles swap-and-haul service, keep those handoff records with the rest of the SWPPP file. An inspector should not have to reconstruct the chain from memory after the fact.
Reuse only inside a controlled process
Research indicates that replacing up to 20% of mixing water with cement-slurry wash water can produce concrete without adverse mechanical effects (PMC study on cement-slurry wash water). That finding supports controlled reuse, not casual reuse.
EPA guidance still requires documented pollution-prevention measures and prohibits unauthorized discharge, so any reuse has to stay inside a closed, controlled process.
Reuse is a quality-control question first and a compliance question second.
That distinction matters in the field. If a project manager treats “reused” as the same as “safe to dump,” problems follow fast. The defensible approach keeps the process closed, documented, and tied to the site's actual pollution-prevention controls.
The Site Manager's Pre-Pour Checklist
The best time to fix a pollution-prevention gap is before the first truck arrives. Once the pour starts, nobody wants to stop production because the washout area is in the wrong place or the spill kit is buried behind materials. A clean pre-pour check protects the schedule and keeps the site from improvising under pressure.
Run this check before concrete shows up
- Inspect silt fences: walk the perimeter and make sure the controls are intact, tied off, and not already undermined by runoff.
- Check the washout area: confirm the container is staged, visible, and ready for use before the first rinse.
- Verify drain covers: make sure inlets and nearby drainage paths are protected where slurry could migrate.
- Review weather forecast: if rain is coming, inspect containment and freeboard with that in mind.
- Confirm spill kit access: keep the kit where the crew can reach it without delay.
- Log daily inspection: document the setup so there's a record if conditions change during the pour.
The crew should also confirm truck access, turning space, and service access to the washout system. If any of those are blocked, the system's theoretical capacity doesn't matter much. Real compliance depends on whether the equipment can be used under job-site conditions.
Final field check: if the pour goes live, the pollution controls have to be live too.
That's why construction pollution prevention works best when it's treated as a pre-pour readiness issue, not a cleanup issue. Get the controls in place, verify them, and leave the crew with fewer decisions to make once the concrete starts moving.
If you need a practical way to keep concrete washout contained on an active site, visit Reborn Rentals and review the washout containment options before your next pour. Their equipment rental focus fits the exact logistics this kind of job depends on, especially when you need a setup that's ready to stage, use, and remove without turning compliance into a last-minute problem.