
Construction Waste Management Guide for Cleaner Sites
You're probably dealing with this right now. The dumpster is already half full before lunch, pallets are leaning against a fence, cutoff scrap is spreading past the laydown area, and the concrete crew wants a washout spot before the pump starts cleaning out. Nothing looks disastrous by itself. Then it stacks up. A blocked access path slows material movement, mixed debris ruins a recyclable load, and one bad washout decision can turn a routine pour into a stormwater problem.
That's why construction waste management works best when you treat it like site logistics. It isn't just about where trash goes. It's about where waste is created, who handles it next, what can stay clean enough for recovery, and how you keep runoff, documentation, and hauling all tied together.
A clean site usually isn't the result of nagging. It's the result of a system people can follow under pressure.
Why Construction Waste Management Matters on Every Job
Pour day is where weak planning shows up fast. The ready-mix trucks are cycling, the pump hose is moving, finishers are focused on timing, and nobody wants to stop and ask where slurry, form trash, or empty admixture packaging should go. If the answer is “somewhere over there,” the job is already drifting.

Waste problems show up as field problems first
Most crews don't think of waste as a planning category. They think in terms of access, safety, productivity, and inspection readiness. That's the right instinct.
When waste handling is loose, you usually see the same chain reaction:
- Access gets tighter: Scrap, packaging, and broken material crowd paths that should stay open for carts, lifts, and deliveries.
- Crews double-handle material: Someone moves the same pile twice because it was dropped in the wrong place the first time.
- Recyclable streams get contaminated: Clean wood, metal, or concrete loses value once mixed with food waste, insulation, or general trash.
- Inspectors notice the symptoms: Overflowing bins, windblown debris, and runoff risks tell an inspector the site isn't under control.
- Supervision gets pulled off higher-value work: Instead of coordinating production, the field team starts playing cleanup and traffic control.
Waste management on a jobsite is site discipline with a disposal plan attached.
That's why I tell new PMs to stop thinking of waste as an afterthought line item. Treat it like temporary power or traffic control. If it isn't laid out early, the project pays for it later in confusion, cleanup, and rework.
The scale is bigger than most people assume
This isn't a niche issue. Construction and demolition waste is one of the world's largest waste streams by mass, with contemporary estimates placing global generation at roughly 2.2 billion tonnes by 2025, and more than 75% of that waste is not currently being reused or recycled, according to UN-Habitat's construction waste report.
On active projects, that global picture lands in very local ways. Every mixed load, every extra haul, and every preventable contamination event is money and schedule pressure hiding inside “cleanup.”
What good planning actually looks like
A workable system usually starts with a few simple field decisions:
- Put waste controls where work happens: Don't make crews walk across the site to do the right thing.
- Match containers to the phase: Demo, structure, interiors, and sitework produce different waste patterns.
- Separate wet risks from dry debris: Concrete washout, slurry, and runoff controls need their own plan.
- Assign ownership: If nobody owns the bins, signage, pickups, and logs, they slide.
A clean site doesn't happen because people care more. It happens because the workflow is easier to follow than to ignore.
Understanding What Counts as Construction Waste
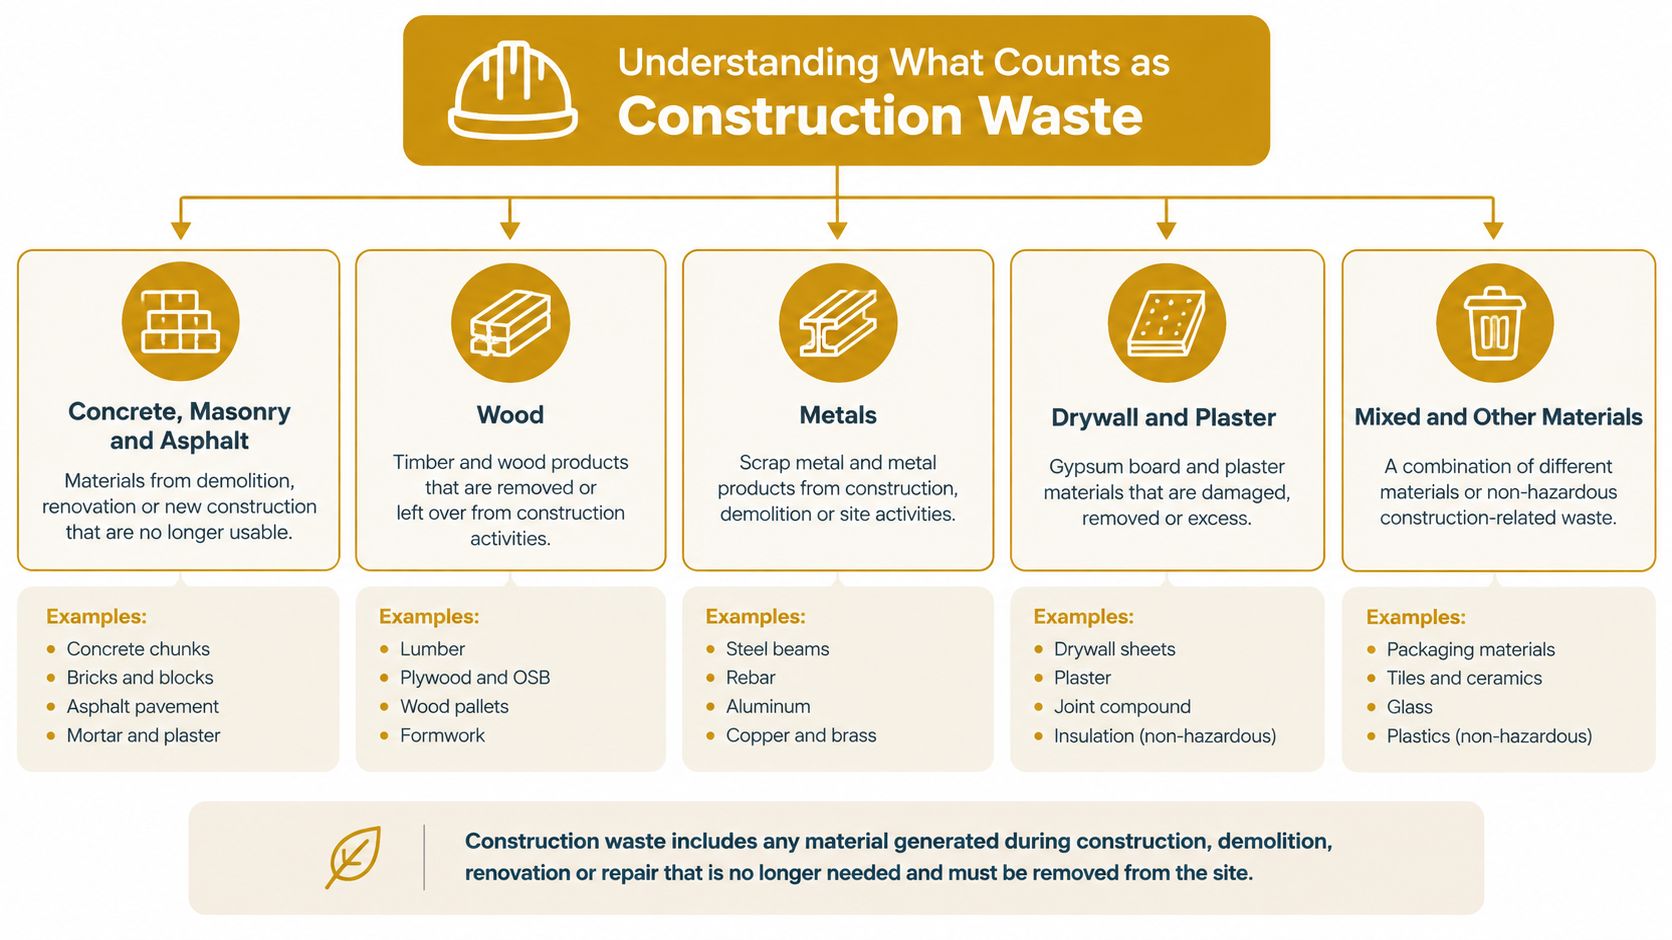
A lot of confusion starts with the word “waste.” On a jobsite, waste isn't only broken material. It includes anything the current activity no longer needs, can't use as-is, or has to move off site under controlled handling.
Think by activity, not just by material
New PMs often sort waste in their heads by material name alone. Concrete. Wood. Metal. Drywall. That helps, but it's not enough. The better question is: what site activity created this, and what condition is it in now?
A few examples make that easier:
- Concrete work creates returned concrete, chipped demo concrete, slurry, wash water residue, and broken form accessories.
- Framing creates dimensional lumber offcuts, engineered wood scraps, banding, and damaged pallets.
- Drywall hanging and finishing creates board cutoffs, corner bead scraps, empty buckets, and packaging.
- MEP rough-in creates cardboard, plastic wrap, spool ends, conduit scraps, and occasional product containers that need special handling.
- Demo creates the hardest stream of all, mixed debris with variable contamination and uneven recovery value.
That activity-based view helps you decide whether something should be reduced upstream, segregated for recycling, held for reuse, or isolated because it carries higher compliance risk.
Three field categories that keep decisions clear
You don't need a legal textbook to build a good site habit. For practical field use, it helps to think in three broad categories:
| Field Category | Typical Site Examples | Main Handling Question |
|---|---|---|
| Inert and heavy material | Concrete, masonry, asphalt, soil-like debris | Can it stay clean enough for recovery or separate hauling? |
| General non-hazardous debris | Wood, drywall, packaging, mixed trash | Can crews keep streams separated before they hit the dumpster? |
| Higher-risk material | Solvents, coatings, certain containers, contaminated debris | Does this need special storage, documentation, or disposal handling? |
What trips people up is that the same material can move between categories depending on condition. Clean broken concrete is one thing. Concrete slurry in runoff is another. Clean cardboard is easy. Wet, muddy cardboard mixed with food trash is just contamination.
The material name matters. Its condition matters more.
Why recovery rates matter
The point of sorting isn't moral purity. It's operational control. A waste stream only has recovery value if the site keeps it usable.
That matters because the overall volume is huge and recovery still lags. Construction and demolition waste has been estimated at 30% to 40% of total solid waste production worldwide, and the waste burden is tied directly to landfill pressure and circular-economy performance, according to UN-Habitat's analysis of global construction waste.
For a superintendent, the takeaway is simple. Don't wait until the dumpster is full to classify material. By then, your best options are already gone.
Regulatory Context and Risk Categories You Must Know
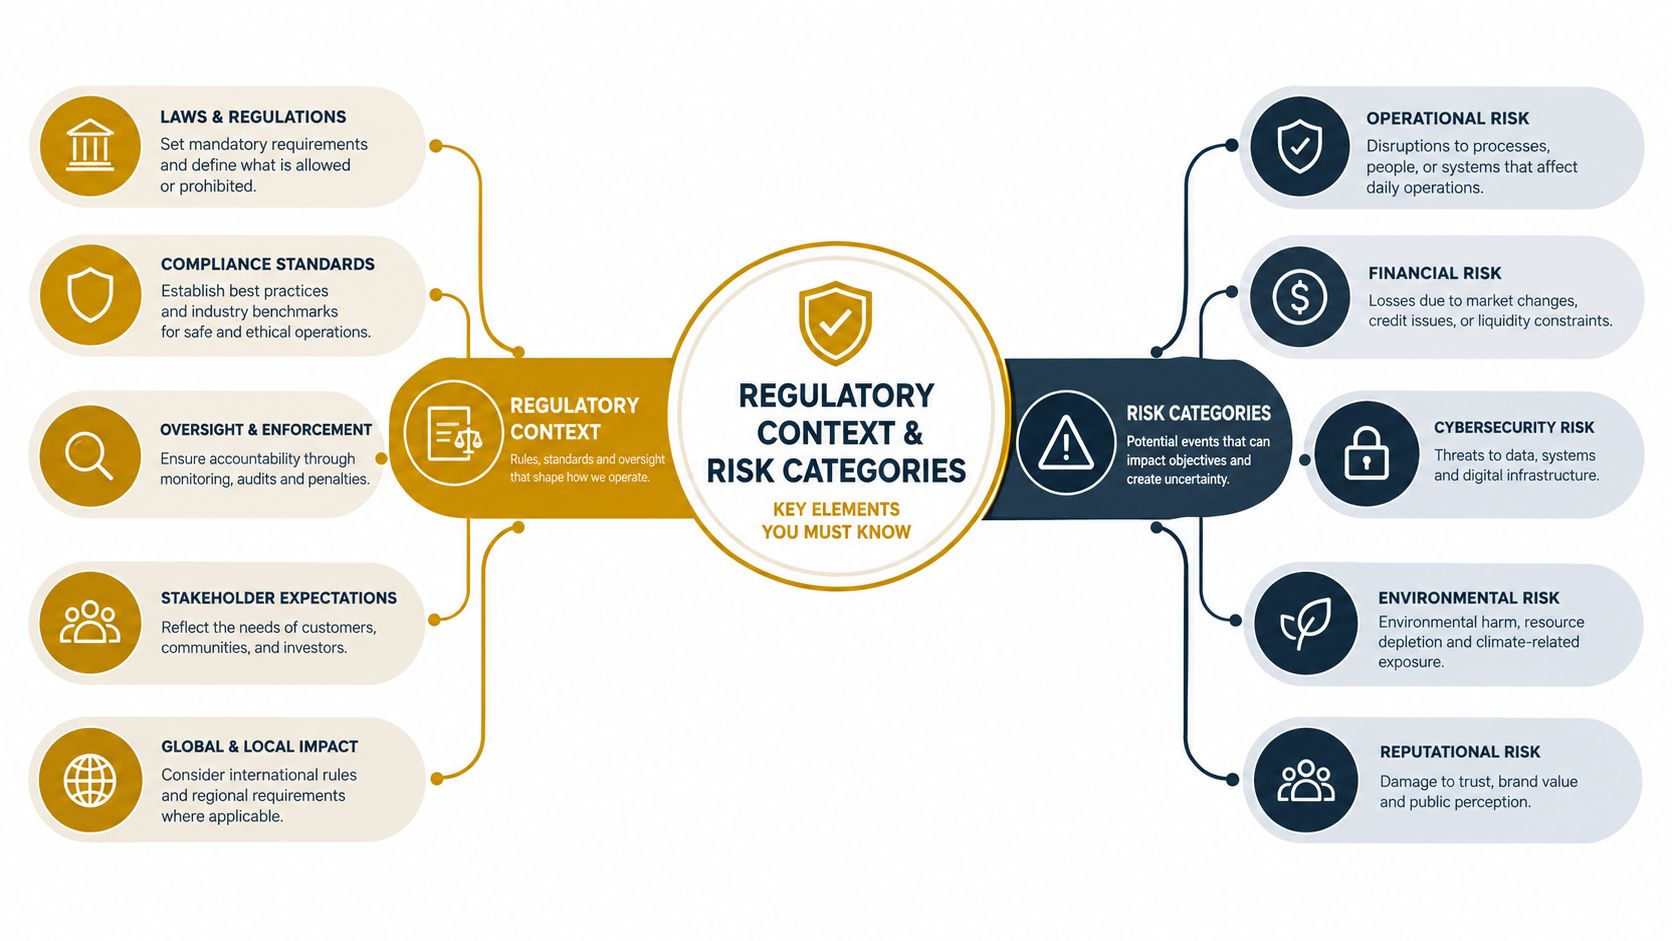
Inspectors usually aren't looking for perfection. They're looking for control. Can the site show that materials are contained, runoff risks are managed, and higher-risk waste isn't being handled like ordinary trash?
Why stormwater drives so many waste rules
A lot of construction waste management rules make more sense once you view them through SWPPP, erosion, sediment, and discharge prevention. Inspectors care about bins, stockpiles, washout zones, and housekeeping because loose site material doesn't stay put. Wind moves it. Water carries it. Traffic grinds it into runoff paths.
That's why waste handling and stormwater compliance are tied together on real jobs. The waste area isn't a separate island. It's part of how the whole site drains, circulates, and gets inspected.
A few common trigger points show up repeatedly:
- Materials stored near drainage paths
- Open containers without clear controls
- Debris that migrates into inlet protection zones
- Uncontained liquids or slurry
- Missing records when a hauler removes mixed or special waste
Misclassification creates avoidable liability
Teams get in trouble when they treat all unwanted material as “just debris.” That shortcut can create two problems.
First, crews may combine recoverable material with general trash and lose any clean diversion path. Second, they may combine ordinary debris with higher-risk waste that needs more careful handling, storage, or paperwork.
Here's the field version of the rule: if a waste stream can affect water quality, create a contamination issue, or require special transport or disposal handling, don't let it disappear into the nearest mixed bin.
Practical rule: If you'd hesitate to dump it on bare ground, don't manage it like ordinary site trash.
Enforcement is moving toward traceability
One of the biggest shifts isn't just stricter targets. It's stricter verification. Recent rules in India require construction and demolition waste recycling targets starting at 25% in 2025–26, rising to 100% by 2028–29, along with a central monitoring system. Delhi-NCR has also added geo-tagging and GPS tracking for waste transport after inspections found compliance gaps in handling and transport, as reported by Mongabay's coverage of India's new construction waste rules.
Even if your project isn't under that exact framework, the lesson carries. Regulators and owners increasingly want a chain of custody, not just a verbal claim that waste was “taken care of.”
A simple risk map for the field office
Use this quick lens when reviewing site waste plans:
| Risk Type | What Usually Triggers Attention | What the Site Needs |
|---|---|---|
| Runoff risk | Slurry, wash water, debris near drains | Containment, siting, protection, inspection logs |
| Handling risk | Mixed streams, poor labeling, overflow | Segregation, signage, pickup timing, crew direction |
| Documentation risk | Missing haul tickets or vague disposal records | Clear records, dates, destinations, responsible party |
A project with decent bins but weak records is still exposed. A project with good paperwork but bad containment is exposed too. Compliance only works when the physical setup and the paper trail match.
The Waste Reduction Hierarchy in Practice
The waste hierarchy sounds simple on paper. Reduce, reuse, recycle. On a jobsite, the trick is deciding which option fits the material, the phase, and the schedule pressure you're under that day.
Start with the highest-value question
The best waste stream is the one you never create. That's reduction. It happens before anything hits a bin.
Reduction usually looks like tighter takeoffs, smarter delivery timing, better storage, and fewer field cuts. If trim, board, or blocking gets damaged because it sat exposed too long, that wasn't a disposal problem. It was a planning problem.
Reuse comes next. That means keeping material in a condition where the site can use it again, either in place, elsewhere on the same job, or through salvage. Form lumber, temporary protection, pallets, and some packaging supports are common examples.
Recycling is still valuable, but it's the downstream move. By the time you're recycling, the site has already accepted that the original use is over.
Reduce Reuse Recycle Decision Matrix for Common Site Materials
| Material Stream | Best Hierarchy Option | When to Choose It |
|---|---|---|
| Forming lumber | Reuse | Choose this when lumber is still structurally useful for additional pours, protection, or temporary works |
| Dimensional framing offcuts | Reduce | Choose this when repeated cut patterns suggest ordering, layout, or prefabrication adjustments would prevent scrap |
| Clean concrete rubble | Recycle | Choose this when the material can be kept separate from trash and soil contamination |
| Pallets | Reuse | Choose this when deliveries are ongoing and pallets can support storage or return workflows |
| Cardboard packaging | Recycle | Choose this when crews can keep it dry and out of mixed trash |
| Drywall | Reduce | Choose this when layout, ordering, and sequencing can lower breakage and overcutting |
| Metal scrap | Recycle | Choose this when a dedicated container can keep it clean and easy to remove |
| Temporary protection materials | Reuse | Choose this when they can be staged, recovered, and redeployed without becoming torn or soaked |
Don't let “recycle” become the lazy answer
A lot of teams say they're managing waste well because they have recycling containers. Sometimes that's true. Sometimes it just means they've added another bin to an unplanned layout.
The field question is more practical: what decision would have kept this material at a higher value? If the answer is “different ordering” or “reuse for the next phase,” then recycling isn't the best result. It's just better than disposal.
Quick calls under schedule pressure
When time is tight, use this short screen:
- Can we avoid generating it? Re-check takeoff, cuts, packaging, and damage prevention.
- Can we use it again as-is? Think temporary works, protection, back-of-house use, or salvage.
- Can it stay clean enough for recovery? If yes, separate it now.
- If none of the above works, what's the safest compliant path? That answer should already be built into the site plan.
The hierarchy only works if foremen can apply it in real time. If the plan is too abstract for the field, crews will default to the nearest open container.
On Site Segregation and Handling Workflows That Work
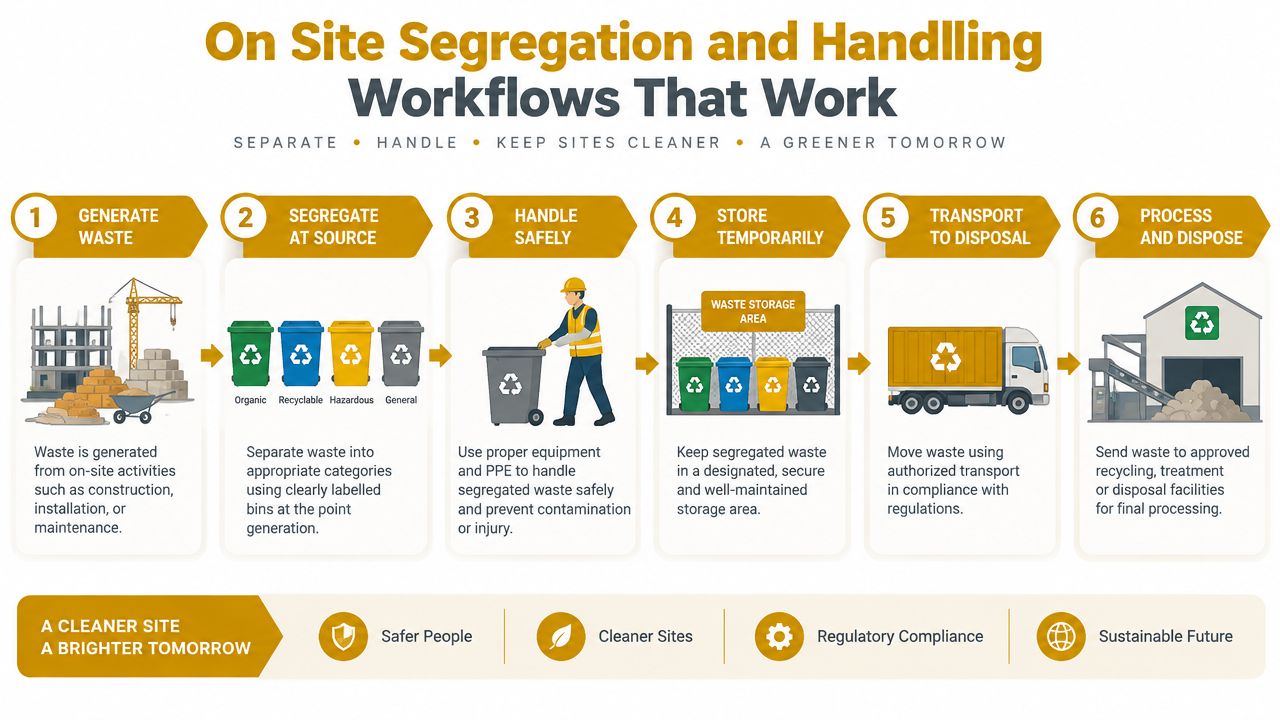
Segregation succeeds or fails on layout. You can give a great talk at orientation, post perfect signs, and still lose the job if the bins are in the wrong place.
Build the flow from point of generation
Start where waste is created, not where the dumpster happens to fit. A framing area, a drywall floor, a demolition zone, and a concrete placement area all produce different material at different speeds. The handling setup should match that reality.
A simple workflow looks like this:
Generation at the work face
Crews create scrap, packaging, slurry, or broken material during the task.Immediate separation nearby
Small carts, gaylords, labeled bins, or designated stacks keep streams from mixing too early.Transfer to a phase-appropriate collection point
Labor or trade partners move material to the right container before it becomes scattered debris.Contamination check before haul-off
Someone verifies the load still matches its intended stream.Pickup and documentation
The hauler takes the right material from the right container, and the site records what left.
That chain sounds basic. It isn't. Most failures happen in the middle, where “temporary” piles become permanent and clean material gets buried.
What makes segregation hold on a busy job
Good systems usually share a few traits:
- Short travel distance: If a crew has to walk too far, they'll create an unofficial dump spot.
- Plain signage: Use simple labels people can understand at a glance.
- Visible ownership: A foreman, labor lead, or superintendent checks the area regularly.
- Right-sized containers: Too small and they overflow. Too large and crews mix streams because “there's room.”
- Layout updates by phase: What worked during structure may fail during interiors.
Clean streams are created by convenience, not lectures.
Crew habits matter more than posters
Training should happen in short field moments, not only in kickoff paperwork. Show crews the actual container locations. Point out what belongs where. Explain what ruins a load.
A few messages stick better than long policy language:
- Keep concrete out of general debris
- Keep packaging dry if it's headed for recovery
- Don't toss unknown containers into mixed waste
- Report overflow before the stream collapses into one big pile
You're trying to reduce decision friction. When crews know the path and trust the setup, they follow it.
Traceability has to be built into the handoff
As digital workflows become more common, the question isn't only whether a project diverted material. It's whether the site can show how waste was segregated, moved, and documented. UK benchmark data drawn from 4,791 projects worth £34bn suggests landfill diversion progress has stalled as it nears a practical ceiling in mature markets, while a 2026 systematic review highlights growing use of digital tools in construction and demolition waste management, according to BRE's UK construction benchmarks insight.
That matters on ordinary jobs too. A simple photo log, container map, haul ticket file, and pickup calendar can do a lot of work. The point isn't flashy software. The point is a record that matches the site reality.
Concrete Washout Containment Done Right With Rental Solutions
Concrete washout deserves its own plan because it isn't ordinary debris control. It's contamination control. If the site treats washout like a leftover cleanup task, that's when you see crews improvising near curb lines, drains, or the nearest open ground.
Why washout gets special scrutiny
Fresh cement slurry is highly alkaline, and wash water can carry fine particulates. Guidance from transport and environmental authorities requires washout areas to be placed away from drainage lines, stormwater drains, and water bodies, with wash water fully contained in an impervious bund because escaped slurry can raise pH in runoff and create direct water-quality risk, according to the New South Wales concrete washout guideline.
That's the science behind the rule. It isn't housekeeping theater. Uncontained washout can change runoff chemistry and move contamination off the work area fast.
Siting rules that keep you out of trouble
A workable washout setup usually follows a few plain rules:
- Pick the location before the pour starts: Don't leave the pump crew guessing.
- Keep it away from drains and flow paths: If rain or hose water can carry overflow to an inlet, it's in the wrong spot.
- Use impervious containment: The system needs to hold liquid and solids, not just mark an area on soil.
- Protect access: Drivers and crews should be able to use it without crossing active hazards.
- Plan removal before capacity becomes a problem: Hardened buildup and overflow risk both get worse when the site waits too long.
A washout area should be as intentional as the pour sequence.
Rental logistics make the control practical
Rental planning helps. Instead of improvising a containment area from scrap and plastic, the site can schedule a dedicated washout pan or container, line up delivery before the pour, and arrange pickup or swap-out based on expected use.
When you're evaluating options, look at practical questions:
| Question | Why It Matters |
|---|---|
| What size pan fits the pour activity? | Undersized containment fills fast and forces bad decisions |
| Can the location support delivery and pickup? | Tight access can derail a good plan |
| Is the terrain stable enough for placement and service? | Rough or soft ground changes setup needs |
| Who checks condition and capacity daily? | Washout controls fail quietly until they don't |
| What's the removal path for hardened residue? | Disposal planning matters as much as initial setup |
One rental option in this category is Reborn Rentals, which focuses on concrete washout containment equipment for construction and renovation projects, including rental pans and delivery scheduling.
Make washout part of the daily field routine
The best washout controls are boring. Crews know where it is. The pump operator can reach it. The superintendent checks it on the walk. Pickup happens before capacity turns into a surprise.
If you want washout containment to hold, tie it into these daily habits:
- Pre-pour check: Confirm location, access, and readiness.
- Mid-activity observation: Make sure crews are using the designated containment.
- End-of-day review: Check buildup, freeboard, surrounding cleanliness, and any sign of migration.
- Record the service cycle: Keep notes on delivery, use, pickup, and disposal handoff.
Treat washout like a controlled utility on the site. Once you do that, a lot of the “messy concrete problem” disappears.
Costs Schedules Monitoring and Your Implementation Playbook
A waste plan only becomes real when it shows up in buyout, the look-ahead schedule, and the superintendent's daily controls. If it lives only in a binder or permit file, the field will route around it.
Put waste activities on the schedule
Waste handling has timing, just like inspections and deliveries. Containers need placement before the phase starts. Washout equipment needs delivery before the pour. Pickup windows need to avoid access conflicts and overflow risk.
A simple schedule view should identify:
- Startup controls: Initial bin layout, signage, washout placement, and crew direction
- Phase changes: Repositioning containers when the work face moves
- Recurring service points: Hauls, swap-outs, cleanup walks, and log updates
- Closeout tasks: Final segregation, last pickups, and record collection
If you don't schedule those moves, they'll happen late.
Watch the costs that actually move
Focusing only on the visible hauling bill misses the bigger picture. That matters, but field costs often hide elsewhere. Double handling, contaminated loads, blocked access, emergency pickups, and cleanup labor can cost more than the bin itself.
Use a short cost review every week:
| Cost Area | What to Check |
|---|---|
| Container use | Are bin sizes and locations still matched to the phase? |
| Hauling | Are pickups happening on a plan or only when there's a problem? |
| Washout rentals | Is the equipment sized and timed to actual concrete activity? |
| Labor | Are crews spending time moving waste twice? |
| Compliance exposure | Are logs, tickets, and site conditions aligned? |
Keep records that can survive an audit
The site doesn't need complicated reporting to stay credible. It needs consistent reporting. A simple SOP starter is enough if someone owns it.
Try this basic implementation checklist:
- Map waste zones by phase and trade activity.
- Assign container types to each stream.
- Name one responsible person for inspections and service coordination.
- Log each haul or pickup with date, material stream, and destination.
- Track washout service events the same way you track other controlled site operations.
- Photograph problem areas and corrections when conditions change.
- Review the setup weekly during superintendent and PM coordination.
The big idea is traceable control. Not just a cleaner site, but a site that can prove what it did and why.
If your job includes concrete work, Reborn Rentals offers rental-ready washout containment equipment with delivery scheduling, upfront daily pricing, and practical contact options that help crews line up the right setup without guesswork. That fits the kind of field workflow covered here: planned siting, controlled containment, and documented service instead of improvised cleanup. Visit Reborn Rentals to review available washout rental options for your next pour or renovation project.