Erosion Control Construction: Strategies for Site Success
An excavator is ready to open the next section of a site. The forecast calls for rain, the soil is loose, and a nearby storm drain sits lower than the work area. Without a plan, one weather event can move sediment onto roads, clog inlets, damage finished grades, and create compliance problems that stop production.
Erosion control construction prevents that chain reaction by keeping soil in place before runoff can carry it away. The strongest plans limit disturbance, stabilize exposed surfaces quickly, route water deliberately, and maintain controls throughout the work. This guide focuses on practical decisions for short-duration, high-disturbance projects, including how to phase earthwork, choose temporary stabilization, layer sediment controls, and connect field work to the SWPPP.
Introduction to erosion control construction
A crew can finish grading before the next storm arrives, leaving bare slopes, compacted pads, and drainage paths that did not exist a week earlier. Rain then strikes exposed soil, loosens particles, and carries them toward low areas, roads, inlets, or streams. Wind can move the finer material first.
The consequences reach beyond water quality. Crews may lose topsoil, repair washed-out grades, clear sediment from drainage structures, or replace controls installed after runoff has already found a concentrated route. Missing inspection records and poor sediment retention can also interrupt work through permit-related problems.
A perimeter silt fence alone is not a plan. Erosion control comes first. Reduce the soil exposed during each phase, stabilize slopes and pads as soon as grading permits, and place downstream sediment controls behind those measures. Preventing soil from moving works like closing a spill at the source. Filtering it after runoff begins is the backup, not the primary strategy. The EPA stormwater guidance places erosion controls ahead of sediment controls for this reason.
For short-duration, high-disturbance work, product selection should follow field conditions and the construction sequence, not a generic BMP list. A workable plan identifies each exposed surface, sets the intended water path, matches stabilization to soil and slope conditions, records the controls in the SWPPP, and assigns responsibility for inspection and repair. That sequence connects planned measures with the performance problems crews see after weather changes.
Understanding erosion and sediment control fundamentals
The basic model is simple: disturb less soil, expose it for less time, and cover it quickly. A Canadian transportation guide describes erosion-control best management practices, or BMPs, as temporary or permanent measures that stabilize exposed soil or slow runoff. It also identifies cover as the single most effective erosion-control practice. The Alberta transportation guide distinguishes between source-control BMPs, which protect exposed surfaces, and conveyance BMPs, which manage runoff.
Think of a construction site as a roof with missing shingles. Source controls are the replacement shingles, mulch, seed, blankets, and mats that keep rain from striking bare soil. Conveyance controls are the gutters, diversions, slope breaks, and channels that guide water safely. Sediment controls are the filters and collection points placed farther downstream when some soil still becomes mobile.
A practical concept map
The sequence looks like this:
- Limit disturbance. Clear only the area needed for the current phase.
- Shape water movement. Keep clean upland runoff away from bare soil and prevent concentrated flow from cutting channels.
- Stabilize exposed ground. Apply cover, seed, mulch, blankets, mats, or permanent treatment as soon as grading allows.
- Capture residual sediment. Use perimeter controls, inlet protection, basins, and stabilized entrances where mobilized particles could leave the site.
- Inspect and maintain. Repair failures before the next storm tests the system.
Phased clearing and staged grading make this model practical. A crew that opens an entire parcel creates a large, connected source of sediment. A crew that works in smaller areas can stabilize completed sections while earthwork continues elsewhere. That approach also gives inspectors a clearer view of what has changed and which controls need attention.
Field rule: A sediment barrier should support a soil-stabilization plan, not substitute for one.
Erosion control methods for construction sites
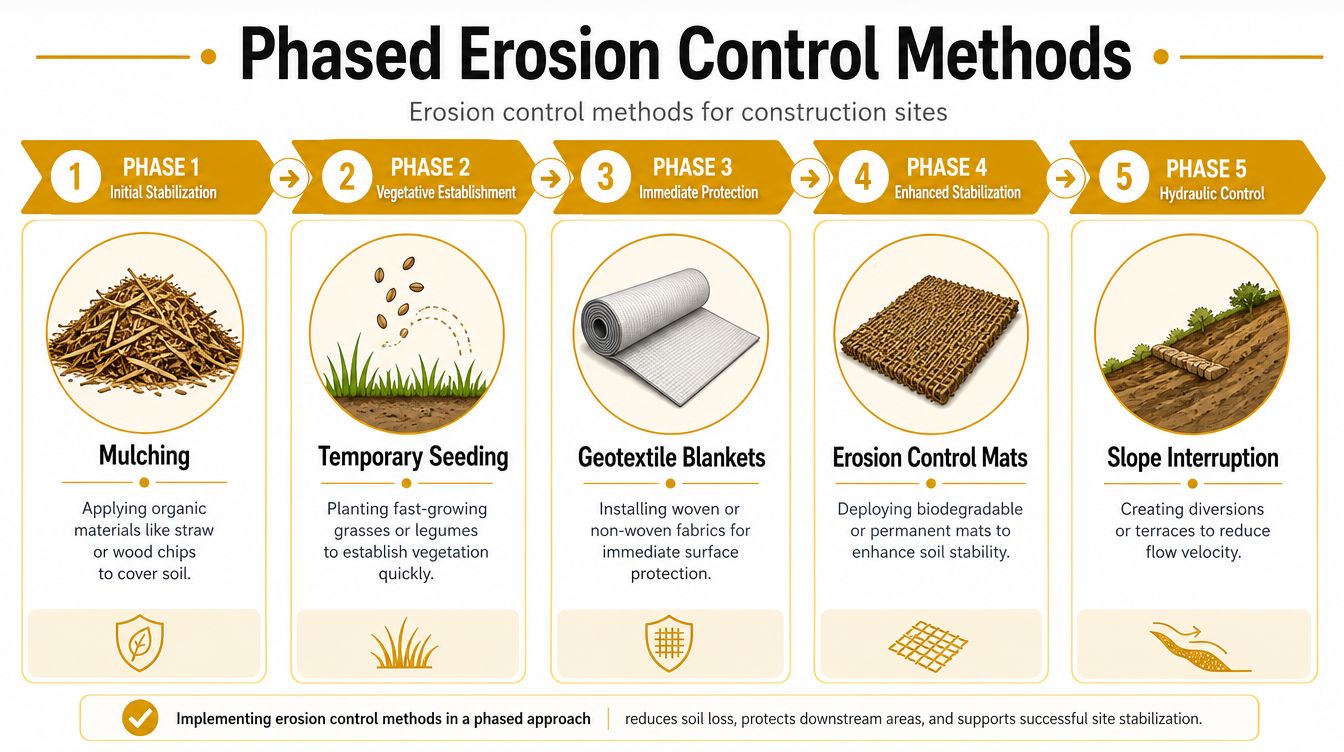
A short-duration, high-disturbance site can change faster than a control plan written for a finished layout. Select methods according to what each surface must withstand, how soon crews will rework it, and whether vegetation has time to establish. Begin with the highest-risk areas, including steep slopes, drainage paths, stockpiles, and freshly graded pads, instead of applying one treatment everywhere.
Mulching acts like a temporary roof over exposed soil. Straw, wood chips, and similar materials soften raindrop impact and reduce wind erosion. Use mulch for rapid, short-term cover, then apply it evenly and secure it where wind or concentrated runoff could move the material.
Temporary seeding fits areas expected to remain idle long enough for vegetation to develop. Fast-growing grasses or legumes can provide living cover, but seed choice, soil preparation, moisture, and season influence establishment. Germination takes time, so add mulch or another protective cover when rain could arrive before growth begins.
Matching methods to the work phase
Use geotextile blankets on slopes or exposed benches where the soil needs protection immediately. Woven and non-woven fabrics can hold particles in place while vegetation develops. The material performs only when installed correctly. Gaps, weak anchoring, poor soil contact, or exposed edges can let runoff travel beneath the blanket and form a new erosion path.
Erosion-control mats suit slopes, channels, and other surfaces that need stronger reinforcement. Biodegradable products can support vegetation, while other mats remain in service longer. Choose according to the expected rework period and hydraulic stress. A product label alone cannot show whether the mat matches site conditions.
Slope interruption reduces the length of the flow path. Diversions, contour features, berms, and terraces break up long slopes, lowering runoff energy before it detaches and transports soil. Place these features carefully and provide stable outlets. If a diversion releases water onto another bare slope, it transfers the erosion problem rather than controlling it.
For contractors working on rapidly changing sites, performance depends on matching the method to the phase, not merely selecting the most familiar BMP. Stabilize the source first, then protect the route and the receiving point. Soil that remains in place does not need to be captured later.
Sediment control BMPs to protect water quality
Sediment controls handle particles that escape source stabilization. Each BMP performs a different job, so a strong system uses layers rather than asking one device to manage every condition.
A silt fence slows shallow sheet flow and allows sediment to settle behind a permeable fabric. It works best when installed along the contour, trenched or secured correctly, and kept away from concentrated drainage. It isn't a substitute for a channel or basin, and accumulated sediment can reduce its available capacity.
A sediment basin or trap provides a larger settling area for runoff from disturbed portions of the site. It needs an appropriate inlet, outlet, access for cleanout, and stable embankments. Inlet protection shields storm-drain openings from sediment carried across paved or graded areas, while a stabilized construction entrance reduces track-out before vehicles reach public roads.
Diversion channels and berms keep clean water away from disturbed soil or direct dirty runoff toward a treatment point. Their success depends on stable outlets and regular inspection after storms. A fast-moving discharge can undermine the channel, bypass a fence, or scour the receiving area.
Comparison of common sediment control BMPs
| BMP | Function | Typical sediment removal rate |
|---|---|---|
| Silt fence | Slows shallow sheet flow and retains sediment along a perimeter | Performance varies with installation, drainage area, slope, and maintenance |
| Sediment basin or trap | Holds runoff long enough for particles to settle | Performance varies with storage, outlet design, inflow, and cleanout |
| Inlet protection | Blocks or filters sediment before it enters a storm drain | Performance varies with the inlet type, flow, and clogging |
| Stabilized construction entrance | Limits soil track-out from vehicle traffic | Performance varies with aggregate condition, traffic, and housekeeping |
| Diversion channel or berm | Routes runoff away from exposed soil or toward treatment | Performance varies with capacity, outlet stability, and flow concentration |
For sites disturbing 1 acre or more, construction stormwater permits generally apply, and layered BMPs are used to retain sediment on-site to the extent practicable. EPA's construction general permit guidance identifies measures such as stabilized entrances, perimeter controls, inlet protection, sediment basins or traps, and runoff diversions. The practical lesson is to combine source control with conveyance control and housekeeping, then maintain every layer.
Selecting products and materials for erosion control
A product should match the failure you're trying to prevent. A blanket that works on a short, gently sloped area may perform poorly on a steep surface exposed to concentrated runoff. A biodegradable mesh may suit a sensitive environment, while a durable synthetic fabric may be more appropriate where the surface will remain exposed or face repeated disturbance.
Start with four questions:
- What is the slope condition? Steep or channelized areas need stronger anchoring and better resistance to flow than a flat pad.
- How long will the surface remain exposed? A short idle period may call for rapid temporary cover, while a longer interval may justify seeding combined with a protective mat.
- Will the area be reworked? Frequently regraded sites need systems crews can install, remove, and replace without creating new exposed edges.
- What does the climate demand? Wind, aridity, intense rainfall, and slow vegetation establishment can change the right choice.
Comparing common material choices
Biodegradable three-dimensional meshes are being developed for sensitive environments where traditional blankets may underperform. The New York erosion and sediment control reference reflects this movement toward materials adapted to environmental conditions rather than one universal blanket. These products may be useful where temporary reinforcement is needed without leaving a permanent synthetic layer, but confirm the manufacturer's installation and service requirements.
Erosion-control blankets provide contact protection and can support vegetation establishment. Natural fibers may fit projects that prioritize biodegradation, while synthetic options can offer longer service. The choice should account for slope, expected runoff, anchoring, and the time before permanent stabilization.
Geotextile fabrics can separate, reinforce, filter, or protect soil depending on their construction. Don't choose by fabric name alone. Review the intended application, flow conditions, overlap requirements, fastening pattern, and compatibility with the soil.
Turbidity curtains address sediment in water, not bare soil on land. They require suitable placement and anchoring, and they won't correct runoff that bypasses the treatment area. Concrete washout pans manage cementitious slurry and washout waste, a separate housekeeping concern that still belongs in a disciplined SWPPP field program.
For short-duration, high-disturbance work, installation speed matters, but speed can't erase poor fit. Ask suppliers for application limits, anchoring details, reusability, disposal requirements, and maintenance instructions. Then document why the selected product matches the climate, slope, and schedule.
Integrating erosion control with SWPPP and maintenance
A control that exists only in a drawing isn't protecting the site. The SWPPP needs to connect each BMP to a location, installation sequence, responsible person, inspection routine, and corrective action.
Begin with a disturbance map. Mark clearing limits, stockpiles, slopes, drainage routes, inlets, entrances, discharge points, and areas that will be stabilized early. Then tie the map to the construction schedule so the team knows which controls must be installed before clearing, before grading, and before a new phase opens.
Build the field routine
Use a short operational checklist:
- Before disturbance: Confirm perimeter controls, diversions, inlet protection, access stabilization, and material availability.
- During earthwork: Keep clearing within the approved limits, protect completed grades, and prevent runoff from crossing bare surfaces.
- After stabilization: Verify cover contact, seed and mulch condition, blanket anchoring, and stable outlets.
- After weather: Look for overtopping, undercutting, sediment accumulation, track-out, clogged inlets, and damaged fabric.
- Before closeout: Remove temporary controls only after permanent stabilization and drainage work are complete.
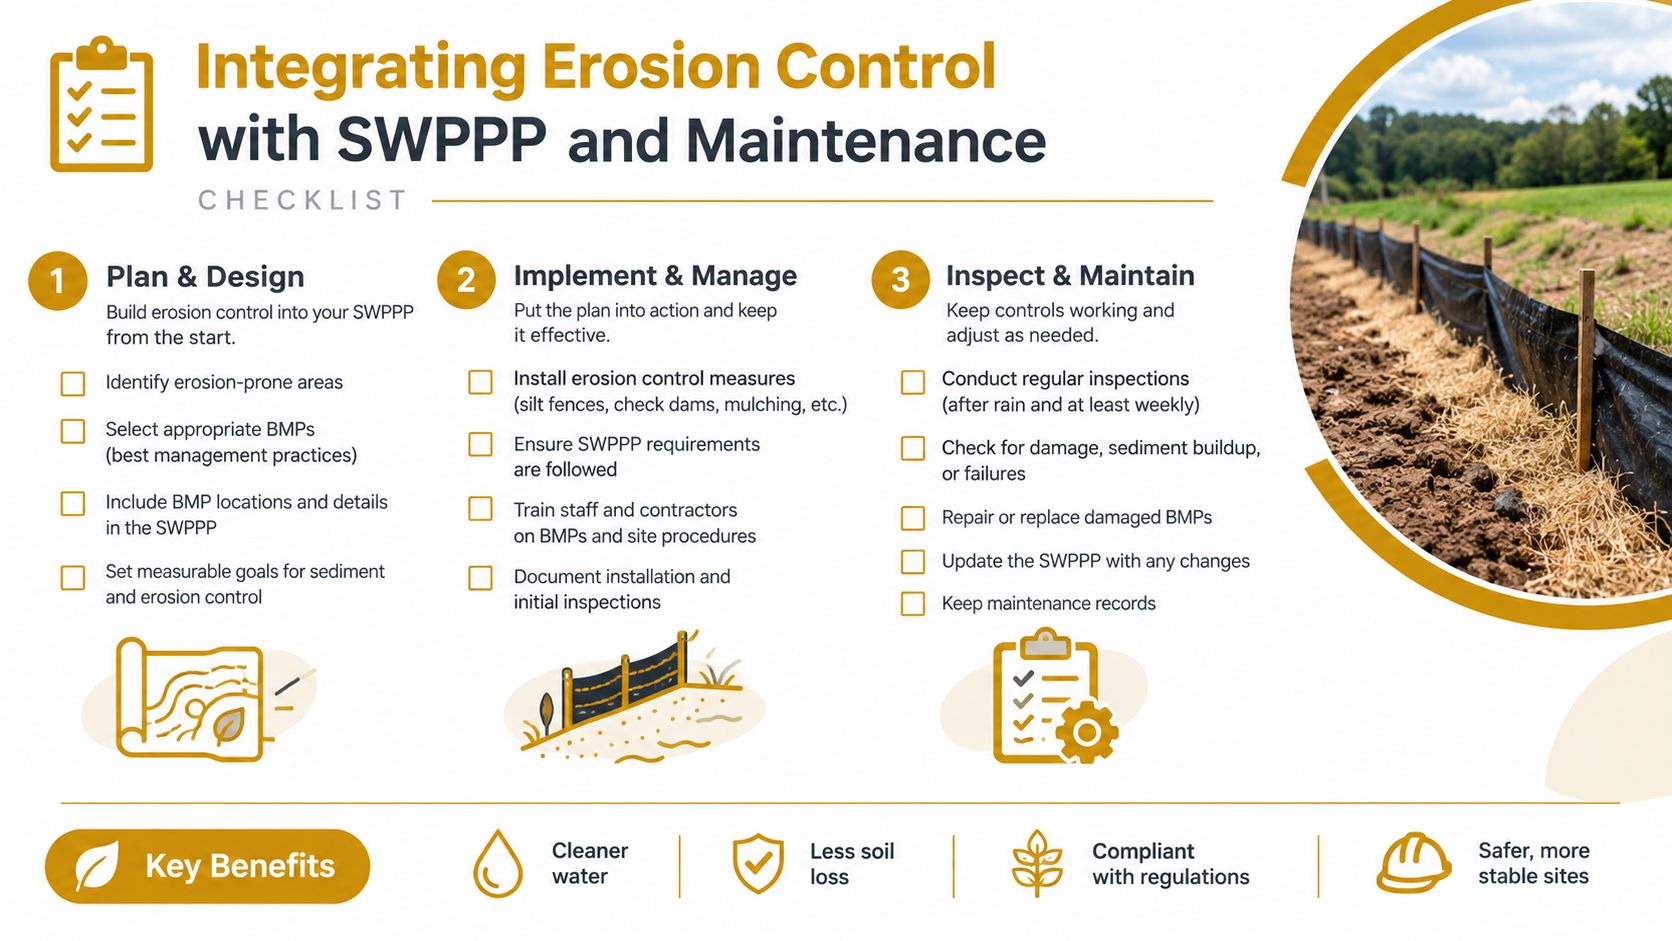
Many construction-stormwater programs typically require inspections every 7 to 14 days and after rainfall events, as described in the University of California stormwater BMP handbook. Follow the schedule and permit requirements that apply to your jurisdiction, and assign a named inspector rather than leaving the task to whoever happens to be onsite.
Record the date, weather, active work, BMP condition, deficiencies, photographs, repairs, and follow-up verification. Maintenance should be specific. Clean accumulated sediment, reset displaced barriers, repair breaches, stabilize eroded outlets, refresh entrances, and protect newly exposed areas before the next inspection. Good records don't replace good work, but they help the team prove that the work was planned, performed, and corrected.
Inspection habit: Walk the controls from the highest ground to the discharge point. That direction reveals where clean water becomes dirty and where flow is concentrating.
Case studies of erosion control in action
A useful case study should show the decision process, not just announce a result. Consider a highway expansion project with several work areas opening at different times. The contractor limited clearing to the active phase, applied mulch to exposed soil, and installed perimeter silt fences before earthwork advanced. Crews then stabilized completed sections while the next area was prepared.
The strength of that approach wasn't one product. It was sequencing. Mulch reduced the amount of soil available for runoff, while the fences provided a downstream safeguard. The team treated erosion prevention as the primary defense and used sediment controls to manage what remained mobile. The lesson applies to roadway, utility, and site-development work: phase the disturbance, cover the source, and keep the controls ahead of the storm.
A contrasting residential project relied on generic perimeter BMPs after opening a broad area for grading. Heavy rain concentrated through an unprotected route, sediment accumulated at low points, and damaged controls were left in place rather than repaired. The crew then had to remove sediment, rework the drainage path, replace failed controls, and address compliance consequences.
The failure came from a planning gap, not necessarily from choosing the wrong fence. The contractor treated installation as completion, rather than as the start of an inspection and maintenance cycle. The project also lacked a clear match between its active work area, its runoff routes, and its temporary stabilization strategy.
Lessons contractors can apply
- Design for the active phase: Don't install controls for an imagined final site while current grading creates different flow paths.
- Protect high-risk surfaces first: Slopes, outlets, stockpiles, and drainage crossings deserve early attention.
- Inspect after change: New grading, traffic, trenching, and storms can invalidate yesterday's layout.
- Repair promptly: A breached control can turn a manageable discharge into a sitewide sediment problem.
Conclusion and next steps
Effective erosion control construction is a sequence of decisions. Limit the disturbance footprint, shorten the time soil remains bare, stabilize surfaces quickly, and direct runoff through stable paths. Use sediment BMPs as layered protection, not as permission to leave exposed soil unmanaged.
Product selection should follow site conditions. Consider slope, climate, runoff concentration, rework frequency, installation speed, durability, and environmental compatibility before choosing mulch, seed, blankets, mats, diversions, or barriers. For larger disturbed sites, build the required combination of entrances, perimeter controls, inlet protection, basins, and conveyance measures into the plan rather than adding them after problems appear.
Your next steps are straightforward:
- Map disturbed areas and likely flow paths.
- Divide the work into clearing, grading, stabilization, and maintenance phases.
- Select source-control and sediment BMPs for each phase.
- Add locations, responsibilities, inspection timing, and repair procedures to the SWPPP.
- Walk the site after rainfall and document every corrective action.
When concrete work is part of the project, include washout containment in the same field discipline. Visit Reborn Rentals to review ready-to-deploy concrete washout pans for short-term construction and renovation needs. Confirm the pan size, delivery conditions, and schedule before your next pour so slurry containment supports both clean operations and responsible site management.