
Portable Containment Unit Guide for Concrete Washout
The pour's done, the pump hopper's dirty, and somebody's asking where the washout should go before the forecast turns ugly. That's usually the moment a jobsite either stays clean and defensible or turns into a problem that sticks to the whole project.
A portable containment unit is the difference between a controlled cleanup point and a random hole in the ground. Under the EPA's NPDES construction stormwater framework, concrete washout wastewater can't just go wherever crews find space, it has to be managed with appropriate controls EPA construction stormwater requirements.
What Unmanaged Concrete Washout Really Costs
A crew finishes a late pour, the washout pit is just a scraped-out patch near the access road, and everyone assumes it can wait until morning. Rain hits overnight. By daylight, the slurry has moved where nobody wanted it to go, and the superintendent is the one explaining it.
EPA identifies concrete washwater as highly alkaline, with a pH near 12, and warns that rainfall can push uncovered washout out of bounds and into soil, drains, or surface water EPA concrete washwater guidance. The problem is not intent, it is whether the washout area was built and managed to prevent discharge.
Why regulators treat washout as a pollution issue
The regulatory shift changed washout from a crew chore into a compliance item. EPA's stormwater program treats concrete washout as material that must be contained, not casually dumped, so the right container is a site-control measure, not a convenience.
Practical rule: if a washout area can leak, overflow, or get buried under rainwater, it is not a containment system, it is a liability.
A portable containment unit gives the crew a designated place for both washwater and solids and helps keep material out of storm drains and surface waters. It also supports the pollution-prevention plan the site is supposed to follow EPA concrete washout PDF. On a live jobsite, that means the general contractor, pump operator, and finisher all work from one clear operating point instead of making ad hoc calls.
The hidden cost shows up when the site depends on whatever dirt, plywood, or leftover liner is available that day. Those setups usually work until the first heavy rain exposes the weak point, and then the cleanup, the documentation, and the disposal chain all become someone else's problem.
Sizing Your Unit for Actual Working Capacity
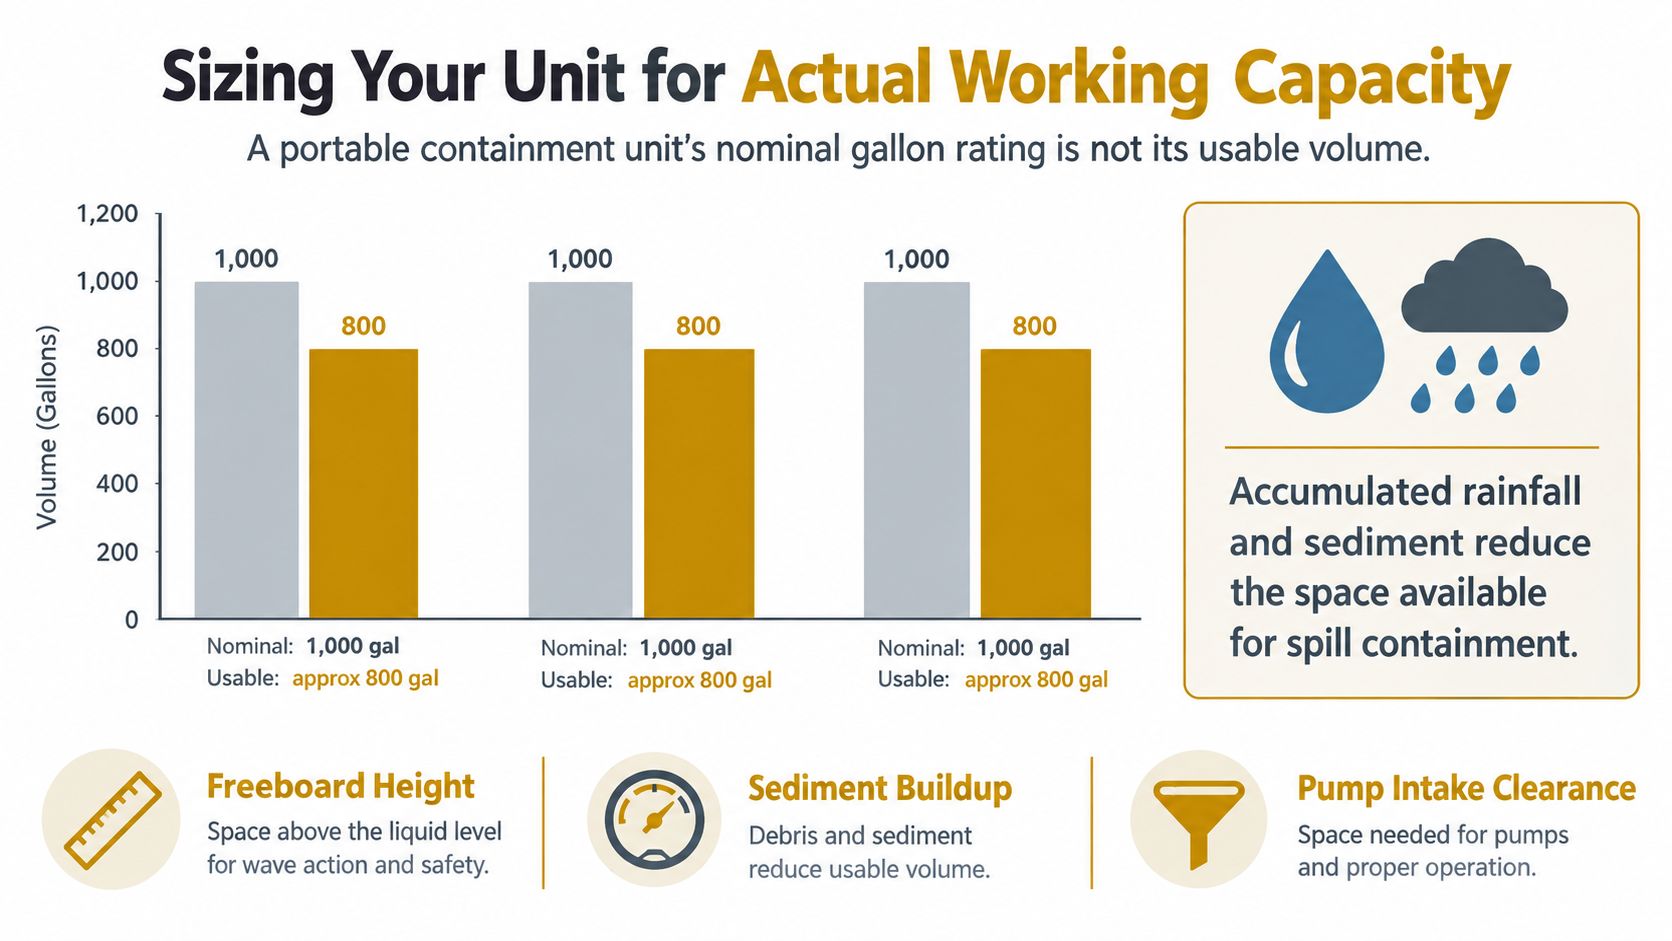
A lot of crews read the gallon rating on a portable containment unit and stop there. That's the mistake. Nominal capacity is not the same thing as working capacity, because real use eats into the space before a single storm ever arrives.
What reduces usable volume
Washout slurry brings solids with it, and those solids take up room. Freeboard has to stay open so the unit can handle rain, splashing, and uneven inflow. EPA's BMP guidance says a practical sizing calculation has to account for anticipated washwater volume plus rainfall, with usable capacity capped below the vessel's geometric maximum, and it gives a 75% trigger for servicing, with a 441-gallon unit leaving about 331 gallons before overflow risk rises EPA BMP field manual.
That's the part many rental conversations miss. A unit advertised at a certain size is not a promise that the whole number is available for active use. Once you factor in solids, splash, and weather, the safe working number is smaller.
A simple way to think about planning
Use the container as a managed reservoir, not a full bucket.
- Estimate the washout load: count the pours, pump hoppers, and finishing crews that will use it.
- Leave room for rain: uncovered capacity is always less than advertised capacity.
- Service before the edge: don't wait for visible overflow, use the 75% trigger from EPA guidance.
- Treat solids as volume loss: hardened residue reduces the liquid space faster than most crews expect.
A container that looks roomy on day one can be functionally tight by the time the second truck is done.
The working-capacity idea matters most for short jobs and small renovations. If the site gets a storm before pickup, the “big enough” unit can become too small very quickly. The safest call is usually to size for the pour plus weather, or schedule vacuum service before the forecast changes.
Strategic Placement and Access Logistics
A washout unit can pass inspection on paper and still fail in the field if nobody can reach it without cutting corners. Put it too close to the pour and it blocks work. Put it too far away and crews start looking for the shortest path, which is usually the path that leaves slurry on the ground.
The placement target should keep the unit away from drains, ditches, and water bodies, while still giving trucks and crews a practical route in and out. Keep it on firm, level ground that can support the load without settling or sinking, especially after rain. Soft fill, saturated soil, and churned-up access lanes make inspection harder and raise the chance of liner damage at the edges.
A setup that works in everyday conditions usually does three things well:
- Stays accessible. Crews can get to it without crossing active traffic or dragging washwater across the site.
- Sits on stable ground. The base holds its shape instead of deforming under a loaded unit.
- Remains visible from the work zone. If the team can't see it, they are more likely to ignore it.
If the washout point is awkward, people improvise. That is where contamination starts.
Distance still matters. EPA guidance calls for keeping washout containers set back from sensitive features, and the disposal side needs equal discipline once the unit reaches the service point noted earlier in the sizing section EPA washout siting and capacity guidance. The practical trade-off is straightforward. You need enough separation to protect the site, but not so much that crews decide the ground is easier than the designated area.
On tight jobsites, the best move is to plan the washout zone before the first truck arrives. That avoids the familiar scramble where the crew is already pouring, the access route is already congested, and the only available spot is the one that will cause problems later.
Portable Units Versus In-Ground Pits and DIY Forms
Old-school washout setups still show up on jobsites, usually because somebody wants to save time or thinks the site only needs a temporary hole. In practice, those options often cost more in labor, risk, and cleanup than the rental line item ever would.
Where the alternatives break down
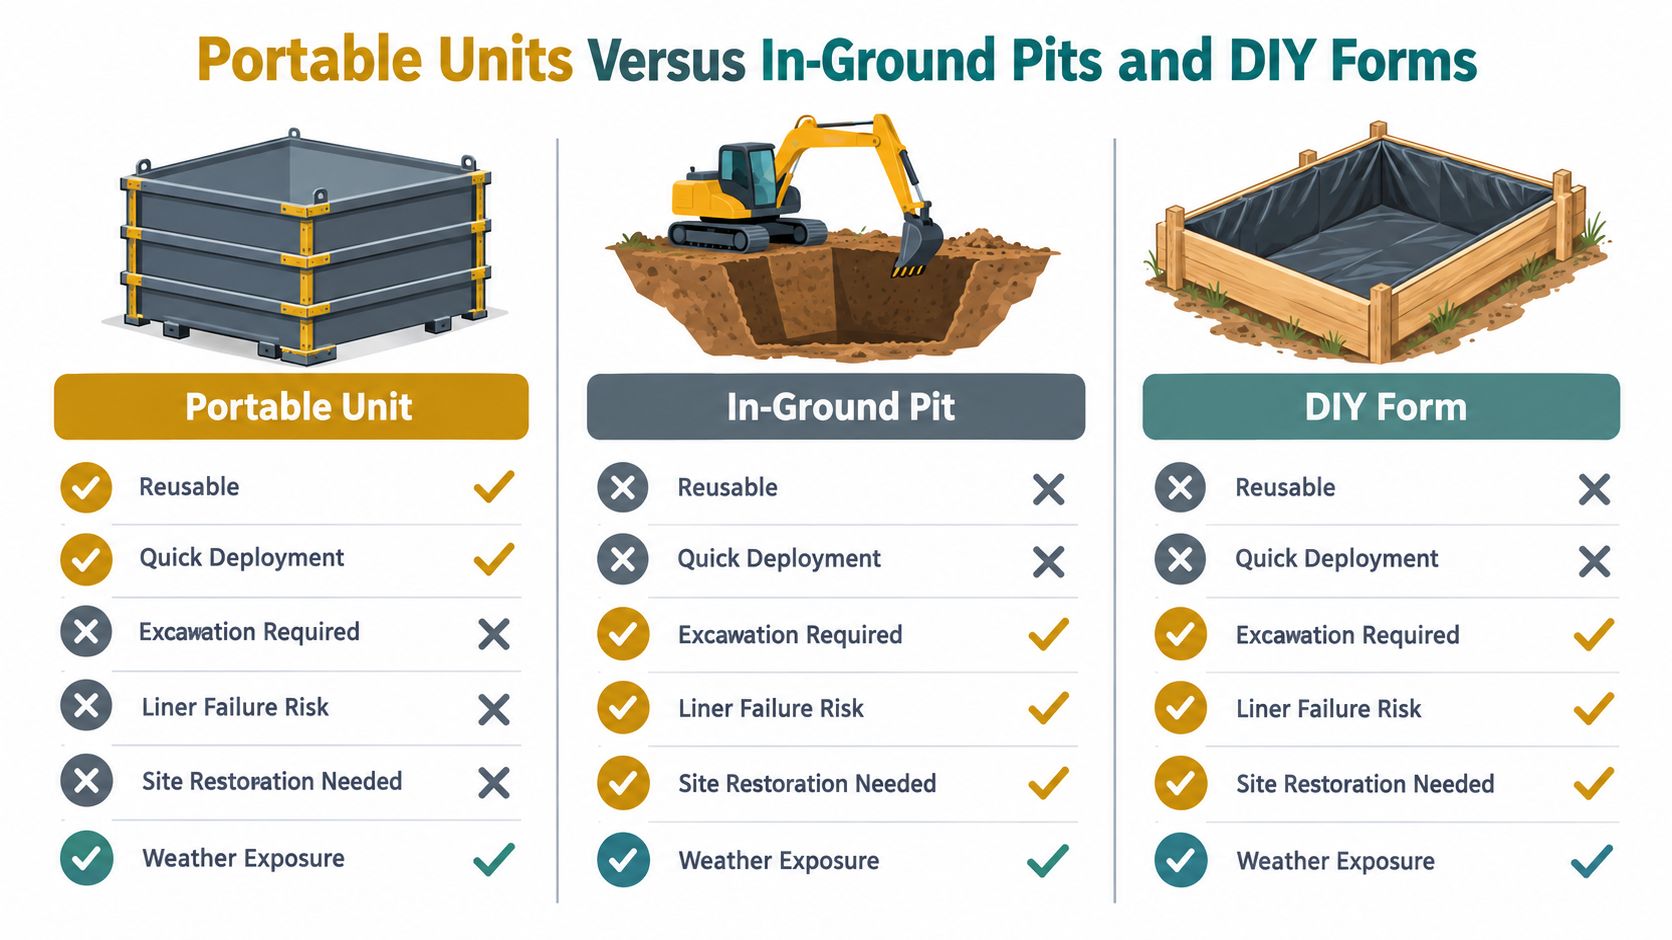
An in-ground pit starts with excavation and usually ends with soil handling. If the liner tears, the contaminated material underneath becomes part of the disposal problem. A DIY form built from wood and plastic can work for a moment, but it tends to age badly under wet, abrasive, and constantly changing site conditions.
A portable containment unit avoids those weak points by being leak-proof, inspectable, and reusable. It doesn't remove the need for discipline, but it does remove the guesswork around whether the pit wall, plastic sheeting, or backfilled soil will hold up when the crew is busy and the weather changes.
What contractors actually trade off
The trade-off isn't just equipment style. It's the amount of field labor you want to commit to a setup that may never be reliable.
- Portable unit: easier to deploy, easier to inspect, and easier to remove when the job is done.
- In-ground pit: more digging, more restoration, and more uncertainty if the liner gets damaged.
- DIY form: low material cost up front, but much higher failure risk when it's loaded, bumped, or left out in bad weather.
The practical advantage of a portable unit is that it keeps the washout problem where you can see it. That matters because the cleanup burden stays in one managed place instead of spreading into the soil.
For contractors comparing solutions, Reborn Rentals is one option that supplies concrete washout pans for jobsite use, which can be delivered to the site and removed when full. The important point isn't the brand name, it's that an engineered container usually creates fewer moving parts than a pit built from whatever the crew has on hand.
Managing the Chain of Custody After Containment
A full unit isn't the end of the job, it's the point where paperwork starts to matter. That's where a lot of otherwise clean-looking sites still pick up compliance exposure, because the washout material has to be handled after it leaves the container.
EPA's objective is to retain both washwater and solids in leak-proof containers and recycle 100% of the collected material where feasible EPA concrete washout disposal guidance. That sounds simple until the container fills and nobody has a clear path for pumping, hauling, or documenting what happened next.
The parts that need a paper trail
The physical unit is only one link in the chain. The rest is administrative, and inspectors care about it because a sealed container doesn't prove lawful disposal by itself.
A solid chain of custody usually answers four questions:
- Who serviced it? The person or hauler who removed the liquid or solids should be identifiable.
- Where did it go? The receiving facility or disposal path should be clear.
- What was removed? Liquid, hardened solids, or both need to be described consistently.
- What record remains? Tickets, manifests, or service notes should be kept with the project file.
A leak-proof container can still become a compliance problem if the contractor can't show timely servicing and lawful disposal.
That point matters on short-term rentals and small renovations, where crews sometimes think an empty unit means the responsibility is over. It doesn't. If the container overflowed in rain before pickup, or if the removal step wasn't documented, the project still has an exposure problem even if the site looks tidy by the end of the day.
The cleanest operations treat the container like a monitored system, not passive storage. Once it's full, the material has to move through a known path, and the records have to move with it. That's the part that closes the loop.
Rental Deployment and Daily Inspection Best Practices
A Monday inspection often finds the problem that looked harmless on Friday. A corner seam starts to peel, the liquid line sits closer to freeboard than anyone expected, or a cover that seemed secure has shifted after a rain event. Catching that early keeps a rental unit in service and keeps the site from inheriting a mess.
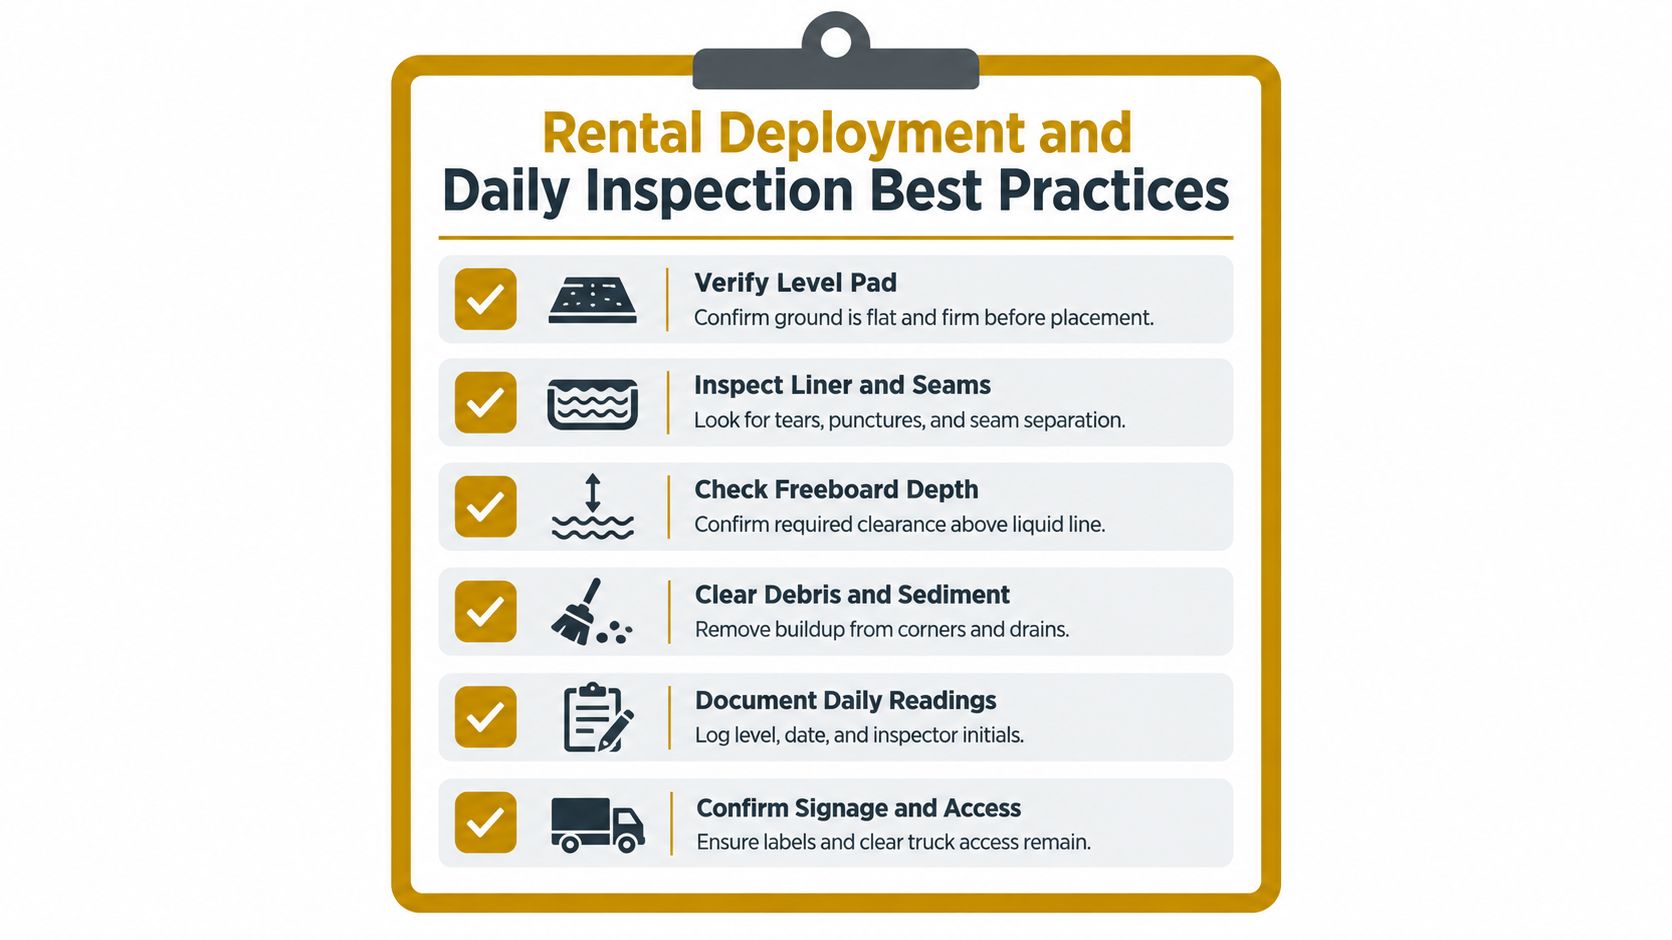
EPA guidance calls for daily inspections and extra checks after heavy rain, with prompt repair when damage shows up. EPA concrete washout maintenance guidance is a good reminder that a rental unit only works when someone is actively watching the condition of the liner, seams, and remaining capacity.
A site superintendent does not need a long checklist to stay ahead of trouble. The better routine is a short walkaround with a clear eye on three things: the pad under the unit, the integrity of the containment, and the room left before overflow. If the base has settled, the liner is scuffed at the corners, or the washout is close to its working limit, the response has to happen before the next pour, not after.
That same walkaround should include the practical details that get overlooked. Note the date, the liquid level, and who inspected it. Clear away sediment before it eats into usable capacity. Make sure signage is visible and access for the hauler stays open. Those are small tasks, but they keep the unit from drifting into a reactive cleanup mode.
The rental process works best when delivery, placement, inspection, and pickup are treated as one continuous job. Stable ground at drop-off matters. So does a route for service trucks and a plan for removal before rain, debris, or overfilling tightens the margin. If the crew keeps the unit on the same disciplined schedule it uses for the rest of the SWPPP, the site stays cleaner and the records are easier to defend.