
Concrete Slurry Storage Requirements Guide
The last mixer truck has left, the crew is washing chutes, and dark clouds are building over the site. A shallow depression beside the slab looks convenient until rainwater starts filling it, carrying alkaline concrete residue toward the nearest drain. At that point, slurry storage requirements stop being paperwork and become a live site-control problem.
Concrete washout needs containment that holds both wash water and hardened solids, remains impermeable, and preserves enough spare capacity for rainfall. The same principle applies to agricultural slurry, where storage must account for production, weather-driven inflows, and the time when spreading may be unsuitable. The practical question is simple: can your containment keep everything inside until an approved removal or disposal route is available?
What Ignoring Slurry Storage Requirements Actually Costs
A washout area can fail within minutes if the crew sizes it only for cleaning water. Rain adds volume immediately, while an almost-full pit has no practical room left. If the containment is unlined, damaged, or protected by a weak berm, contaminated water can cross the work area and enter drainage infrastructure.
The response is disruptive. The site team may need to stop work, isolate the affected area, shield nearby drains, record the incident, and arrange lawful removal. Regulators may treat an uncontrolled discharge as an environmental breach. The project owner may also see it as poor site management rather than bad weather.
Practical rule: Treat every washout unit as pollution-control infrastructure, not as a hole for leftover concrete.
Cleanup costs continue after the visible water is gone. Concrete residue can raise the pH of receiving water and harm soil and aquatic environments. Pumping, specialist waste handling, soil removal, drainage protection, and restoration may all be required. Even without enforcement action, those tasks consume labor, plant time, and access space that the programme did not allow for.
The same operational risk applies to agricultural slurry, but over a longer storage period. In England, the historical SSAFO baseline has been at least 4 months of storage. Environment Agency guidance recommends 6 months to better align with Farming Rules for Water expectations. In Nitrate Vulnerable Zones, the legal minimum is 5 months for cattle, sheep, goats, deer, and horses, and 6 months for pigs and poultry, as set out in the government guidance on planning slurry storage.
Scotland requires capacity for 22 weeks for most livestock slurry and 26 weeks for pig slurry. These figures show why the legal minimum should not automatically become the operating target. Storage also needs allowance for poor weather, delayed spreading, pump failure, and restricted site access. A rental washout pan can provide controlled containment while preserving the freeboard needed for stormwater, rather than forcing the crew to rely on an improvised pit.
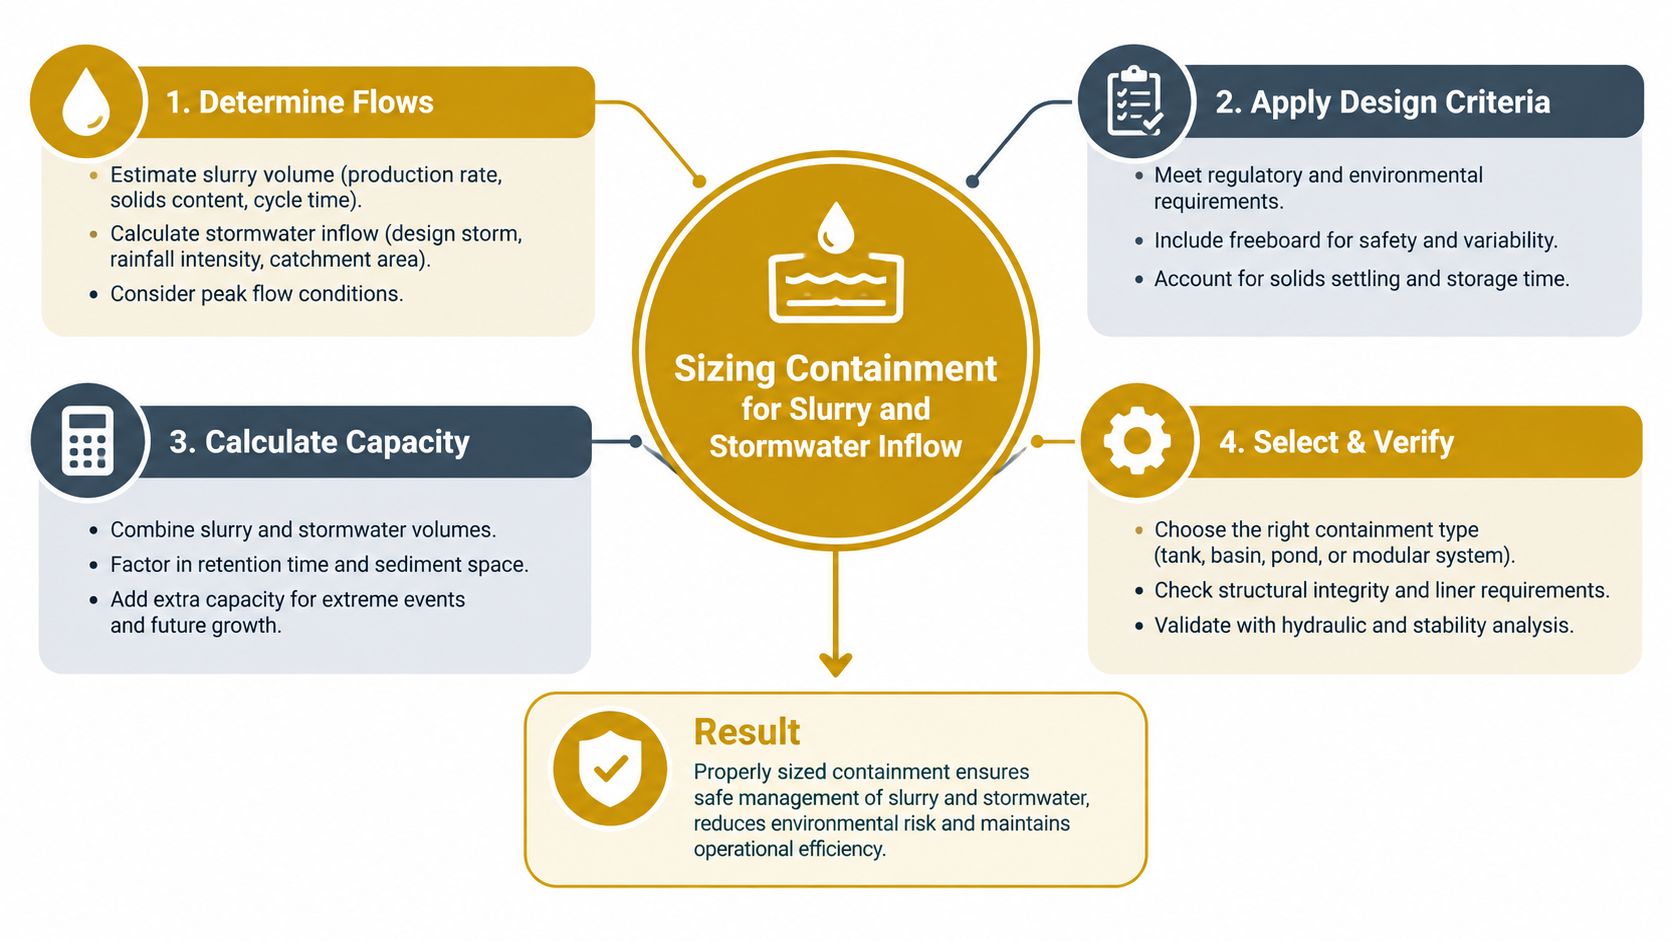
Sizing Containment for Slurry and Stormwater Inflow
A washout pan can be large enough for the concrete operation and still overflow after a storm. The working capacity must cover liquid waste, incoming water, freeboard, and solids that settle before removal.
Start with the expected washout volume. Add direct rainfall for the period the pan will remain on site, then account for runoff if nearby hardstanding drains toward it. Idaho Transportation Department concrete waste management guidance sizes slurry wastewater storage as the expected wastewater volume plus a 10-year, 24-hour storm event. Use the applicable local rainfall and catchment data. The capacity printed on a rental unit is not a substitute for that calculation.
Track three separate allowances:
- Liquid waste volume: Wash water and cement-rich residue from chute, pump, and tool cleaning.
- Rainfall volume: Direct rain entering the opening, plus runoff from surfaces that fall toward the pan.
- Reserved capacity: Freeboard and volume occupied by settled or hardened material.
A practical benchmark is at least 4 inches of freeboard for above-grade washouts and 12 inches for below-grade washouts. The operator should also arrange removal when the unit reaches about 75% of capacity, based on the concrete washout guidance from the Tennessee Department of Environment and Conservation. These limits create room for a weather change instead of leaving the crew with a full pan and no compliant discharge route.
Use the site footprint, not just the tank label
Set the pan where mixer trucks can reach it without crossing unnecessary work areas, while keeping clean site runoff away. A low point may appear convenient, but it can turn the rental unit into a stormwater basin. Covers reduce direct rainfall and preserve reserve capacity, although wind-driven rain, uncovered periods, and water carried by equipment still require allowance.
Agricultural slurry follows the same calculation over a longer holding period. The Environment Agency's winter-readiness guidance recommends planning for 6 months of storage and stresses that freeboard means the full lagoon or tower volume is not available for slurry. Size the store around usable operating volume, not its external dimensions, so rainfall and required headspace do not consume the margin needed for safe management.
Groundwater Protection and Structural Impermeability
Containment must prevent slurry from reaching soil, groundwater, and surface water throughout its service life. A large footprint does not make a system compliant. The base, walls, joints, liners, and connections must resist leakage under the expected liquid pressure, equipment loads, weather, and chemical exposure.
English regulations require slurry tanks, effluent tanks, channels, and reception pits to have impermeable bases and walls, corrosion protection, and suitable separation from water resources. Placement is generally prohibited within 10 metres of inland freshwaters or coastal waters unless the regulator accepts adequate safeguards. These requirements are set out in the 2010 English regulations.
An unlined excavation does not provide dependable liquid containment. Soil can allow seepage, while a poorly secured liner can fail under sharp aggregate, exposed rebar, loader traffic, or repeated movement. Solids may conceal a puncture, allowing leakage to continue before anyone sees the defect.
Select the location before the equipment
Set the washout away from storm drains, open ditches, waterbodies, and areas where surface water collects. Keep clean runoff out of the pan so its usable capacity remains available for slurry and wash water. A clear access route matters just as much. If trucks must cross a slope or soft shoulder, operators may avoid the designated washout when conditions worsen.
Prepare a stable, level supporting surface that can carry the filled unit and the equipment using it. Settlement can distort the base, stress the walls, and compromise impermeability. Plan vehicle movements before delivery, then protect the perimeter from impact by giving drivers a direct approach and departure path.
Match construction to structural demand
Regulations address structural performance as well as pollution prevention. Wales requires bases and walls to withstand characteristic loads calculated under BS 5502: Part 50: 1993, as set out in the Water Resources (Control of Pollution) (Silage, Slurry and Agricultural Fuel Oil) (Wales) Regulations.
For a temporary concrete washout, a manufactured liquid-tight pan reduces uncertainty around wall integrity and the condition of the containment surface. It also gives the site a defined footprint for managing freeboard and keeping stormwater inflow under control. A permanent agricultural store requires competent design, suitable materials, inspection records, and a maintenance plan. Temporary use does not justify replacing engineered containment with a convenient excavation.
Daily Monitoring and Routine Maintenance Protocols
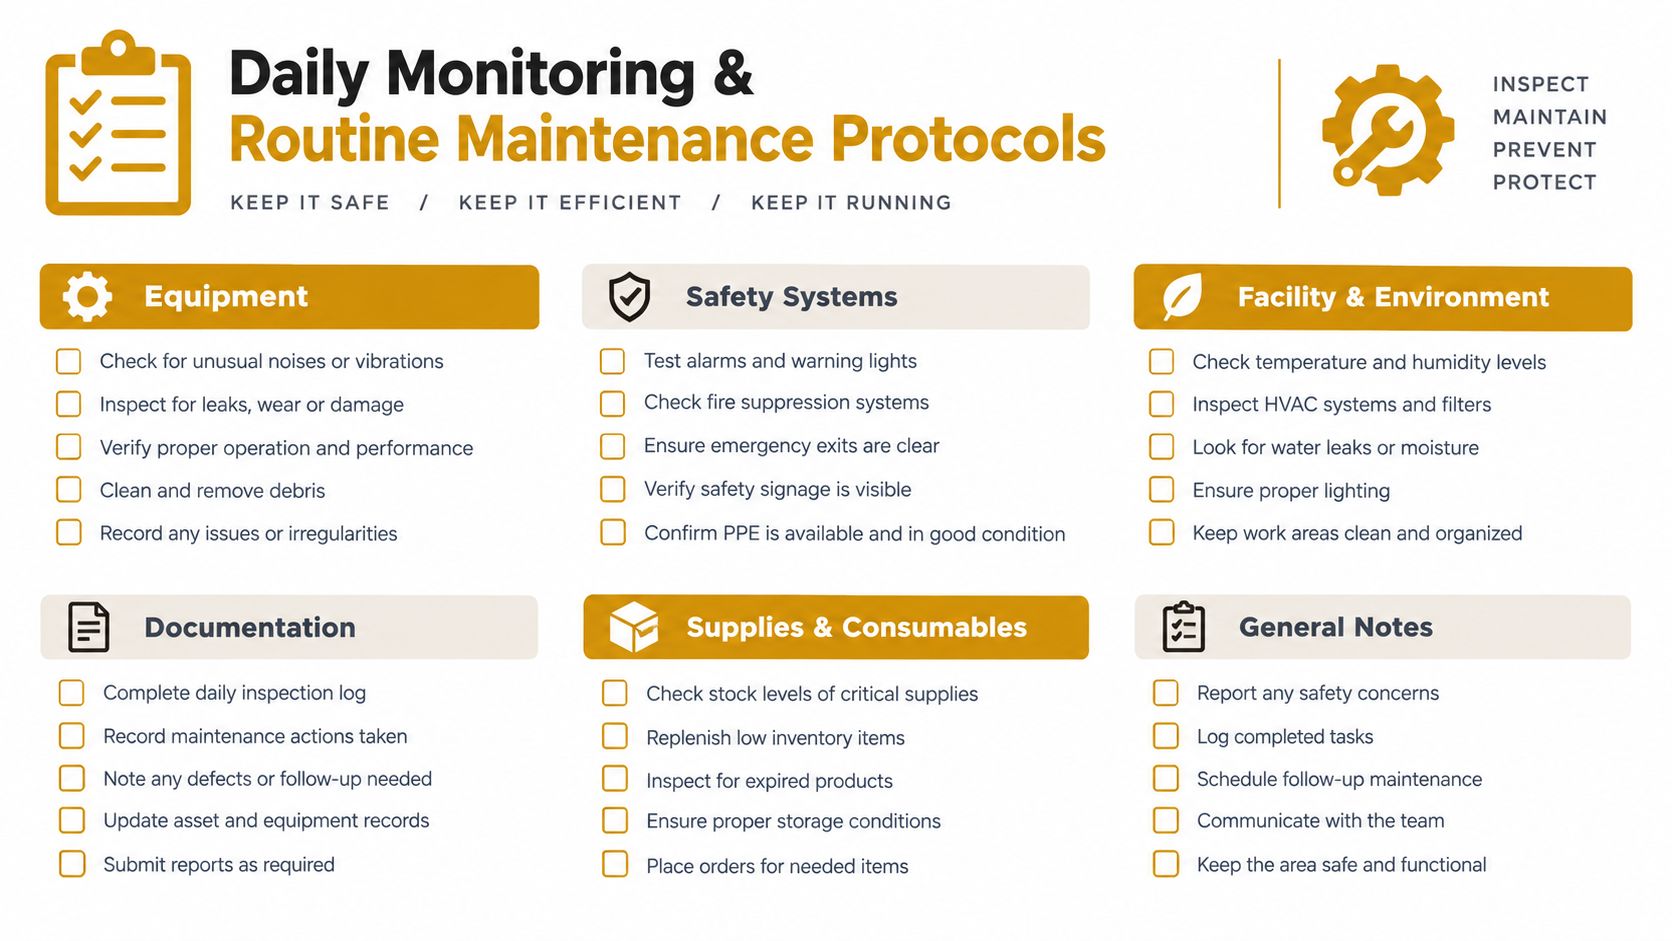
A compliant washout unit can become non-compliant during a single shift if the crew lets solids build up, leaves it uncovered before rain, or parks equipment where it damages the walls. The foreman should assign one person to check the containment during the daily site walk and record the result.
The check doesn't need to delay production. It does need to be consistent.
Build the inspection into the morning routine
Use a short checklist that covers condition, capacity, access, and records:
- Inspect the base and walls: Look for tears, cracks, bulging, displaced edges, corrosion, or impact damage.
- Check freeboard: Confirm that rain and wash water still have room to enter without overtopping.
- Look for external leakage: Wet soil, staining, or an unexplained wet track outside the unit needs immediate attention.
- Clear surrounding drainage: Keep clean water from flowing into the washout and contaminated water from flowing toward a drain.
- Confirm the cover position: Cover the unit when it isn't actively receiving washout, particularly before wet weather.
- Record the condition: Note the date, inspector, visible level, damage, corrective action, and planned pump-out or clean-out.
Hardened concrete at the bottom is a capacity problem, not just a housekeeping issue. It displaces liquid volume, reduces the freeboard available for rainfall, and can make the remaining material harder to remove. The concrete washout guidance advises routine emptying and identifies about 75% full as a practical removal trigger.
Don't rely on pH treatment as a substitute for containment
Testing may help the site team understand the condition of wash water, but neutralizing agents don't repair a leaking unit or create missing freeboard. Handle treatment and discharge according to the project's permit, SWPPP, and local authority requirements. If the approved route is pumping and off-site disposal, arrange it before the unit becomes difficult to access.
The crew should also know the emergency response. Stop the source, protect nearby drains, isolate the affected area, notify the responsible environmental contact, and document what happened. A written response plan is more useful than trying to invent one while slurry is moving across the site.
Evaluating DIY Pits Versus Engineered Rental Solutions
A temporary excavated pit can look inexpensive because the first cost appears to be limited to excavation and liner material. The actual workload includes selecting a suitable location, shaping the pit, preparing the surface, installing and securing the liner, checking for damage, maintaining access, removing hardened residue, and restoring the area afterward.
A rental pan takes a different route. The supplier provides a manufactured containment unit, and the project team manages delivery, placement, inspection, use, and collection. That can simplify a short pour, especially where the site has limited space or the ground conditions make excavation unattractive.
| Feature | DIY Excavated Pit | Rental Washout Pan |
|---|---|---|
| Initial setup | Requires excavation, grading, lining, and perimeter control | Requires delivery, placement, and site protection |
| Leak risk | Depends on liner quality, preparation, anchoring, and equipment traffic | Depends on the unit's condition, correct placement, and inspection |
| Mobility | Usually stays in the excavated location | Can be positioned for changing pour logistics |
| Cleanup | Requires breakout, liner handling, backfill, and surface restoration | Requires removal of liquid and hardened solids before collection |
| Weather exposure | Often needs separate cover and runoff controls | Can be paired with a cover or lid where supplied |
| Documentation | Project team must retain installation and inspection records | Supplier specifications can support the site file, but inspections remain the contractor's responsibility |
| Best fit | Longer-duration work with suitable ground and controlled access | Short-term pours, constrained sites, and projects needing rapid deployment |
A cheap pit isn't cheap if one loader bucket, rut, or sharp stone compromises the liner.
DIY construction can make sense where the site already has suitable excavation capability and the containment will remain in place long enough to justify the setup and restoration work. It becomes less attractive when the pour is short, the ground is congested, or the site needs to move the washout point as work fronts change.
Manufactured pans also aren't automatic compliance. The team still needs to verify capacity, keep the unit away from sensitive drainage, maintain freeboard, prevent vehicle impact, and arrange proper disposal. Renting shifts some design and fabrication risk to the supplier, but it doesn't shift the project's environmental responsibilities.
Streamlining Compliance with Washout Pan Rentals
For a short concrete operation, rental containment can turn a complicated temporary works task into a controlled logistics item. The project manager still has to choose the right capacity and location, but the unit arrives ready for placement instead of requiring excavation, lining, and later backfill.
Reborn Rentals lists washout pans and containers for concrete washout, including a 72' x 72' x 24' option with approximately 18.25 tons of load capacity and about 441 gallons of liquid capacity, plus a 72' x 72' x 14' option listed at about 310 gallons. Those product figures are useful for planning, but the team should compare them with expected washout volume, rainfall exposure, freeboard, and settled solids before ordering.

Order around the pour, not after it
A practical rental workflow has three decisions:
- Specify the work: Identify the pour dates, expected truck and pump activity, site address, access restrictions, and required containment dimensions.
- Confirm the unit: Check liquid and load capacity, freeboard expectations, cover or lid availability, delivery conditions, and disposal responsibilities.
- Book the logistics: Set the delivery window early enough for the pan to be inspected and positioned before concrete arrives.
Reborn Rentals presents a three-step online checkout, Cart, Details, and Checkout, with daily pricing listed from $25 per day. The provider also notes possible additional charges for delivery, rough terrain, and express orders. Those items should be included in the project estimate rather than treated as surprises after the pour.
The value of rental isn't just the equipment. It reduces the number of site activities competing with the concrete schedule. A delivery team can place the unit where the washout operation needs it, while the superintendent keeps responsibility for access, inspection, weather protection, and final disposal.
Don't order solely by the largest advertised capacity. A larger pan may require more room, stronger ground, or different access equipment. Choose a unit that fits the planned operation and leaves practical reserve capacity, then confirm the arrangement with the supplier and the project's environmental lead.
Final Disposal and Site Restoration Best Practices
The containment job isn't finished when the last truck leaves. Liquid wash water and hardened concrete are separate waste streams, and both need an approved handling route. Leaving the pan full for an extended period exposes the site to changing weather, reduced capacity, and avoidable access problems.
Start by confirming who will remove the material and where it will go. The project environmental plan, permit conditions, waste documentation, and local requirements should control whether the liquid is pumped for off-site disposal, treated through an approved process, or handled by another authorized method. Don't discharge alkaline wash water to a storm drain, ditch, soil surface, or waterbody because the unit is inconvenient to empty.
Remove liquid before the unit becomes a hazard
Schedule pumping while the pan remains accessible to the service vehicle. Keep hoses contained, protect nearby drainage, and inspect connections before transfer begins. If filtration or treatment is part of the approved method, document the process and retain the relevant records with the project's environmental file.
Hardened residue needs controlled removal too. Break it out without puncturing the pan, load it into suitable transport, and send it to an approved construction and demolition waste facility or recycling route where accepted. The residue isn't a free source of fill unless the project and local rules specifically allow that use.
Leave the ground as controlled as the work area
After collection, inspect the pan for damage and clean it according to the rental or equipment procedure. Check the ground beneath and around it for staining, rutting, escaped slurry, or accumulated solids. Remove contaminated material through the approved waste route, then restore the surface so it won't direct runoff toward a drain or waterbody.
Keep the closeout file together:
- Containment records: Delivery, placement, inspection, and removal dates.
- Capacity records: Freeboard checks, clean-outs, and pump-out triggers.
- Waste records: Transfer notes, disposal receipts, and treatment documentation.
- Incident records: Any overflow, leak, corrective action, and notification.
- Restoration records: Final inspection photographs and site-condition notes.
For farm slurry, contingency planning matters when weather delays spreading or storage approaches capacity. The Environment Agency's winter preparation guidance emphasizes inspecting cracks, testing pumps and pipelines, and confirming adequate storage before wetter conditions arrive. The right plan may involve temporary storage, off-farm storage, or an authorized treatment route, but it should be agreed before the main store is full.
Reborn Rentals provides concrete washout pans and containers for short-term construction and renovation work, with online booking, listed specifications, and delivery coordination. To plan containment around your next pour, review the available options and contact Reborn Rentals with your dates, site access details, and required capacity.