
How to Write a Stormwater Management Plan for Construction
You're standing on a fresh pad while the mixer is still on the street, and the inspector wants the stormwater management plan before anyone cuts another inch of soil. The lot looks small. The building is smaller. Rain is in the forecast tonight, and the only control on site is a roll of silt fence still in the truck.
That gap is how sites get cited. Soil that is still vegetated typically sheds only about 10% of rainfall as runoff, while an urban surface with 75% to 100% impervious cover can generate approximately 55% runoff, according to a NOAA-hosted technical report. The same materials cite USGS observations that identical storms in 1995 produced two to three times more runoff in an urban watershed than in a rural one. Once roofs, haul roads, and a concrete pad replace that soil, the plan is what keeps sediment and slurry out of the inlet.
Check Whether Your Project Needs a Plan and Permit
Say the crew pours a pad on a 0.8-acre lot and the inspector asks for a plan nobody thought they needed. The footprint is not the test. Disturbed area is. Clearing, staging, stockpiles, haul roads, and any lot inside a larger common plan of development all count, even when the building itself is small.
Federal coverage arrived in two steps. The Congressional Research Service summary of the Clean Water Act stormwater program traces the 1987 amendments to EPA's Phase I rule published on November 16, 1990, which required permits for construction disturbing at least 5 acres, and the Phase II rule on December 8, 1999, which expanded coverage to sites disturbing between 1 and 5 acres. That summary also reports that more than 6,000 communities must develop stormwater management plans under NPDES requirements.
Permit triggers by disturbed area
| Disturbed area | Federal trigger | What you must prepare |
|---|---|---|
| Under 1 acre, standalone | Usually no federal construction permit | State and local erosion control rules may still require a plan |
| 1 to under 5 acres | Covered under the Phase II construction rules | Notice of intent, stormwater plan and permit compliance |
| 5 acres or more | Covered under the Phase I construction rules | Same as above, plus stricter review and notice requirements |
| Part of a larger common plan | Coverage counts the whole development's disturbed area | One plan covering all phases and lots |
State and local programs often sit below those federal lines or add their own rules for impaired waters, buffers, and post-construction treatment. The state construction general permit, read with the local MS4 ordinance, is what the inspector enforces.
Work the decision in this order. Pull the grading plan. Total every acre that will be bare, including staging yards, borrow and fill sites, and haul roads. If the lot is one piece of a subdivision or phased campus, add the disturbed area of the whole common plan, not just today's lot. Then match that total to the state program and file coverage before the first dozer shows up. I would not wait for the pre-construction meeting to discover the common-plan total.
The permit question is answered by disturbed acreage on the grading plan, not by the size of the building.
Assess the Site Before You Draw a Single BMP
Controls copied from a template fail when the water doesn't follow the drawing. A defensible stormwater management plan is a site-specific control system, and the EPA construction general permit tools call for a scaled map of drainage divides, slopes, flow directions, discharge points, surface waters, stockpiles, storage areas, and every temporary or permanent BMP. That same guidance flags the usual misses: a copied template, omitted off-site borrow or fill, maps that never change with the phase, and concrete washout treated as ordinary trash. It also calls for a leak-proof, lined washout basin, current maps on site, and maintenance of sediment traps or ponds before they quit working. One federal construction guide identifies 50% sediment capacity as that maintenance threshold.
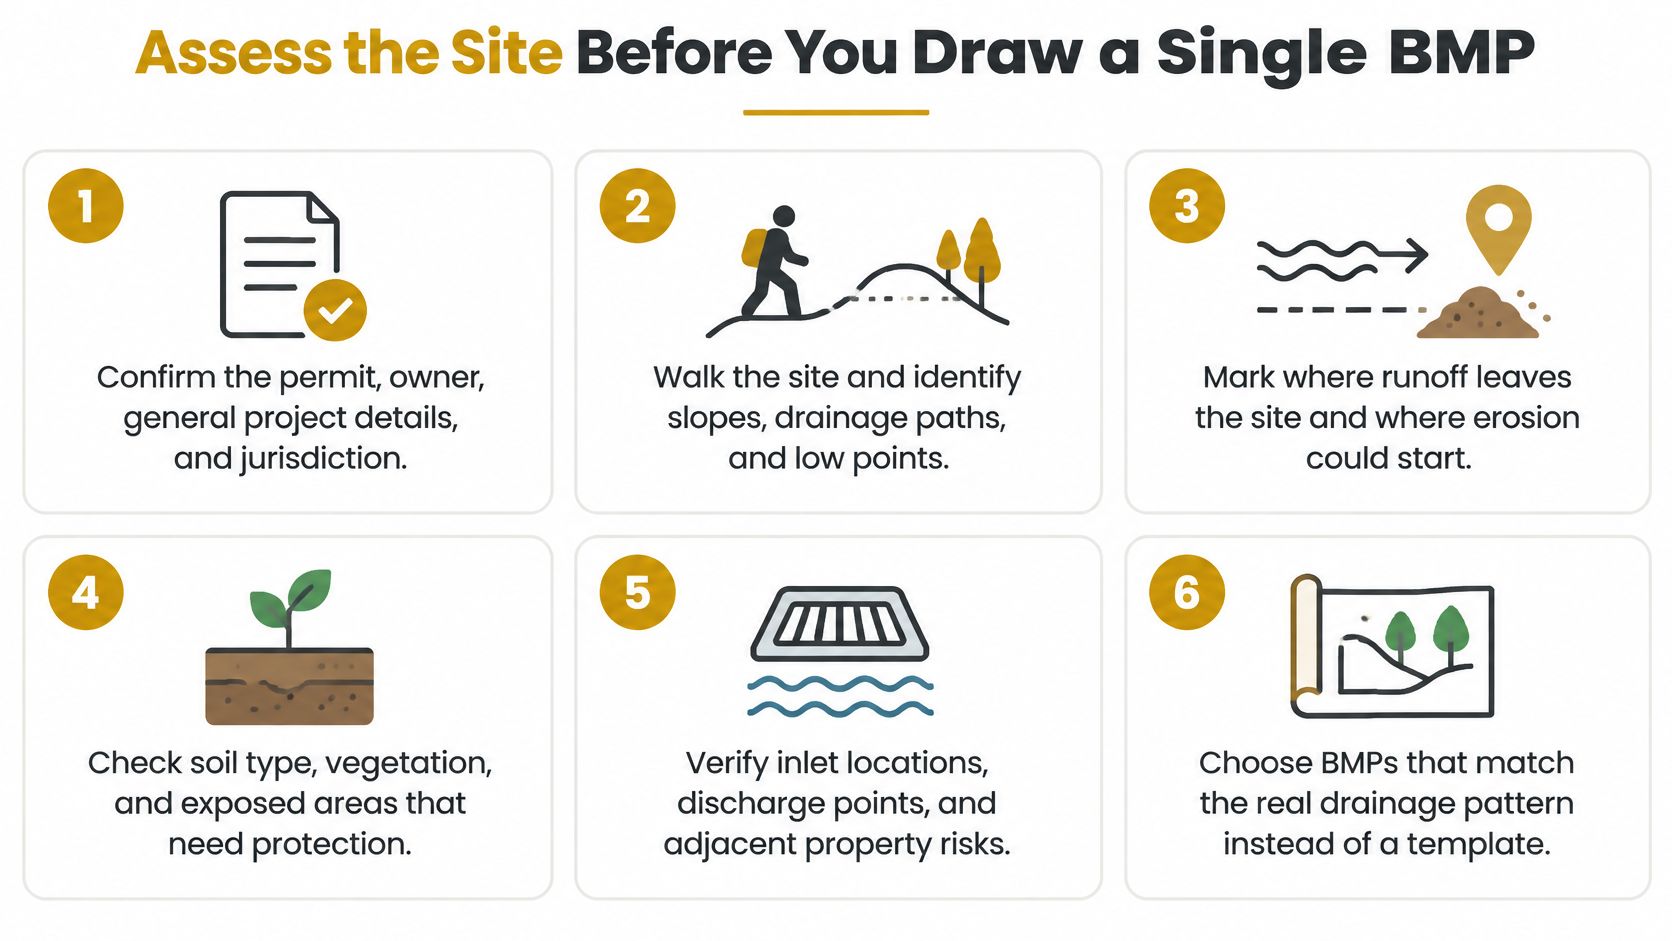
Six steps before any symbol goes on the sheet
- Confirm who owns the permit. Write down the NPDES or local authorization, the owner, the general contractor, the plan preparer, and the inspector, with phone numbers a new foreman can use on day one.
- Name the receiving water. Check whether it is listed as impaired or covered by a TMDL. A sediment or metals listing changes the discharge limit, not just the narrative.
- Set project limits. Include off-site borrow, fill, staging, and haul routes. If a truck leaves the property with mud, that route is part of the site.
- Draw a scaled, dated map. Show drainage divides, slopes, flow arrows, discharge points, surface waters, stockpiles, material storage, and the washout location. Hand sketches without a scale don't survive an inspection.
- Phase the grading. Open only a small area at one time, and stabilize soil that will sit idle. Downstream basins can't replace that sequence.
- List every pollutant source. Exposed soil, concrete washout, fuels, chemicals, waste, and vehicle track-out each need a control, a person, an inspection frequency, and a maintenance trigger.
Say a 3-acre site sits upslope of a creek already listed for sediment. The first basin looked fine on a template. The map showed a second flow path slipping around it and into the creek. A second basin, placed on that path before grading, was the fix. The scaled, dated map is the deliverable. Update it at every phase, or the plan describes a site that no longer exists.
Choose and Place BMPs for Each Pollutant Source
Match the practice to the pollutant, then to the point in the drainage where that pollutant moves. Source control comes first, then conveyance, then sediment capture, then the post-construction practice you intend to keep. Installing a basin and calling the job done is the mistake inspectors keep writing up.
BMP selection, placement and maintenance triggers
| BMP | Pollutant controlled | Placement and timing | Maintenance trigger |
|---|---|---|---|
| Stabilized construction entrance | Sediment tracked onto roads | Before any clearing, at every vehicle exit | Top-dress when voids fill or mud reaches the road |
| Perimeter silt fence or fiber roll | Sheet-flow sediment | Downslope edge, installed before grading | Repair after rain where water undercuts or overtops it |
| Inlet protection | Sediment entering storm drains | Every inlet downslope of disturbance | Clean when sediment reaches about half the device capacity |
| Sediment basin or trap | Concentrated runoff sediment | Built before grading, sized to the drainage area | Remove sediment when storage drops to 50% of capacity |
| Concrete washout basin | Alkaline slurry and wash water | Before the first pour, away from drains and low spots | Inspect after each pour and rain; remove hardened residue |
| Stockpile cover and perimeter control | Wind and rain erosion | Within the active phase, before piling | Reseed or cover stockpiles left idle beyond the plan's limit |
| Infiltration or bioretention protection | Compaction and clogging of the BMP itself | Fenced off before grading, no construction traffic | Keep closed until the contributing area is stabilized |
Size to the drainage area, not to the catalog cut
Delineate each drainage area and estimate pre-construction and post-construction runoff coefficients. Check those values against local rainfall data and the design standard, then size diversion swales, check structures, and basins to the flow you calculated. A fence laid on the property line without a drainage split will belly, undercut, or overtop the first time sheet flow concentrates.
Published ranges are wide, and they are not promises. The EPA sample SWPPP template materials cite FHWA figures in which an existing detention pond removed approximately 20–40% of incoming total phosphorus, extended detention reached phosphorus removal of up to 80%, and annual catch-basin cleaning with twice-weekly sweeping was estimated at 35–60% effectiveness. Hydrology, residence time, bypassing, vegetation, and maintenance decide which end of that range you get.
Fence off infiltration and bioretention areas before grading. EPA recommends keeping those areas off-limits during construction because compaction and sediment clogging can wipe out the hydraulic performance you designed. Give every BMP one dated maintenance trigger on the plan, and carry each failed check into a deficiency list with a deadline and a name. Installation is not performance.
Contain Concrete Washout Before the First Truck Arrives
Concrete washout is highly alkaline slurry, not ordinary waste, and a single uncontrolled rinse can undo an erosion program that otherwise looks tight.
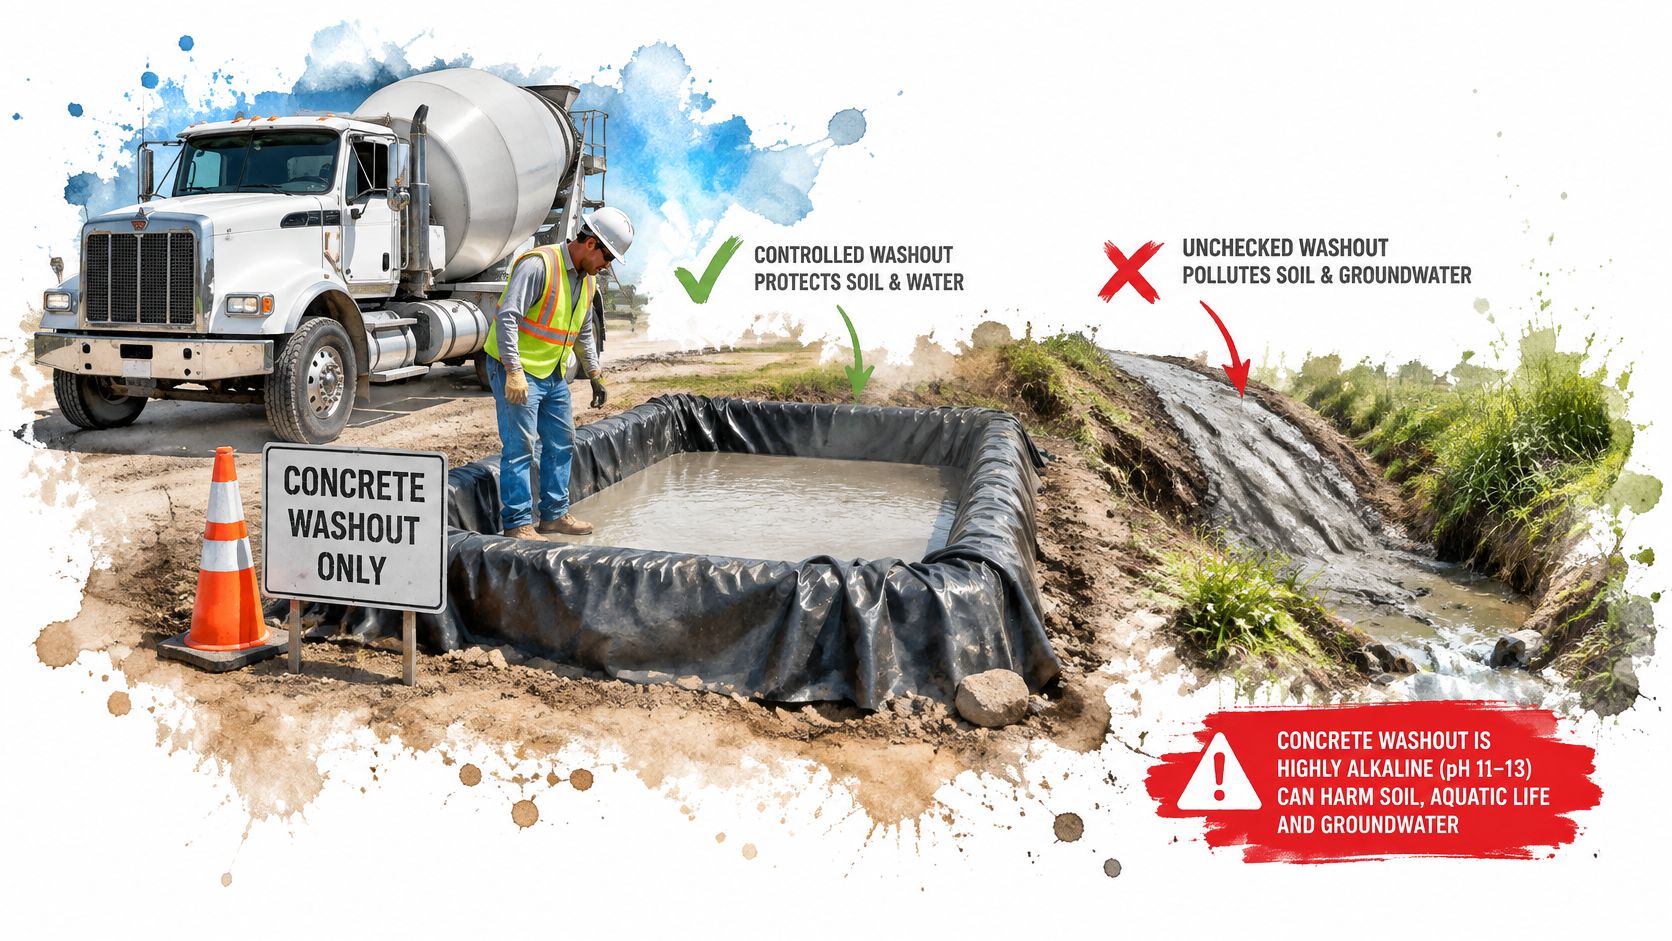
Eight steps that keep slurry in the basin
- Pick the spot before the pump is spotted. Keep it away from storm inlets, ditches, creeks, and low spots, and still close enough that the mixer and the pump can reach it without backing across fresh grade.
- Set a leak-proof, lined basin. A hole in the dirt without a liner is a direct path into soil and groundwater. The liner is the control, not the excavation.
- Size it for the worst pour of the week. Add the wash water from chute cleaning and from the pump truck, not just the mixer drums. A basin that fits the first truck and not the pump will overflow on the big day.
- Sign it and fence it. Tell every driver, in the pre-pour briefing, exactly where washout is allowed. A sign facing the wrong way is the same as no sign.
- Aim chutes, drums, and pump lines only into the basin. Rinsing "just off the edge" is how slurry reaches a ditch. Crews handling wet slurry should wear nitrile gloves so alkaline water doesn't burn skin.
- Inspect after every pour and after rain. Check the liner, freeboard, overflow path, and signs. A torn liner found on Monday means Sunday's rinse already left the site.
- Let residue harden, then haul it under local rules. Don't dump hardened chunks into the sediment basin or the trash dumpster unless the disposal approval says so.
- Log the pour, the inspection, and the haul. The log is what shows the basin was used, not just drawn.
Say a pump truck rinsed into a shallow ditch because the basin was still on the truck. An afternoon storm filled that ditch and sent slurry toward the inlet. The crew moved the washout location and lined it before the next pour, and the deficiency stayed open until the haul ticket was in the folder.
Place the basin before the pump is set up, not after the first pour.
Write, Sign and Keep the Plan Current
Write the stormwater management plan so a superintendent who starts on day one can run the site without a phone call to the person who drafted it.
What belongs in the binder
- Site description. Project limits, total disturbed area, and the receiving waters, including any impairment or TMDL note.
- Scaled map and its date. The date matters as much as the lines. An undated map can't be matched to a phase.
- BMP list. Location, construction phase, and the maintenance trigger for each practice.
- Named owner for each control. A company name is not a person. Put a name and a backup.
- Inspection schedule and the rain threshold in the permit. The crew calendar should match the permit, not a generic weekly note.
- Washout procedure and the disposal route. Where slurry goes after it hardens, and who hauls it.
- Deficiency and corrective-action steps. Deadline, responsible person, and what "closed" looks like.
- Rainfall dataset and design storm used to size each basin, swale, and freeboard.
The responsible party signs and dates the plan. Certify it when the permit requires certification. Don't leave the signature block blank "until the owner is on site."
Keep one controlling copy in the job trailer and one in the office, with a revision log on the first page. Amend the plan and the map when a phase changes, when a control is added or removed, when a new subcontractor takes a work area, or when inspections show a practice is undersized. Each amendment gets a date and a reason, so the file shows what was true on each day. A plan that still describes mobilization conditions will not pass inspection on a multi-phase job.
Run Inspections and Keep Records You Can Defend
A plan that nobody can prove was followed is treated as a plan that wasn't followed. EPA's long-term stormwater planning guide for communities flags stormwater asset-data gaps as a planning problem and pushes proactive, data-driven upkeep instead of fixing whatever failed last.
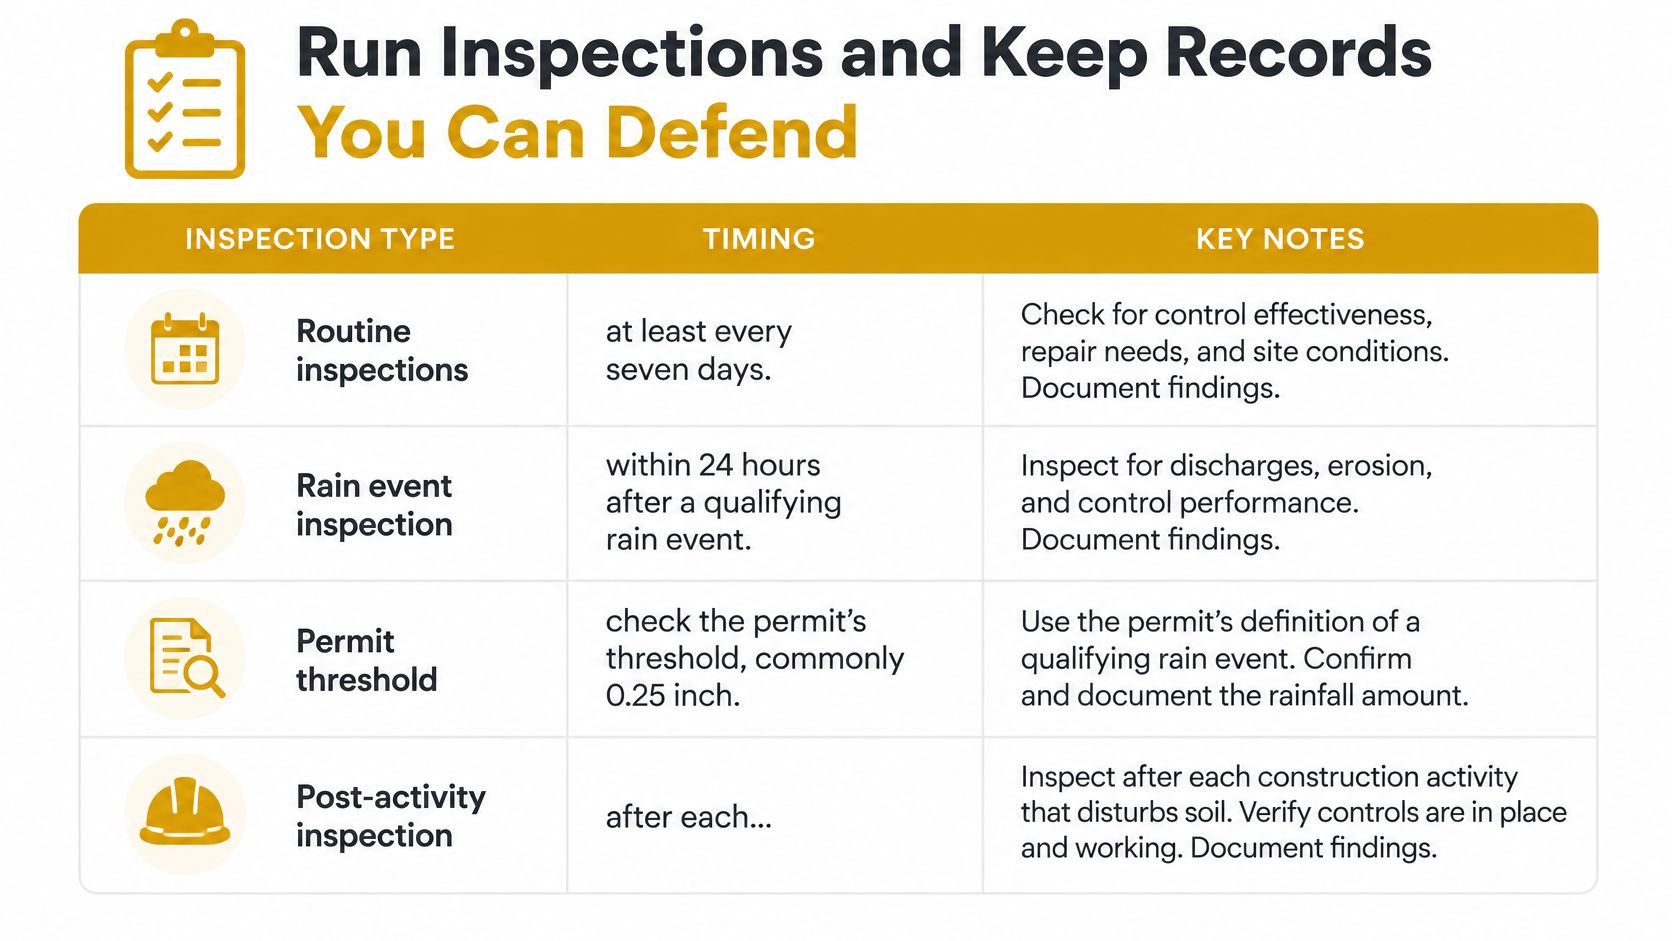
Inspection triggers and required checks
| Trigger | Timing | What to check |
|---|---|---|
| Routine | At least every 7 days | BMP condition, sediment buildup, stabilization, inlet status, entrance condition |
| Qualifying rain | Within 24 hours after the rain event the permit defines as qualifying | Perimeter controls, inlets, outlets, sediment levels |
| Concrete pour | After each pour | Washout basin level, liner, freeboard, signage |
| Phase change | At each phase change | Map updated and BMP locations matched to the new phase |
| Inactive area | Before an area is left inactive | Stabilization and cover in place |
Evidence that survives a crew change
An undocumented control is treated as an uncontrolled one. Build the file so the next person inherits it.
- Responsibility matrix. One named person per BMP, plus a backup, updated when the subcontractor changes.
- Geotagged inspection photos. Same viewpoint each time, so a torn liner or a buried inlet is obvious next to last week's shot.
- Weather-linked logs. Tie each inspection to the rain that triggered it, not to a stack of undated forms.
- Delivery and removal records for temporary controls, including washout pans, so you can show when containment arrived and when residue left.
- Deficiency list with deadlines and an escalation rule if the deadline slips.
- Closeout package at demobilization: final map, last inspections, haul tickets, and stabilization photos.
Say a replacement superintendent found no inspection log for two weeks of rain. The inspector treated the gap as a violation even where the silt fence was still standing. Record every handover in the log so open deficiencies and named owners move with the job, not with the person who quit.
Plan for Heavy Rain and Fix Failed Controls
Meeting the code minimum and staying effective in a harder storm are different jobs. In 2025, sector experts identified climate resilience and the lack of a standard method for accounting for increased rainfall as major planning challenges, and they anticipated that NOAA Atlas 15 would improve future-rainfall sizing, according to Stormwater magazine's association outlook. Undersizing brings flooding, permit violations, sediment releases, and rework. Oversizing eats land and money. The plan should say which risk you accepted.
Write down the rainfall dataset, the design storm, and any future-climate sensitivity you tested. Add freeboard above the basin design level. Route overflows to a controlled outlet, never into the street or a neighbor's lot. Keep spare capacity on call: an extra washout basin, sandbags, and a haul arrangement. On a small renovation, phased upgrades and a slightly conservative basin beat a full redesign you can't fit on the lot.
Symptoms, likely causes and fixes
| Symptom | Likely cause | Fix |
|---|---|---|
| Silt fence bulging or flattened after a storm | Undersized fence or drainage area too large | Add a second row, shorten the run, or split the drainage area |
| Turbid water leaving the site | Bypass around the control or undercut fence | Repair the gap, add check dams, re-test the outlet after the next rain |
| Washout basin overflowing | Rain filled the freeboard or pour volume exceeded capacity | Pump or haul out residue, add a cover, enlarge the basin before the next pour |
| Washout liner torn or leaking | Traffic, rebar or hardened residue damage | Patch or replace before the next pour and record the repair date |
| Sediment basin half full | Cleaning missed at the trigger | Remove sediment now, log the date, and set a closer inspection interval |
Before the next cell moves in
- Run a rain-day checklist the afternoon a storm is forecast, not the morning after.
- Cover the washout basin so rainfall doesn't consume the freeboard you saved for slurry.
- Pre-stage pumps and sandbags at the outlet and the low corner, where the last storm went.
Where the outlet drains to a sensitive or already impaired water, I would size conservatively even when the code minimum calculates smaller. Compliance is the floor. The storm you get next month is the test.
Confirm the Plan Is Ready Before Mobilization
Treat mobilization as a go or no-go gate. If any line below is open, don't clear.
- Permit coverage filed and the notice posted where crews and inspectors can read it.
- Plan signed and dated, with the certification block complete if the permit requires it.
- Scaled map current for the first phase, not for the concept sketch.
- Perimeter controls and the stabilized entrance in the ground before clearing.
- Inlet protection on every inlet downslope of disturbance.
- Washout basin located, lined, and signed before the first truck is scheduled.
- Named inspector and a backup, both on the call list.
- Inspection schedule on the team calendar, including the post-rain window in the permit.
- Records folder started, with the revision log and a blank deficiency sheet.
Schedule washout containment before the first pour, and choose basin volume from the largest pour plus pump and chute rinse. Set the basin before the pump is spotted. If you need a rental pan, use a lined pan with a steel lid that keeps stormwater out of the slurry, a pan that takes pump-truck washout directly, and a haul that disposes of hardened residue under local rules. Our 72-inch steel lid seals the pan so stormwater never mixes with slurry. The pans are built for washing out a pump truck or a dug-out ramp, including rear pump washout, and we haul off and dispose of the concrete waste in a fully compliant manner.
A plan that is ready on day one is the one that still holds up on day forty.
Reborn Rentals rents concrete washout pans with jobsite delivery so slurry stays in a lined pan instead of a ditch or an inlet. Crews can reserve a pan, set dates, and arrange haul-off of hardened residue as part of the same stormwater management plan they already have to keep current. Visit Reborn Rentals to check pan sizes and get containment on site before the first truck arrives.